background image

Power Off, Remote (Oracle ILOM CLI)

Power Off, Remote (Oracle ILOM CLI)

You can use the Oracle ILOM SP command-line interface (CLI) to remotely power off the

server to standby power mode.

Before You Begin

See: 

“Power Modes, Shutdowns, and Resets” on page 107

1.

Open an SSH session and at the command line log in to the SP Oracle ILOM CLI.

Log in as a user with root or administrator privileges. For example:

ssh root@

ipadress

where 

ipadress

 is the IP address of the server module SP.

For more information, see 

“Accessing Oracle ILOM” in 

Oracle X4 Series Servers

Administration Guide

.

The Oracle ILOM CLI prompt appears:

->

2.

At the prompt, type one of the following commands:

For 

graceful

 power off:

stop /System

For 

immediate

 power off:

Caution - 

Data loss. All applications and files close abruptly without saving. Warn users and

close all applications before powering off.

stop -force /System

An immediate shutdown should be used in situations when you know that the loss of data

is nonexistent or acceptable (for more information, see 

“Power Modes, Shutdowns, and

Resets” on page 107

).

Next Steps

“Managing the Locator Indicator” on page 109

Oracle Integrated Lights Out Manager 3.2.2 Documentation Library at: 

http://docs.

oracle.com/cd/E37444_01/index.html

104

Sun Server X4-8 Service Manual • December 2015

Summary of Contents for SUN X4-8

Page 1: ...Sun Server X4 8 Service Manual Part No E40317 07 December 2015 ...

Page 2: ......

Page 3: ...mation management applications It is not developed or intended for use in any inherently dangerous applications including applications that may create a risk of personal injury If you use this software or hardware in dangerous applications then you shall be responsible to take all appropriate fail safe backup redundancy and other measures to ensure its safe use Oracle Corporation and its affiliate...

Page 4: ...n des informations Ce logiciel ou matériel n est pas conçu ni n est destiné à être utilisé dans des applications à risque notamment dans des applications pouvant causer un risque de dommages corporels Si vous utilisez ce logiciel ou ce matériel dans le cadre d applications dangereuses il est de votre responsabilité de prendre toutes les mesures de secours de sauvegarde de redondance et autres mesu...

Page 5: ...ront Components 20 Chassis Internal Components 21 Chassis Rear Components 23 CPU Module CMOD Overview 24 Processor and Memory Overview 24 CMOD Configuration Options 24 CMOD Population Rules 27 CMOD Layout 28 CMOD and Fan Module Power 29 System Module SMOD 29 SMOD Overview 30 Storage Drives 31 SMOD Motherboard 31 Service Processor SP 32 Storage Drive Backplanes 32 SAS Host Bus Adapter HBA Card Rise...

Page 6: ...wer Issues 69 Troubleshooting With Diagnostic Tools 70 Diagnostic Tools 71 Diagnostic Tool Documentation 72 Attaching Devices to the Server 73 Attach Devices to the Server 73 Configuring Serial Port Sharing 73 Ethernet Port Device Naming 75 Getting Help 75 Contacting Support 76 Locating the Chassis Serial Number 76 Servicing the Server 79 Component Serviceability Locations and Designations 79 Comp...

Page 7: ...ve Power 106 Power Modes Shutdowns and Resets 107 Managing the Locator Indicator 109 Turn On the Locator Indicator Remotely Oracle ILOM CLI 109 Turn On the Locator Indicator Remotely Oracle ILOM Web Interface 110 Control the Locator Indicator Locally 111 Servicing Components 113 Servicing Fan Modules and Fan Frames 113 Remove a Fan Module 113 Install a Fan Module 116 Remove a Fan Frame 118 Install...

Page 8: ...and DPCC Reference 194 Servicing System Module SMOD Components 195 Remove the SMOD 195 Install the SMOD 197 Servicing the Host Bus Adapter HBA Card 200 Servicing the SAS Cable 209 Servicing the Internal USB Flash Drives 210 Replace the Real Time Clock System Battery 213 Replace the Midplane Assembly 216 Returning the Server to Operation 229 Prepare the Server for Operation 229 Power On the Server ...

Page 9: ...7 Advanced USB Ports 248 Advanced Serial Port Console Redirection 249 Advanced Trusted Computing 253 Advanced Network Stack 255 Advanced Legacy iSCSI 256 Advanced BMC Network Configuration 257 IO Screen 260 Boot Screen 266 Index 269 9 ...

Page 10: ...10 Sun Server X4 8 Service Manual December 2015 ...

Page 11: ...Server X4 8 name identifies the following X identifies an x86 product The first number 4 identifies the generation of the server The second number 8 identifies the number of processors Getting the Latest Firmware and Software Firmware drivers and other hardware related software for each Oracle x86 server server blade and blade chassis are updated periodically You can obtain the latest version in t...

Page 12: ...cfeedback About This Documentation The information in this documentation set is presented in topic based format similar to online help and therefore does not include chapters appendixes or section numbering Contributors Primary Authors Ray Angelo Michael Bechler Cynthia Chin Lee Lisa Kuder Mark McGothigan Ralph Woodley Contributors William Schweickert Anthony Villamor Mick Tabor Richard Masoner Ta...

Page 13: ...rm service for CMOD components updates for Linux Fault Management Architecture FMA and added issues to Product Notes February 2015 Technical corrections and editorial improvements December 2015 Technical updates Using This Documentation 13 ...

Page 14: ...14 Sun Server X4 8 Service Manual December 2015 ...
Page 15: ...edures and information Troubleshooting and Diagnostics on page 53 General Information and procedures for servicing the server Servicing the Server on page 79 Information and procedures for preparing the server for service Preparing for Service on page 95 Procedures and information for removing and installing components Servicing Components on page 113 Procedures and information for returning the s...

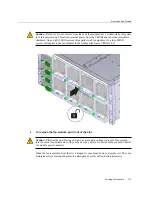
Page 16: ...16 Sun Server X4 8 Service Manual December 2015 ...
Page 17: ...lified to replace and install hardware Warning Label The following warning label is visible from the front of the server when you remove a fan module It warns you to not insert your hands or any object into the space left vacant by the removal of the fan module Fan modules are hot swap components Removing a fan module from a fully powered server exposes open and active power connectors that can ca...

Page 18: ...18 Sun Server X4 8 Service Manual December 2015 ...
Page 19: ...SMOD System Module SMOD on page 29 Server subsystems their functions and related components Server Subsystems on page 34 Schematic type block diagram of the server interconnects Server Block Diagram on page 50 Server Overview The Sun Server X4 8 is a 5 rack unit RU server system with the following features Four and eight socket configurations that use Intel EX Xeon E7 8895 v2 processors and provid...

Page 20: ...s SMOD For more information see Chassis Overview on page 20 Chassis Overview The chassis consists of the front accessible components internal components and components accessible from the back of the server Chassis Front Components on page 20 Chassis Internal Components on page 21 Chassis Rear Components on page 23 Chassis Front Components At the front of the server the chassis includes Four power...

Page 21: ...e accessible from the front of the server after removing the FMs and the fan frames For more information see CPU Module CMOD Overview on page 24 Call Out Description 1 Front indicator module FIM 2 Power supplies 4 3 Fan modules FMs 8 4 Fan frames 2 5 CMOD bays internal 2 Chassis Internal Components Internal components include Server and Components Overview 21 ...

Page 22: ... about the CMODs see CPU Module CMOD Overview on page 24 The mid plane assembly which provides an interconnect between the rear components and the front side components Removal and installation of the mid plane assembly requires cold service Call Out Description 1 CMOD bays 2 2 Midplane busbar 22 Sun Server X4 8 Service Manual December 2015 ...
Page 23: ...ge 29 Dual PCIe card carrier DPCC bay The DPCC bay contains eight DPCCs and up to 16 PCIe cards For more information see Storage and IO Subsystem on page 45 AC power block The AC power block has four AC power inlet connectors The power block is not a removable component For more information see Power Subsystem on page 50 Call Out Description 1 System module SMOD 2 Dual PCIe card carrier DPCC bay 3...

Page 24: ...ocessor The server CMODs contain the system memory The maximum system memory depends on the number of CMODs in the server For a four CMOD system the maximum memory DDR 1333 32 GB DIMMs is 3 TB and for an eight CMOD system the maximum memory DDR 1333 32 GB DIMMs is 6 TB CMOD Configuration Options The server supports two CMOD configurations a four CMOD and eight CMOD configuration In the four CMOD c...

Page 25: ...xposing the empty CMOD bay on the right The four right side fan modules are not powered however in a four CMOD configuration these fan modules must be installed Call out 1 identifies the group of four CMODs installed on the left side of the server Call out 2 identifies the empty CMOD bay on the right side of the server Server and Components Overview 25 ...

Page 26: ...ith an eight full CMOD configuration Call out 1 identifies the group of four CMODs installed on the left side of the server and call out 2 identifies the second group of four CMODs installed on the right side of the server 26 Sun Server X4 8 Service Manual December 2015 ...

Page 27: ...CCs 4 7 are not powered and not active CMOD Population Rules For the four socket server configuration CPU modules CMODs must be installed in slots 0 3 DPCC slots 0 3 are active Both fan frames must be installed All eight fan modules FMs must be installed only FMs 0 3 are active For the eight socket server configuration CPU modules CMODs must be installed in slots 0 7 DPCC slots 0 7 are active Both...

Page 28: ...st circuit which helps you locate failed DIMMs and verify a failed CPU Fault Remind button Circuit Charge Status indicator 24 DIMM slot fault indicators CPU fault indicator The following illustration shows the location of the CMOD components Call Out Description 1 Fault Remind button 2 Circuit Charge Status indicator 28 Sun Server X4 8 Service Manual December 2015 ...
Page 29: ...er to fan modules The following table shows which CMOD slots provide FM power Power Slots Fan Modules Powered CMOD 0 FMs 0 and 1 CMOD 2 FMs 2 and 3 CMOD 4 FMs 4 and 5 CMOD 6 FMs 6 and 7 CMODs in slots 1 3 5 and 7 do not supply FM power System Module SMOD This section contains information about the server system module SMOD and its components SMOD Overview on page 30 Storage Drives on page 31 SMOD ...

Page 30: ...d SMOD motherboard Two internal USB ports System battery The SMOD is accessible and removable from the back of the server The two removal and installation levers are located on the sides of the SMOD and have two green lock release tabs The following illustration shows the location of the SMOD at the back of the server and the two release levers 30 Sun Server X4 8 Service Manual December 2015 ...
Page 31: ...e on the SMOD and arranged in two rows of four each For component serviceability locations and designations see Component Serviceability Locations and Designations on page 79 SMOD Motherboard The SMOD motherboard hosts the service processor SP two disk backplanes for the externally accessible server storage drives and the system battery It also has a PCIe riser for Server and Components Overview 3...

Page 32: ...rives on the SMOD connect to two backplanes mounted on the SMOD motherboard A SAS cable also connects the backplane to the HBA card that is installed in a riser slot on the bottom of the SMOD The backplanes are not removable or replaceable For component serviceability locations and designations see Component Serviceability Locations and Designations on page 79 SAS Host Bus Adapter HBA Card Riser a...

Page 33: ...ions on page 79 Internal USB Ports The SMOD also has two internal USB ports on the underside of the SMOD motherboard next to the PCIe card riser slot The ports are designated as P0 and P1 Unless you have opted out port P0 has a factory installed flash drive that contains Oracle System Assistant a boot capable server set up provisioning and update tool Port P0 can Server and Components Overview 33 ...

Page 34: ...acle System Assistant and Oracle ILOM Front Indicator Module FIM Panel on page 34 CMOD Service Action Required Indicators on page 36 Power Supply Unit PSU Indicators on page 37 Fan Module FM Indicators on page 38 Back Indicator Panel on page 40 Switches and Buttons on page 43 Service Processor SP Oracle ILOM on page 44 Oracle System Assistant on page 45 Front Indicator Module FIM Panel The front i...

Page 35: ...it provides the status of the system power For more information about using the Power and SP indicators to determine power state see Troubleshooting Indicators on page 58 Server over temperature indicator amber When lit it indicates that a fault has occurred in the cooling subsystem The system Service Action Required indicator might also be lit For more information about using the subsystem fault ...

Page 36: ...dicators 0 7 CMOD Service Action Required Indicators The fault indicators for the CMODs are located on the front indicator module FIM They are arranged like the CMODs themselves in ascending order from left to right They light if the corresponding CMOD 0 through 7 is in a fault state The following illustration shows the lower section of the FIM and the two groups left and right of CMOD Service Act...

Page 37: ...e A green OK indicator This indicator lights steady on when the PSU is powered on and in a normal functioning state in this state the AC indicator is also lit An AC input indicator This indicator lights steady on when the PSU is connected to a properly rated AC power source The following illustration shows the front of the PSU and the location of the three indicators on the indicator panel it also...

Page 38: ... to right as follows An amber Service Action Required indicator This indicator lights steady on when the FM is in a fault state A green OK indicator This indicator lights steady on when the FM is powered on and in a normal functioning state The following illustration shows the front of the FM and the location of the two indicators on the indicator panel it also shows the location of the release bu...

Page 39: ...age drive is in a normal functioning state The light may blink to show activity An amber Service Action Required indicator This indicator lights steady on when the FM is in a fault state A blue Ready to Remove indicator This indicator is used to show when the storage drive is ready to be removed from the server Preparing to remove a storage drive is initiated from the server OS Note The storage dr...

Page 40: ...state while servicing it from its back side The panel is located on the SMOD and includes some indicators and buttons not found on the front indicator module FIM including reset switches and indicators for components inside the SMOD Of the nine switches indicators and buttons four provide a summary of the state of the system three are switches and two are for components inside the SMOD The followi...

Page 41: ...ou isolate the fault to a particular subsystem For more information about using the Service Action Required and subsystem fault indicators see Troubleshooting Indicators on page 58 5 Power OK indicator Along with the SP indicator below it provides the status of the system power For more information about using the Power and SP indicators to determine power state see Troubleshooting Indicators on p...

Page 42: ...CC Indicators Each DPCC has two indicator panels one for each PCIe slot inside the server Each panels contains a green OK indicator an amber Service Action Required indicator and a recessed pinhole switch Call Out Description 1 Recessed pinhole switch 2 Service Action Required indicator 3 OK indicator 42 Sun Server X4 8 Service Manual December 2015 ...
Page 43: ...re at the server the following switches and buttons are accessible Front panel Power button Allows you to control server power while local to at the server For power off information see Powering Off the Server on page 101 For power on information see Power On the Server on page 230 Two Locator indicator buttons one on the front of the server and one on the back The buttons allow you to manage the ...

Page 44: ...d and allows you to identify a failed DIMM or CPU after the CMOD has been removed for the server For button location information see CMOD Layout on page 28 Sixteen 16 recessed ATTN attention buttons two on each DPCC The buttons are used to initiate DPCC removal and install Before removing a DPCC use a stylus to press both ATTN buttons After installing a DPCC that contains a PCIe card press the but...

Page 45: ...cle support site Update OS drivers and component firmware and configure RAID Install supported operating systems with the latest drivers and supported tools Configure a subset of Oracle ILOM settings Save and restore customized BIOS settings or revert the BIOS to the factory defaults Access embedded product documentation Display system overview and detailed hardware inventory information For more ...

Page 46: ... SP port 1 RJ45 RS 232 serial console port 4 AC power inlets Call Out Description 1 Video DB 15 2 USB 2 0 port 3 USB 2 0 port 4 1 RJ45 10 100 1000 Ethernet service processor SP port 5 1 RJ45 RS 232 serial console port 6 RJ45 Host GigabitEthernet port 7 RJ45 Host GigabitEthernet port 46 Sun Server X4 8 Service Manual December 2015 ...
Page 47: ...ed below the SMOD For component serviceability locations and designations see Component Serviceability Locations and Designations on page 79 Chassis Cooling Subsystem System cooling airflow is from front to back with primary cooling being provided by eight redundant front side accessible 100 watt hot swappable cooling fan modules To maintain the integrity of the cooling system ensure that Server a...

Page 48: ...odules The fan modules FMs provide the airflow cooling for zones 1 4 Each zone has a pair of dedicated FMs Zone 1 airflow cooling is concentrated on the CPU modules CMODs 0 and 1 and is provided by FMs 0 and 1 Zone 2 airflow cooling is concentrated on CMODs 2 and 3 and is provided by FMs 2 and 3 Zone 3 airflow cooling is concentrated on CMODs 4 and 5 and is provided by FMs 4 and 5 Zone 4 airflow i...

Page 49: ...s zone 0 is provided by the PSUs Power for the fan modules zones 1 4 is supplied by CMODs 0 2 4 and 6 The chassis cooling fans and the power supply cooling fans operate only when the chassis is in full power mode see Full Power Mode on page 108 They do not operate in standby power mode The following table shows the CMODs and the fan modules to which they supply power CMOD Fan Modules Powered CMOD ...

Page 50: ...ual 2 2 redundancy Therefore the minimum PSU configuration is two To ensure redundancy power for the server should come from at least two separate circuits When the AC power cords are connected to AC inputs at the back of the chassis the PSUs supply power to the Ethernet ports the system sensors and inventory circuits and the service processor SP When power is supplied to the SP it boots and the s...

Page 51: ...Server Block Diagram Server and Components Overview 51 ...

Page 52: ...52 Sun Server X4 8 Service Manual December 2015 ...
Page 53: ... to the Server on page 73 Information about contacting Oracle support Getting Help on page 75 Troubleshooting Server Component Hardware Faults This section contains maintenance related information and procedures that you can use to troubleshoot and repair server hardware issues The following topics are covered Description Section Links Troubleshooting overview information and procedure Troubleshoo...

Page 54: ...oting Steps on page 54 Troubleshoot Hardware Faults on page 55 Basic Troubleshooting Steps Use the following process to address a hardware fault for the step by step procedure see Troubleshoot Hardware Faults on page 55 1 Identify the server subsystem containing the fault You can use Oracle ILOM to identify the failed component 2 Review the Product Notes Once you have identified the hardware issue...

Page 55: ... go to Trouble Shooting Hardware Faults Use this procedure to troubleshoot hardware faults with the Oracle ILOM web interface and if necessary prepare the server for service Note This procedure provides one basic approach to troubleshooting hardware faults It uses a combination of the Oracle ILOM web and CLI interfaces However the procedure can be performed using only the Oracle ILOM CLI interface...

Page 56: ...screen identify the server subsystem that requires service In the above example the Status screen shows that the Memory subsystem requires service This indicates that a hardware component within the subsystem is in a fault state 3 To identify the component click on the subsystem name 56 Sun Server X4 8 Service Manual December 2015 ...
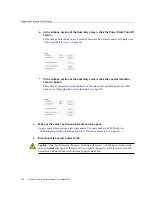
Page 57: ...s a chronological list of all the system events and faults that have occurred since the log was last reset and includes additional information such as severity levels and error counts To access it click the System Log link In this example the hardware fault with DIMM 8 of CPU 0 requires local physical access to the server 5 Before going to the server review the server Product Notes document for in...

Page 58: ...racle Sun Server X4 series servers including information about how to use Oracle System Assistant and using the Oracle ILOM system event log SEL to identify a problem s possible source Oracle X4 Series Servers Administration Guide Troubleshooting Indicators The eight indicators on the server front panel show the state of the server For more information about indicator locations see Front Indicator...

Page 59: ...the server the service processor SP boots While the SP boots its indicator blinks at the slow blink rate for indicator blink rate information see Indicator Blink Rates on page 62 and the Power OK indicator is off steady 2 When the SP has successfully booted the SP indicator is on steady and the Power OK indicator blinks at the single blink rate This indicates that the server is in standby power mo...

Page 60: ...ervice Typically a server readied for service is placed in standby power mode and the Locate indicator is turned on Once at the server press the Locator button to deactivate the flashing indicator For indicator blink rate information see Indicator Blink Rates on page 62 Over Temperature Condition For a server in an over temperature state the server amber over temperature indicator and the amber Se...

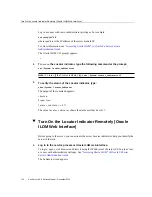
Page 61: ...vice Action Required indicators front and back and an amber CMOD Service Action Required indicator are on steady The activity of front and back green Power OK indicator and the green SP indicator vary depending on whether the server can boot successfully The server might not be able to boot out of standby power mode For indicator blink rate information see Indicator Blink Rates on page 62 Fan Modu...

Page 62: ...ribes the following indicator blink rates Steady On on page 62 Steady Off on page 63 Slow Blink Rate on page 63 Fast Blink Rate on page 64 Single Standby Blink Rate on page 64 Slow Unison Blink Rate on page 65 Insertion Blink on page 65 Unison Steady On on page 66 Alternating Invalid FRU Blink Rate on page 66 Feedback Flash on page 67 Data Blink Rate on page 67 Sequential Diagnostic Blink Rate on ...

Page 63: ...ator or a subsystem not in a fault state unlit amber Service Action Required indicator Slow Blink Rate For the slow blink rate the indicator typically green repeatedly lights for half a second during a one second interval 1 Hz and turns off for half a second The slow blink rate indicates an on going activity For example device rebuilding booting or in transition from one mode to another Troublesho...

Page 64: ...data transfer Single Standby Blink Rate For the single blink rate the indicator repeatedly flashes once at the beginning of a three second interval This indicates a system or component in standby mode For example a server in standby power mode or a hot spare device waiting to be used also used with amber indicators to indicate a predicted fault 64 Sun Server X4 8 Service Manual December 2015 ...
Page 65: ...d to three successive blinks This confirms the successful insertion of a removable device for example a storage drive or blade into a powered system confirming the power connection Insertion Blink The insertion blink is three successive blinks of a hot swap component s primary status indicator for example the green Power OK indicator The insertion blink occurs immediately Troubleshooting and Diagn...

Page 66: ...me that the Locator indicator is on steady Alternating Invalid FRU Blink Rate The alternating invalid FRU blink rate is a repeating sequence of lit green and amber indicators at 1 Hz This indicates that a component has an incorrect version or mismatch for example a power supply with a lower rating than the one specified The blink rate is also used for an unsupported component a component in an uns...

Page 67: ...it and receive activity Data Blink Rate For this blink rate a normally on Indicator repeatedly turns off twice during a one second interval 2 Hz see also Fast Blink Rate on page 64 while data activity is taking place Sequential Diagnostic Blink Rate This blink rate is a repeating sequence in which each indicator successively lights for 0 5 sec to indicate that diagnostics are running This blink ra...

Page 68: ... a temperature fault the cause of the problem might be External Ambient Temperature Too High on page 68 Airflow Blockage on page 69 Hardware Component Failure on page 69 External Ambient Temperature Too High Server component cooling relies on the movement of cool air through the server The cool air is pulled into the server from its external environment If the ambient temperature of the server s e...

Page 69: ...re can rise This rise in temperature can cause other components to enter into an over temperature state Additionally some components such as processors might overheat when they are failing which can also generate an over temperature event To reduce the risk related to component failure power supplies and fan modules are installed in pairs to provide redundancy Redundancy ensures that if one compon...

Page 70: ...U An amber AC OK indicator indicates that the AC power to the PSU is insufficient Prevention Use the AC power cord retaining clips and position the cords to minimize the risk of accidental disconnection Ensure that the AC circuits that supply power to the server are stable and not overburdened Power Supplies PSUs The server power supplies PSUs provide the necessary server voltages from the AC powe...

Page 71: ...rizes the diagnostic tools that you can use when troubleshooting or monitoring your server Diagnostic Tool Type What It Does Availability Remote Capability Oracle ILOM SP firmware Monitors environmental condition and component functionality sensors generates alerts performs fault isolation and provides remote access Available in either standby power mode or full power mode It is not OS dependent D...

Page 72: ...ftware Displays various kinds of system information Requires operating system Local and over network Oracle VTS Diagnostic tool standalone software Exercises and stresses the system running tests in parallel Requires operating system Install Oracle VTS software separately View and control over network Diagnostic Tool Documentation The following table identifies where you can find more information ...

Page 73: ...work connect an Ethernet cable to the Ethernet port labeled NET MGT 3 To access the Oracle ILOM command line interface CLI locally using the management port connect a serial null modem cable to the RJ 45 serial port labeled SER MGT 4 To interact with the system console locally connect a mouse and keyboard to the server front panel USB connectors and a monitor to the server front panel DB 15 video ...

Page 74: ...ce on page 74 Assign Serial Port Output Using the CLI 1 Open an SSH session and at the command line log in to the SP Oracle ILOM CLI Log in as a user with root or administrator privileges For example ssh root ipadress where ipadress is the IP address of the server SP For more information see Oracle X4 Series Servers Administration Guide The Oracle ILOM CLI prompt appears 2 To set the serial port o...

Page 75: ... the server see Back Panel Ports and Connectors on page 45 Note Naming used by the interfaces might vary from that listed below depending on which devices are installed in the system The device naming for the Ethernet interfaces is reported differently by different interfaces and operating systems The following illustration explains the logical operating system and physical BIOS naming conventions...

Page 76: ...d to the system Email address and phone number for you and a secondary contact Street address where the system is located Superuser password Summary of the problem and the work being done when the problem occurred IP address Server name system host name Network or internet domain name Proxy server configuration See Also Locating the Chassis Serial Number on page 76 Locating the Chassis Serial Numb...

Page 77: ...ocate the yellow Customer Information Sheet CIS attached to your server packaging This sheet includes the serial number From Oracle System Assistant see the Summary screen From Oracle ILOM enter the show SYS command or go to the System Information tab in the Oracle ILOM browser interface Troubleshooting and Diagnostics 77 ...

Page 78: ...78 Sun Server X4 8 Service Manual December 2015 ...
Page 79: ...d Non Powered Components on page 92 Procedure for clearing hardware faults in the system Clear Hardware Fault Messages on page 92 Component Serviceability Locations and Designations This section contains information about how to service components component locations and the names designations for components Component Serviceability Requirements on page 79 Component Locations on page 81 Component ...

Page 80: ... Oracle Service person This qualification is not required for servicing a CRU component Component Service Designation Serviceability Front indicator module FIM CRU Cold Power supply unit PSU CRU Hot Fan modules FM CRU Hot Fan frame CRU Cold CPU module CMOD CRU Oracle ILOM 3 2 4 18 or newer Warm Older versions of Oracle ILOM Cold Memory DIMMs CRU Oracle ILOM 3 2 4 18 or newer Warm Older versions of...

Page 81: ... server s components Call Out Description Call Out Description 1 AC power block 8 Midplane 2 Dual PCIe carrier card DPCC with PCIe card 9 Server chassis 3 Host bus adapter HBA card 10 CPU module CMOD 4 HBA battery 11 Fan frame 2 5 Storage drive 12 Fan module 8 6 System module SMOD 13 Power supply PSU Servicing the Server 81 ...

Page 82: ...on page 84 CMOD Slot Designations on page 84 Memory Slot Designations on page 85 Storage Drive Slot Designations on page 86 DPCC and PCIe Card Slot Designations on page 87 AC Input Power Block on page 89 Fan Module Designations The eight fan modules FMs are directly accessible at the front of the server and are arranged in two stacked rows of four FMs The bottom row of four fan modules are designa...

Page 83: ...me contains FM 0 FM1 FM2 and FM 3 The right side frame contains FM 4 FM 5 FM 6 and FM 7 Additionally the FMs and frames have a relationship to the CPU modules CMODs which are installed directly behind the FMs and for which the FMs provide cooling The left side frame contains the FMs 0 3 that provide cooling for CMODs 0 3 and the right side frame contains the FMs 4 7 that provide cooling for CMODs ...

Page 84: ...g illustration shows the arrangement of the PSUs Call Out Description 0 PSU 0 1 PSU 1 2 PSU 2 3 PSU 3 CMOD Slot Designations The server is available in two CPU module CMOD configurations four CMODs or eight CMODs for more information see CPU Module CMOD Overview on page 24 The slots for the CMODs are accessible from the front of the server by removing the FM frames The slots are arranged in a sing...

Page 85: ...CMOD 5 6 CMOD 6 7 CMOD 7 Memory Slot Designations Memory is installed on the CPU modules CMODs Each CMOD contains 24 DIMM slots The slots are arranged in four groups of six slots The following illustration shows the arrangement of the four groups on the CMOD and shows the designation of each slot Servicing the Server 85 ...

Page 86: ... eight storage drive slots are in the system module SMOD and directly accessible at the back of the server Slots are arranged in two stacked rows of four slots and designated from right to left The four slots in the bottom row are designated as slots 0 2 4 and 6 The four slots in the top row are designated as 1 3 5 and 7 86 Sun Server X4 8 Service Manual December 2015 ...
Page 87: ...d carrier DPCC slots are directly accessible at the back of the server and are arranged in a single row The slots are designated from right to left as DPCC 0 DPCC 7 Additionally the 16 PCIe cards slots are also designated from right to left as PCIe 1 PCIe 16 Each DPCC contains two PCIe card slots as shown below DPCC 0 contains PCIe slots 1 and 2 DPCC 1 contains PCIe slots 3 and 4 Servicing the Ser...

Page 88: ...esignations of the PCIe slots Call Out Description Call Out Description 1 PCIe Slot 1 in DPCC 0 9 PCIe PCIe Slot 9 in DPCC 4 2 PCIe Slot 2 in DPCC 0 10 PCIe Slot 10 in DPCC 4 3 PCIe Slot 3 in DPCC 1 11 PCIe Slot 11 in DPCC 5 4 PCIe Slot 4 in DPCC 1 12 PCIe Slot 12 in DPCC 5 5 PCIe Slot 5 in DPCC 2 13 PCIe Slot 13 in DPCC 6 6 PCIe Slot 6 in DPCC 2 14 PCIe Slot 14 in DPCC 6 7 PCIe Slot 7 in DPCC 3 1...

Page 89: ...sponding to the PSUs on the front side as bottommost AC 0 AC 1 AC 2 and AC 3 The AC power block is not a removable component The following illustration shows the location and designation of the inlets on the AC power block Call Out Description 0 AC 0 1 AC 1 2 AC 2 3 AC 3 Component Network Access Control NAC Names Name Description SYS System SYS UUID Unique system ID SYS PS 0 3 Power supplies stati...

Page 90: ...al PCIe card carriers DPCCs SYS DPCC 0 7 PCIE 1 16 PCIe cards SYS FIM Front indicator module Performing Electrostatic Discharge and Static Prevention Measures Electrostatic discharge ESD sensitive devices such as the PCIe cards hard drives CPUs and memory cards require special handling Using an Anti static Wrist Strap Wear an anti static wrist strap when handling components such as disk drive asse...

Page 91: ...oards DIMMs and CPUs You can use the following items as anti static mats Anti static bag used to wrap a replacement part ESD mat orderable from Oracle A disposable ESD mat shipped with some optional system components Tools and Equipment Most server component removal and installation procedures can be performed without tools However to service the system you need the following ESD mat and grounding...

Page 92: ... installed in a fully powered on server Clear Hardware Fault Messages After servicing the following components you must clear the fault event in Oracle ILOM PCIe card HBA Front Indicator Module FIM Processor CPU Use the Oracle ILOM CLI to access the Fault Management shell fmadm For details see http docs oracle com cd E37444_01 index html Before You Begin This procedure uses the Oracle ILOM CLI int...

Page 93: ...ired FRU repaired faults on a FRU repair FRU repair faults on a FRU rotate errlog rotate error log rotate fltlog rotate fault log 4 Use fmadm faulty and the following options to display active faulty components a Show active faulty components f Show active faulty FRUs r Show active fault FRUs and their fault management states s Show a one line fault summary for each fault event u uuid Show fault d...

Page 94: ...Clear Hardware Fault Messages 6 Close the Oracle ILOM session 94 Sun Server X4 8 Service Manual December 2015 ...
Page 95: ...repare the Server for Hot Service Note The steps in this remote procedure use the Oracle ILOM web interface However the procedure can also be performed remotely using the Oracle ILOM CLI interface for more information refer to the Oracle ILOM documentation A hot service component can be serviced while the server is operating at full power mode For more information about component serviceability se...

Page 96: ...g Fan Modules and Fan Frames on page 113 Servicing Power Supply Units PSUs on page 122 Servicing Storage Drives on page 176 Servicing PCIe Cards and the Dual PCIe Card Carriers DPCCs on page 183 Prepare the Server for Warm Service This procedure describes how to prepare the server for warm service so you can remove and replace CMODs DIMMs and processors and heatsinks without disconnecting the powe...

Page 97: ...t CMOD system this applies to all fan modules On a four CMOD system this applies to the fan modules in the left hand fan frame CMODs 0 3 Before You Begin Important Review the Sun Server X4 8 Product Notes for hardware related information before performing removal and installation procedures 1 To power down the host and activate the front panel Locator indicator do the following Note Warm service c...

Page 98: ...Set up an ESD safe space where you can place components See Performing Electrostatic Discharge and Static Prevention Measures on page 90 3 Once at the service location press the Locator indicator button to deactivate the indicator For more information see Control the Locator Indicator Locally on page 111 4 Begin the CMOD removal procedures For details see Servicing the CPU Module CMOD Components o...

Page 99: ...e for more information refer to the Oracle ILOM documentation A cold service component must be serviced when the server is completely powered off For more information about component serviceability see Component Serviceability Requirements on page 79 This procedure describes how to prepare the server for service so you can Remove replace or install cold serviceable components Use the motherboard p...

Page 100: ...anel For other options see Managing the Locator Indicator on page 109 2 When at the server set up an ESD safe service space Set up a space where you can place components The space needs to be ESD safe See Performing Electrostatic Discharge and Static Prevention Measures on page 90 3 Disconnect the server power cords Caution Data loss Removing the power cords when the server is in full power mode r...

Page 101: ...Button on page 103 Power Off Remote Oracle ILOM CLI on page 104 Power Off Remote Oracle ILOM Web Interface on page 105 Remove Power on page 106 Power Modes Shutdowns and Resets on page 107 Power Off the Server Using the Server OS If the server operating system OS is running you can use its shutdown procedure to power off the server to standby power mode The procedure provides a graceful shutdown o...

Page 102: ...the server press and immediately release the front panel Power button Caution Potential for loss of data Do not press in and hold the power button for longer than five seconds Doing so initiates an immediate server shutdown Press and release the button immediately 2 Verify that the server is in standby power mode When the server is in standby power mode the SP indicator is on steady and the Power ...

Page 103: ...wering off Use this procedure when you are at the server to immediately power off the server to standby power mode Before You Begin Physical access to the server front panel is required 1 Press and hold the Power button for at least five seconds until full power turns off and the server enters standby power mode 2 Verify that the server is in standby power mode When the server is in standby power ...

Page 104: ...ies Servers Administration Guide The Oracle ILOM CLI prompt appears 2 At the prompt type one of the following commands For graceful power off stop System For immediate power off Caution Data loss All applications and files close abruptly without saving Warn users and close all applications before powering off stop force System An immediate shutdown should be used in situations when you know that t...

Page 105: ...appears 2 In the Actions section of the Summary screen verify that the Power State is ON If the Power State status shows off the server is already powered off 3 To perform a graceful power off of the server click the Turn Off button The power as indicated in the Actions section changes from on to off In this state the server is in standby power mode Alternatively other power off options are availa...

Page 106: ...ce the server in a non powered state you must disconnect the AC power cables from the back of the server Use this procedure to completely remove power from the server Before You Begin See Power Modes Shutdowns and Resets on page 107 1 Place the server in standby power mode Use one of the power off methods See Powering Off the Server on page 101 2 Access the back of the server 3 To remove power fro...

Page 107: ...ecting the AC power cables to the power supplies For information about cold resets see Cold Reset on page 109 See Also Performing Electrostatic Discharge and Static Prevention Measures on page 90 Power Modes Shutdowns and Resets This section contains information about power modes server shutdowns and server resets Preparing for Service 107 ...

Page 108: ...blinks quickly while the SP is booting Once the SP has booted the indicator is on steady and the Power OK indicator flashes Graceful Shutdown A graceful shutdown also referred to as an orderly shutdown is the safest method of shutting down the server to standby power mode because it warns users closes files and prepares the file system To perform a graceful shutdown use the server OS Oracle ILOM o...

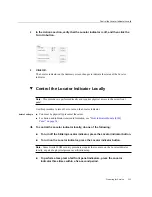
Page 109: ...ete power removal see above wait 30 60 seconds and then connect the server to its power source See Also Powering Off the Server on page 101 Managing the Locator Indicator This section provides procedures for turning the Locator indicator on and off remotely using Oracle ILOM and locally using the server Locator buttons The Locator indicator helps you identify the server in a rack Turn On the Locat...

Page 110: ...he status of the Locator indicator type show System locator_indicator The output of the command appears System Properties locator_indicator Off The value locator_indicator shows the status as either On or Off Turn On the Locator Indicator Remotely Oracle ILOM Web Interface Before going to the server you can activate the server Locator indicator to help you identify the server in the rack 1 Log in ...

Page 111: ...re You Begin You must be physically present at the server For button and indicator location information see Front Indicator Module FIM Panel on page 34 To control the Locator indicator locally do one of the following To turn off the blinking Locator indicator press the Locator indicator button To turn on the Locator indicator press the Locator indicator button Note Some Oracle ILOM security proced...

Page 112: ...Control the Locator Indicator Locally All of the front panel indicators light up and remain lit for 15 20 seconds 112 Sun Server X4 8 Service Manual December 2015 ...
Page 113: ...install PCIe cards and dual PCIe card carriers DPCCs Servicing PCIe Cards and the Dual PCIe Card Carriers DPCCs on page 183 Removing and installing SMOD components Servicing System Module SMOD Components on page 195 Replacing the midplane assembly Replace the Midplane Assembly on page 216 Servicing Fan Modules and Fan Frames This section includes information and procedures for servicing fan module...

Page 114: ... Prepare the Server for Hot Service on page 95 Alternatively to prepare the server for warm or cold service see Prepare the Server for Cold Service on page 99 or Prepare the Server for Warm Service on page 96 2 Identify the fan module by its position and designation or if it is in a failed state by its steady on Service Action Required indicator A fan in a failed state has a lit amber color Servic...

Page 115: ...odules in the left hand fan frame CMODs 0 3 4 To remove the fan module pull it out of the slot Caution Electrical hazard During a hot service procedure voltage is present Do not reach into the vacant fan module slot with your hand or any object Do not touch the exposed CMOD fan module power connector When the fan is removed from the slot a hinged air vane drops down to close the slot The vane main...

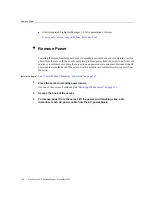
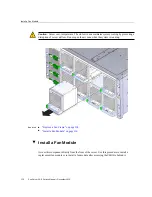
Page 116: ...e air vane when the system is running See Also Remove a Fan Frame on page 118 Install a Fan Module on page 116 Install a Fan Module Access this component directly from the front of the server Use this procedure to install a replacement fan module or to install a fan module after accessing the CMODs behind it 116 Sun Server X4 8 Service Manual December 2015 ...
Page 117: ...elease button to the left and that the air vane for the slot swings freely Caution Component damage Do not apply excessive force when sliding the fan module into the server Ensure that the connector on the CMOD and the connector on the fan module are aligned correctly 2 To install the fan module slide it into the slot until it stops and gently push it inward until the fan module locks into place T...

Page 118: ...d to remove the fan frame to access the CMODs behind it Before You Begin For component serviceability locations and designations see Component Serviceability Locations and Designations on page 79 1 Prepare the server for cold or warm service See Prepare the Server for Cold Service on page 99 or Prepare the Server for Warm Service on page 96 2 Remove the fans associated with the fan frame 118 Sun S...

Page 119: ...Remove a Fan Frame Note The center of the fan frame is marked with green labels The labels indicate where to hold the frame when you want to install or remove it Servicing Components 119 ...

Page 120: ... installing a fan frame handle it by the green tabs at the center of the frame The two fan frames and all eight fan modules must be installed to operate both a four CMOD and a eight CMOD configured server Before You Begin For component serviceability locations and designations see Component Serviceability Locations and Designations on page 79 120 Sun Server X4 8 Service Manual December 2015 ...
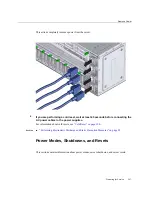
Page 121: ...ver with the air vane hinges at the top Note The center of the fan frame is marked with green labels The labels indicate where to grab the frame when you want to install or remove it 2 Slide the fan fame into the server until it stops and is flush with the front of the server Next Steps Install a Fan Module on page 116 Servicing Components 121 ...

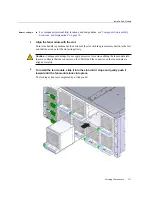
Page 122: ...efore You Begin For component serviceability locations and designations see Component Serviceability Locations and Designations on page 79 1 Prepare the server for hot service See Prepare the Server for Hot Service on page 95 Alternatively to prepare the server for cold service see Prepare the Server for Cold Service on page 99 2 Identify the power supply by its position and designation or if it h...

Page 123: ...a PSU Note To access the FIM release latch you need to remove the topmost PSU 3 To unlock the power supply lever squeeze together the two green release latches at the end of the lever Servicing Components 123 ...

Page 124: ...oint When operating the lever keep your fingers clear of the hinged end of the lever The pawl at the hinged end of the lever engages the sidewall of the server and provides the pivot point for the leverage necessary to disengage the power supply This action leaves the power supply extending partially from its slot 124 Sun Server X4 8 Service Manual December 2015 ...
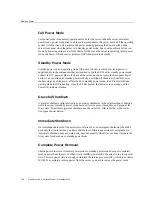
Page 125: ...he Server to Operation on page 229 Install a PSU Access this component directly from the front of the server Use this procedure when replacing a failed PSU or after having serviced the FIM Before You Begin For component serviceability locations and designations see Component Serviceability Locations and Designations on page 79 Servicing Components 125 ...

Page 126: ...that the power supply lever is in its fully open position a To open the power supply lever squeeze together the two green release latches at the end of the lever and rotate the lever to the left 4 Align the power supply with its slot Ensure that the connector end of the PSU is at the opening of the slot and that the open hinge on the front of the PSU is at the bottom and to the left 5 Slide the po...

Page 127: ...cessary to draw the power supply into the slot and engage the internal connector Caution Pinch point Keep your fingers clear of the back side of the lever 7 Verify that the green Power OK indicator on the power supply indicator panel turns on steady and that the amber Service Action Required indicator is not lit Servicing Components 127 ...

Page 128: ... fault state See Also Returning the Server to Operation on page 229 Servicing the Front Indicator Module FIM This section includes information and procedures for servicing the server front indicator module FIM Remove the FIM on page 129 Install the FIM on page 130 128 Sun Server X4 8 Service Manual December 2015 ...
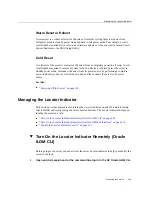
Page 129: ...ignations see Component Serviceability Locations and Designations on page 79 1 Prepare the server for cold service See Prepare the Server for Cold Service on page 99 2 Remove the topmost power supply PSU 3 See Remove a PSU on page 122 3 To unlock the FIM reach into the vacant power supply slot locate the release latch on the underside of the FIM and push the latch upward Servicing Components 129 ...

Page 130: ...on page 130 Install the FIM Access this component directly from the front of the server Before You Begin For component serviceability locations and designations see Component Serviceability Locations and Designations on page 79 1 Position the connector end of the FIM at the opening of the slot 130 Sun Server X4 8 Service Manual December 2015 ...
Page 131: ...FIM Ensure that the open side internal ribbon cable visible of the FIM is facing upward 2 To install the FIM slide it into the slot until it locks and is flush with the front of the server Servicing Components 131 ...

Page 132: ... the server is in full power mode 5 Clear any related component faults For more information see Clear Hardware Fault Messages on page 92 Servicing the CPU Module CMOD Components This section includes information and procedures for servicing CMODs and CMOD components Remove a CMOD on page 133 Remove and Install the CMOD Cover on page 136 Install a CMOD on page 139 Replace a Failed DIMM on page 142 ...

Page 133: ...1 and with Oracle ILOM 3 2 4 18 or newer use cold service or warm service For warm service see Prepare the Server for Warm Service on page 96 2 Identify which group of fan modules left or right to remove to access the CMOD In an eight CMOD configured server CMODs belong to either a left or a right group CMODs 0 3 are in the leftmost group and CMOD s 4 7 are in the rightmost group If you know the g...

Page 134: ...7 To disconnect the CMOD from the connector on the midplane rotate the CMOD lever downward and away from the CMOD Caution Pinch point Keep your fingers clear of the underside of the lever The lever disconnects the CMOD from the midplane and its DPCC 134 Sun Server X4 8 Service Manual December 2015 ...
Page 135: ...Remove a CMOD 8 Use the lever to slide the CMOD partially out of the server until you can grab it with both hands Servicing Components 135 ...

Page 136: ...age 157 See Also Install a CMOD on page 139 Remove and Install the CMOD Cover When removing or installing the CMOD cover always maintain component serviceability requirements with regard to static protection To protect components from damage always use an anti static mat and wrist strap Before You Begin Remove a CMOD on page 133 136 Sun Server X4 8 Service Manual December 2015 ...

Page 137: ...Remove and Install the CMOD Cover 1 To remove the CMOD top cover push the release button slide the cover away from the front of the CMOD and lift it off the CMOD Servicing Components 137 ...

Page 138: ...nstall the CMOD Cover Caution Component damage CMOD components are extremely sensitive to electrostatic discharge Wear a wrist strap and use an anti static wrist mat 138 Sun Server X4 8 Service Manual December 2015 ...
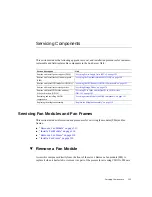
Page 139: ...ges of the chassis and that the pins in the cover are aligned with the slots in the chassis sidewall 5 Slide the cover forward until it locks into place This action is accompanied by a click sound Install a CMOD Use this procedure to install a CMOD after replacing it or after servicing its internal components Before You Begin Remove a CMOD on page 133 For component serviceability locations and des...

Page 140: ...e CMOD lever is in the fully open position a Squeeze together the green tabs on the end of the lever b Rotate the lever downward and away from the CMOD 2 Position the CMOD in the slot 140 Sun Server X4 8 Service Manual December 2015 ...
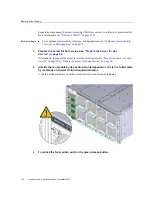
Page 141: ...ops In this position the pawl at the lever hinge is aligned with the slot in the server 5 To install the CMOD rotate the lever upward until it locks into place and is flush with the front of the CMOD Caution Pinch point When operating the lever keep your fingers clear of the back side and hinged end of the lever Servicing Components 141 ...

Page 142: ...he four fan modules See Install a Fan Module on page 116 8 Prepare the server for operation See Returning the Server to Operation on page 229 Replace a Failed DIMM This procedure uses the DIMM fault remind test circuit in the CMOD to identify the failed DIMM The circuit is a charged time limited circuit Once power is removed from the server you have 10 minutes to use the circuit 142 Sun Server X4 ...

Page 143: ...d with versions of Oracle ILOM older than 3 2 4 18 use cold service See Prepare the Server for Cold Service on page 99 For servers equipped with SW 1 1 and with Oracle ILOM 3 2 4 18 or newer use cold service or warm service For warm service see Prepare the Server for Warm Service on page 96 2 Remove the CMOD that contains the failed DIMM See Remove a CMOD on page 133 3 To remove the CMOD top cover...

Page 144: ...Replace a Failed DIMM See Remove and Install the CMOD Cover on page 136 144 Sun Server X4 8 Service Manual December 2015 ...
Page 145: ...lot 5 Verify that the Fault Remind Power indicator is lit The green LED lights to indicate that the circuit is operational 6 With the Fault Remind button pressed look for a lit DIMM fault indicator The indicators are located next to the DIMM slot 7 To remove the failed DIMM from its slot simultaneously rotate the two DIMM slot levers outward to their fully open position Servicing Components 145 ...

Page 146: ...s the DIMM from its connector 8 Remove the DIMM from the CMOD 9 To align the replacement DIMM in the slot ensure that the notch on the DIMM connector edge lines up with the key in the DIMM slot 146 Sun Server X4 8 Service Manual December 2015 ...
Page 147: ...e DIMM sits evenly in the slot and is locked Both levers should be in their fully closed and vertical position In this position the levers lock the DIMM in the slot 12 To align the CMOD cover position it over the CMOD with the lip end of the cover toward the front of the CMOD 13 Set the cover on the CMOD so that the edges of the cover encapsulate the edges of the CMOD When correctly seated the cov...

Page 148: ...y Locations and Designations on page 79 Remove a DIMM on page 151 1 Prepare the server for warm or cold service For servers equipped with SW 1 0 and with versions of Oracle ILOM older than 3 2 4 18 use cold service See Prepare the Server for Cold Service on page 99 For servers equipped with SW 1 1 and with Oracle ILOM 3 2 4 18 or newer use cold service or warm service For warm service see Prepare ...

Page 149: ...rge Wear a wrist strap and use an anti static wrist mat 4 Locate the DIMM slot 5 To align the DIMM in the slot ensure that the notch on the DIMM connector lines up with the key in the DIMM slot 6 To install the DIMM in the slot simultaneously press down on both edges of the DIMM Servicing Components 149 ...

Page 150: ...lot levers to rise and lock the DIMM in the slot 7 Verify that the DIMM sits evenly in the slot and is locked Both levers should be in their fully closed and vertical position In this position the levers lock the DIMM in the slot 150 Sun Server X4 8 Service Manual December 2015 ...
Page 151: ...o physically reset a DIMM in its slot removal and installation For replacing a failed DIMM see Replace a Failed DIMM on page 142 Tip For an overview video about replacing a failed DIMM see Replacing DIMMs Before You Begin For component serviceability locations and designations see Component Serviceability Locations and Designations on page 79 Install a DIMM on page 148 1 Prepare the server for war...

Page 152: ...th Oracle ILOM 3 2 4 18 or newer use cold service or warm service For warm service see Prepare the Server for Warm Service on page 96 2 Remove the CMOD See Remove a CMOD on page 133 3 To remove the CMOD top cover push the release button slide the cover away from the front of the CMOD and lift it off the CMOD See Remove and Install the CMOD Cover on page 136 152 Sun Server X4 8 Service Manual Decem...

Page 153: ...Remove a DIMM Caution Component damage CMOD components are extremely sensitive to electrostatic discharge Wear a wrist strap and use an anti static wrist mat Servicing Components 153 ...

Page 154: ...ge 154 DIMM Slot Numbering and Color Coding on page 155 DIMM Rules on page 156 DIMM Slot Population Order on page 157 DIMM Specifics Supported DIMM speeds 1333 and 1600 MHz All supported DIMMs regardless of speed rating operate at 1333MHz Mixing of different size memory within one CMOD is not allowed see DIMM Rules on page 156 Mixing of LVDIMM and LRDIMM in the same chassis is not allowed Memory B...

Page 155: ...ering and Color Coding For slot numbering information see Memory Slot Designations on page 85 To differentiate the two memory channels within a group of slots and to assist in DIMM population order the three DIMM slots assigned to each channel have color coded slots and levers The color coding is black slots with black levers black slots with white levers and white slots with white levers The foll...

Page 156: ...12 and D18 An upgrade of four DIMMs for each CMOD is allowed in this configuration by installing four DIMMs in slots D3 D9 D15 and D21 Aside from an upgrade to the minimum shipped configuration stated above DIMMs must be added to each CMOD in sets of eight one for each memory buffer channel Add eight DIMMs to each CMOD starting with CMOD 0 and ending with CMOD 3 four CMOD configuration or CMOD 7 e...

Page 157: ...e white slot white lever slots D2 D5 D8 D11 D14 D17 D20 D23 Remove a Heatsink and Processor FRU Heatsinks and processors are field replaceable units FRUs and must be serviced by an Oracle Service person This procedure uses the CPU fault remind test circuit The circuit is a charged time limited circuit Once power is removed from the server you have 10 minutes to use the circuit Before You Begin For...

Page 158: ...ear a wrist strap and use an anti static wrist mat You can verify the processor that has failed by pressing the Fault Remind button and checking to see if the CPU fault indicator turns on The button and indicator are part of the CMOD Fault Remind test circuit The test circuit is powered by a time limited charge The charge allows you to use the circuit after the CMOD has been removed from the serve...

Page 159: ...out on page 28 4 To check the charge status of the test circuit press and hold the Fault Remind button and verify that the indicator lights The green indicator is located next to the button and it lights if the circuit is operational 5 To verify the processor that has failed continue to press and hold the Fault Remind button and look for the lit processor fault indicator The amber indicator is loc...

Page 160: ... the four spring loaded screws A thermal compound that has been applied to the top of the CPU to facilitate the transfer of heat to the heatsink also acts as an adhesive 7 To separate the heatsink from the top of the processor gently twist the heatsink left and right while it pulling upward 160 Sun Server X4 8 Service Manual December 2015 ...

Page 161: ...or FRU The twisting action helps to break the seal created by the thermal compound 8 Remove the heatsink from the CMOD taking care that you do not allow the thermal compound to contaminate other components Servicing Components 161 ...

Page 162: ...he replacement CPU 9 Use the alcohol wipe to completely remove the thermal compound from the top of the CPU and the bottom of the heatsink taking care that you do not allow the thermal compound to contaminate other components 10 Open the spring loaded CPU load plate release levers by pushing them down and moving them slightly toward the CPU socket and away from their retaining clips 162 Sun Server...

Page 163: ...Remove a Heatsink and Processor FRU The levers are numbered by their required order of operation 11 Rotate the levers to their fully open position Servicing Components 163 ...

Page 164: ...ssor FRU When the second lever is in its fully open position the load plate is unlocked and can be opened 12 To open the load plate lift the unhinged end to its fully open position 164 Sun Server X4 8 Service Manual December 2015 ...

Page 165: ...e correct CPU replacement tool Always use the tool part number 7080240 that is included with the replacement CPU The tool is used to remove and install the CPU in the socket The top side of the replacement tool has a button in the center and a tab on one side Pressing down on the button opens the tool Pressing the tab closes the tool and releases the button a Press down on the release button on to...

Page 166: ...The tool and the CPU are correctly positioned with the socket when all of the triangles are aligned b Orient the bottom of the tool over the CPU ensuring that the triangle on the tool aligns with the triangle on the CPU c Lower the tool onto the CPU ensuring that it sits evenly on the CPU d Push the release tab away from the center button This action is accompanied by a click sound as the tool clo...

Page 167: ...metal CPU contacts are facing upward and the topside of the tool is facing downward g Hold the CPU by its edges h On the topside of the tool which is now facing downward pull the release tab away from the center button This action is accompanied by a click sound as the tool releases its hold on the CPU Servicing Components 167 ...

Page 168: ...eatsink and Processor FRU Before You Begin Remove a Heatsink and Processor FRU on page 157 For component serviceability locations and designations see Component Serviceability Locations and Designations on page 79 This procedure requires a Phillips screwdriver and an anti static wrist strap 168 Sun Server X4 8 Service Manual December 2015 ...

Page 169: ...ew CPU The tool is used to remove and install the CPU in the socket The top side of the replacement tool has a button in the center and a tab on one side Pressing down on the button opens the tool Pressing the tab releases the button and closes the tool a Press down on the release button on top of the replacement tool This action opens the tool On one corner of the tool there is a label with a dow...

Page 170: ...U sits flat in the tool Do not release your hold the CPU The CPU is not yet secured in the tool f With the tool and the CPU in the topside down position press the topside release tab outward away from the center button This action is accompanied by a click sound as the tool closes and grabs the CPU The CPU should now be secured in the tool g Ensure that the CPU is secured in the tool When the CPU ...

Page 171: ... side movement of the CPU within the socket 6 To release the CPU from the tool press the center button This action is accompanied by a click sound as the tool opens and releases the CPU 7 Remove the tool 8 Inspect the CPU to ensure that it sits evenly within the socket Servicing Components 171 ...

Page 172: ... load plate 10 Lower and lock the right side lever ensuring that the lever is secured under its retaining clip and that the bend in the lever locks the cover plate The right side lever must be closed first 172 Sun Server X4 8 Service Manual December 2015 ...

Page 173: ...d under its retaining clip 12 To apply the thermal compound dispense the contents of the syringe as a single dollop in the center on the top of the CPU Do not spread the thermal compound The pressure applied during the heatsink installation performs this action 13 To install the heatsink Servicing Components 173 ...

Page 174: ...aptive spring loaded heatsink screws with the threaded standoffs on the motherboard b Set the heatsink on top of the CPU Once the heatsink is in contact with the CPU avoid extra movement of the heatsink 174 Sun Server X4 8 Service Manual December 2015 ...

Page 175: ...crewdriver and alternately tighten each screw one half turn until both screws are completely tightened 14 Ensure that all tools and debris are removed from the CMOD 15 Install the CMOD cover See Remove and Install the CMOD Cover on page 136 Servicing Components 175 ...

Page 176: ... Steps Install a CMOD on page 139 Servicing Storage Drives Remove a Storage Drive on page 176 Install a Storage Drive on page 179 Storage Drive Reference on page 182 Remove a Storage Drive Access this component directly from the rear of the server Tip For a video overview on replacing a storage drive see Replacing DIMMs 176 Sun Server X4 8 Service Manual December 2015 ...

Page 177: ...he Server for Hot Service on page 95 Alternatively to prepare the server for cold service see Prepare the Server for Cold Service on page 99 2 Identify the storage drive by its position designation and the indicators on its front panel For example you can look for the blue steady on Ready to Remove indicator or the amber steady on Service Action Required indicator 3 To unlock the storage drive han...

Page 178: ...Remove a Storage Drive The spring loaded handle pops open 178 Sun Server X4 8 Service Manual December 2015 ...

Page 179: ...n position disengages the drive from its internal connector 5 If you are not replacing the HDD install an HDD filler panel See Also Returning the Server to Operation on page 229 Install a Storage Drive Access this component directly from the front of the server Tip For a video overview on replacing a storage drive see Replacing DIMMs Servicing Components 179 ...

Page 180: ... See Prepare the Server for Hot Service on page 95 Alternatively to prepare the server for cold service see Prepare the Server for Cold Service on page 99 2 If necessary remove the HDD filler panel from the slot a Press the handle release button on the front of the filler panel The spring loaded handle pops open b To remove the filler panel use the handle to pull it out of the slot 3 Ensure that t...

Page 181: ... a Storage Drive 4 Align the drive with the vacant slot so that the open handle is the right 5 Slide the drive into the slot push it inward until it is flush with the front of the SMOD Servicing Components 181 ...

Page 182: ...r to Operation on page 229 Storage Drive Reference This section contains storage drive reference information including storage drive slot population rules Storage Drive Population Rules When populating the storage drive slots use the following rules 182 Sun Server X4 8 Service Manual December 2015 ...

Page 183: ... The DPCCs allow the cards to be hot serviced removed and installed while the server is powered on Remove a DPCC on page 183 Remove a PCIe Card on page 186 Install a PCIe Card on page 188 Install a DPCC on page 191 Replace a DPCC on page 193 Remove a DPCC This component is accessed directly from the rear of the server Dual PCIe Card Carriers DPCCs can house two PCIe cards You need to perform this ...

Page 184: ... Card Carrier DPCC Indicators on page 42 The Attn buttons alert the system to a request to remove a PCIe card When the system has acknowledged the request it takes the device offline and lights both indicators for each slot When the indicators are lit it is safe to remove the component 184 Sun Server X4 8 Service Manual December 2015 ...

Page 185: ...To unlock the DPCC lever lift the release latch and pull the lever downward away from the server This action disengages the PCIe card IO connectors from the connectors on the back of the CMODs Servicing Components 185 ...

Page 186: ...d you must first remove its DPCC see Remove a DPCC on page 183 Perform this procedure when replacing a PCIe card or when changing its configuration Before You Begin For component serviceability locations and designations see Component Serviceability Locations and Designations on page 79 1 Prepare the server for hot service See Prepare the Server for Hot Service on page 95 186 Sun Server X4 8 Servi...

Page 187: ...ce on page 99 2 Identify the DPCC containing the PCIe card 3 Remove the DPCC See Remove a DPCC on page 183 4 Orient the DPCC so that the hinge is to the left 5 To open the top of the DPCC lift the release latch at the non hinged end of the lid and rotate the lid upward and to the left Servicing Components 187 ...

Page 188: ...e installed in pairs inside in Dual PCIe Card Carriers DPCCs To install a PCIe card you must first remove its DPCC see Remove a DPCC on page 183 Perform this procedure when replacing a PCIe card or when changing its configuration Before You Begin For component serviceability locations and designations see Component Serviceability Locations and Designations on page 79 188 Sun Server X4 8 Service Ma...

Page 189: ...e Remove a DPCC on page 183 4 Orient the DPCC so that the hinge is to the left 5 To open the top of the DPCC lift the release latch at the non hinged end of the lid and rotate the lid upward and to the left 6 Ensure that the DPCC top cover is open The top of the DPCC is hinged at one end To open lift the tab on the non hinged end 7 Orient the PCIe card with the edge or bus connector facing downwar...

Page 190: ...ll the card align the edge connector with the slot in the DPCC and push the card downward into the slot 9 To close the top of the DPCC rotate it to the right ensuring the clip on the edge of the top is secured over the unhinged edge of the DPCC 190 Sun Server X4 8 Service Manual December 2015 ...

Page 191: ...91 Install a DPCC Perform this procedure as part of a PCIe card replacement or configuration To remove a DPCC see Remove a DPCC on page 183 Before You Begin For component serviceability locations and designations see Component Serviceability Locations and Designations on page 79 Obtain a stylus for activating recessed buttons 1 Prepare the server for hot service See Prepare the Server for Hot Serv...

Page 192: ... with the vacant slot The connector back side of the DPCC faces inward toward the server 4 Slide the DPCC into the slot until it stops This leaves the DPCC protruding slightly from the back of the server Do not attempt push the DPCC inward beyond this point 5 Rotate the lever on the DPCC upward until it locks into place Caution Pinch point Keep fingers away from the back side of the lever when clo...

Page 193: ...of the DPCC The buttons alert the system to a request to bring the devices online When the system acknowledges the request it turns on the indicators on the the DPCC 7 Verify that the green OK indicators on the front of the DPCC are on steady See Also Returning the Server to Operation on page 229 Replace a DPCC Perform this procedure to replace a failed DPCC Servicing Components 193 ...

Page 194: ...formation for PCIe cards and DPCCs including DPCC population rules Server PCIe Card Capabilities The server contains nine low profile PCIe slots eight Gen 3 DPCC slots accessible at the rear of the server and one Gen 2 slot which is located internally and not directly accessible on the system module SMOD This internal slot is used for server HBA and provides SAS connectivity to the server storage ...

Page 195: ...ated DPCC must be installed for each CMOD four or eight populated DPCCs All eight DPCCs must be installed in the system regardless of the system configuration and whether the DPCC contains a PCIe card Servicing System Module SMOD Components This section contains removal and installation procedures for the SMOD Remove the SMOD on page 195 Install the SMOD on page 197 Servicing the Host Bus Adapter ...

Page 196: ...in labels and a pen for labeling cables 1 Prepare the server for cold service See Prepare the Server for Cold Service on page 99 2 Label and disconnect all cables from the SMOD 3 Disengage the SMOD from the server midplane a To unlock the SMOD handles squeeze together the release latches on the end of both handles The unlocking action is accompanied by an audible click 196 Sun Server X4 8 Service ...

Page 197: ...nnectors on the server midplane Caution Physical harm or component damage Do not use the SMOD handles to remove the SMOD from the server 4 To remove the SMOD grab it by its sides and slide it out the server Next Steps Install the SMOD on page 197 Install the SMOD This is a cold service component Disconnect the AC power cables from the server before performing this procedure Servicing Components 19...

Page 198: ...page 79 Remove the SMOD on page 195 1 Ensure that the handles on the SMOD are in their fully open position a To unlock the SMOD handles squeeze together the release latches on the end of both handles The unlocking action is accompanied by an audible click b To open rotate both handles downward until they are at a 90 degree angle to the SMOD fully open position 2 Orient the SMOD with the handles fa...

Page 199: ...nward beyond this point 5 To install the SMOD simultaneously rotate both handles upward until they lock into place Caution Pinch point When operating the lever keep your fingers clear of the back side and hinged end of the lever This action draws the SMOD inward engaging the SMOD connectors with the connectors on the server midplane 6 Connect the cables to the SMOD Servicing Components 199 ...

Page 200: ...d Perform this procedure to replace the HBA card Before You Begin For component serviceability locations and designations see Component Serviceability Locations and Designations on page 79 1 Prepare the server for cold service See Prepare the Server for Cold Service on page 99 2 Remove the SMOD See Remove the SMOD on page 195 3 Set the SMOD on a flat surface with the front side facing toward you 4...

Page 201: ...facing opening on the right side In the following illustration call out 2 shows the location of the HBA card and call out 3 shows the card locking lever call out 1 shows the location of the USB flash drive 8 To unlock the HBA card rotate the green release handle downward Servicing Components 201 ...

Page 202: ...ccess it you might need to push it outward from the inside 9 To disconnect the HBA card from its connector on the SMOD motherboard pull the card toward you Note The two storage drive backplane cables are still attached to the card 202 Sun Server X4 8 Service Manual December 2015 ...

Page 203: ...ni SAS4I connectors connect the HBA to the storage drive backplane 10 Carefully lift the card up and pull it slightly away from the SMOD until the cable connectors are visible 11 Disconnect the cables from the card Servicing Components 203 ...

Page 204: ...Remove the HBA Card Note Do not disconnect the cables from the SMOD 204 Sun Server X4 8 Service Manual December 2015 ...

Page 205: ...rear of the server by removing the SMOD The host bus adapter HBA card is installed in an internal PCIe slot mounted on the SMOD motherboard Perform this procedure to install the HBA card Before You Begin Remove the HBA Card on page 200 For component serviceability locations and designations see Component Serviceability Locations and Designations on page 79 Servicing Components 205 ...

Page 206: ...e back connector side facing you orient the HBA card in the opening on the right 3 Ensure that the two backplane cables are routed under the support bracket on the bottom of the SMOD 4 Connect the cables to the connectors on the HBA card 5 Lower the card and align its edge connector with the PCIe slot on the SMOD motherboard 206 Sun Server X4 8 Service Manual December 2015 ...

Page 207: ...Install the HBA Card 6 To install the HBA card push it into the slot 7 To lock the card rotate the green locking lever upward Servicing Components 207 ...

Page 208: ...t is accessible from the rear of the server by removing the SMOD The host bus adapter HBA card is installed in an internal PCIe slot mounted on the SMOD motherboard Perform this procedure to replace the HBA battery Before You Begin You need a small tip Phillips screwdriver For component serviceability locations and designations see Component Serviceability Locations and Designations on page 79 1 P...

Page 209: ...es Replace the SAS Cable on page 209 Replace the SAS Cable This is an internal component that is accessible from the rear of the server by removing the SMOD Perform this procedure to replace the SAS cables on the SMOD Before You Begin For component serviceability locations and designations see Component Serviceability Locations and Designations on page 79 1 Prepare the server for cold service See ...

Page 210: ...the support bracket 13 Install the HBA card See Install the HBA Card on page 205 Next Steps Install the SMOD on page 197 Servicing the Internal USB Flash Drives This section contains procedures for accessing and servicing a USB flash drive installed in the internal USB ports Remove an Internal USB Flash Drive on page 210 Install an Internal USB Drive on page 212 Remove an Internal USB Flash Drive ...

Page 211: ...e 79 1 Prepare the server for cold service See Prepare the Server for Cold Service on page 99 2 Remove the SMOD See Remove the SMOD on page 195 3 Set the SMOD on a flat surface with the front side facing toward you 4 Close the SMOD handles 5 Rotate the SMOD 180 degrees so the back connector side is facing toward you 6 Turn the SMOD upside down and locate the HBA card The USB flash drive ports are ...

Page 212: ...ear of the server by removing the SMOD Perform this procedure to access and install internal USB flash drives Before You Begin For component serviceability locations and designations see Component Serviceability Locations and Designations on page 79 1 Prepare the server for cold service See Prepare the Server for Cold Service on page 99 2 Remove the SMOD See Remove the SMOD on page 195 212 Sun Ser...

Page 213: ...einstall Oracle System Assistant on the new USB flash drive For instructions see the Oracle X4 Series Servers Administration Guide at http www oracle com goto x86AdminDiag docs Next Steps Install the SMOD on page 197 Replace the Real Time Clock System Battery This is an internal component accessed from the rear of the server by removing the SMOD Perform this procedure to replace a failed system ba...

Page 214: ...Replace the Real Time Clock System Battery The RTC battery is located on the SMOD motherboard 214 Sun Server X4 8 Service Manual December 2015 ...

Page 215: ...To remove the battery pull it up and out of its holder 5 To orient the replacement battery ensure that the positive side of the battery is facing the holder 6 To install the battery set it in the holder and push it inward Servicing Components 215 ...

Page 216: ... the BIOS Setup Utility to set the clock Next Steps Install the SMOD on page 197 Replace the Midplane Assembly Caution Hazardous voltage Possibility of electrical shock if the power cables are connected to the server when accessing the midplane and bus bar assembly This is a cold service procedure Disconnect all power cables before removing the server access panels 216 Sun Server X4 8 Service Manu...

Page 217: ...Fan Module on page 113 3 Remove both fan frames See Remove a Fan Frame on page 118 4 Remove the CMODs See Remove a CMOD on page 133 5 Remove the four PSUs See Remove a PSU on page 122 6 Remove the FIM See Remove the FIM on page 129 7 At the rear of the server remove any cables attached to the rear of the server Before removing cables label each one noting its connection point 8 Remove the SMOD See...

Page 218: ...erver In the following illustration call out 1 shows the location of the midplane assembly 10 Remove the eight screws that secure the server to the rack at the front of the server 11 Use a lift to remove the server from the rack 218 Sun Server X4 8 Service Manual December 2015 ...

Page 219: ...anel and remove the panel 13 Carefully remove and retain the protective black plastic insert that covers the top of the midplane assembly Note the orientation of the insert with respect to the opening The insert is fitted to the opening using tabs and flaps Servicing Components 219 ...

Page 220: ... five cables four 20 pin PSU cables and one 8 pin cable for the AC power indicator LEDs that are routed through the server and are connected to the back side of the midplane assembly To remove the midplane assembly disconnect these connectors As an aid a label on the side of the chassis shows the arrangement and labeling of the five connectors 220 Sun Server X4 8 Service Manual December 2015 ...

Page 221: ...abel 15 Reach into the side access opening and disconnect the five connectors from the back of the midplane assembly Tip To see the connectors direct the light from a flashlight through the small opening in the top access just above the cable connect points Servicing Components 221 ...

Page 222: ...Replace the Midplane Assembly The following illustration shows the location and arrangement of the connectors on the back of the midplane 222 Sun Server X4 8 Service Manual December 2015 ...

Page 223: ... s side access opening The cables inside the chassis should lie flat so they are not damaged during the installation of the replacement midplane assembly 18 Align and position the replacement midplane assembly in the opening in the top of the server 19 Carefully lower the midplane assembly into the server until the top of the assembly is flush with the top of the server Servicing Components 223 ...

Page 224: ... server 20 Connect the five cables to the connectors on the back of the midplane assembly Ensure that the connectors are positioned correctly so the key protrusion on the side of the connector is aligned with the notch in the connector on the midplane assembly For best access 224 Sun Server X4 8 Service Manual December 2015 ...

Page 225: ...ng that the four captive screws are aligned with the holes in the side of the chassis 22 To secure the access cover to the chassis tighten the four captive screws 23 Install the black plastic insert over the top of the midplane assembly Ensure that the orientation of the insert is correct The insert is fitted to the opening using tabs and flaps 24 Align the top access cover with the opening in the...

Page 226: ...of the server a Install the CMODs See Install a CMOD on page 139 Your server might have four CMODs or it might have eight b Install both fan frames See Install a Fan Frame on page 120 c Install all eight fan modules See Install a Fan Module on page 116 d Install the FIM See Install the FIM on page 130 226 Sun Server X4 8 Service Manual December 2015 ...

Page 227: ...ll the SMOD on page 197 b Install the DPCCs See Install a DPCC on page 191 For slot designations see DPCC and PCIe Card Slot Designations on page 87 c Attach cables to their respective connectors and ports at back side of the server 29 Prepare the server for operation See Returning the Server to Operation on page 229 Servicing Components 227 ...

Page 228: ...228 Sun Server X4 8 Service Manual December 2015 ...

Page 229: ...ll AC power cables to their inlets on the rear of the server and verify that they are locked The retaining clips lock the power cables and prevent accidental disconnect 4 If necessary connect the other end of the AC power cables to the supply outlet 5 Ensure that the server is powering into standby power mode When AC power is applied to the server power inlets the server boots into standby power m...

Page 230: ...e the Power button on the server front panel From the Oracle ILOM web interface Summary home screen click Power On From the Oracle ILOM command line interface CLI type start System When AC power is applied to the server power inlets the server boots into standby power mode for information about discerning the boot status of the server using the front panel indicators see Server Boot Process and No...

Page 231: ...owing steps 1 Power on or power cycle the server 2 Press the F2 key while the system is performing the power on self test POST Note If there is an error during the boot process you can press F1 to access the BIOS Setup utility Alternatively you can use the following hot key combinations to access the BIOS Setup utility from a serial connection F1 Control Q F2 Control E F7 Control D F8 Control P F9...

Page 232: ...interface for plug and play PnP devices virtualization internal devices and add in cards Boot Configuration interface for boot settings including boot mode Legacy or UEFI Oracle System Assistant Configuration and boot option priority Exit Saves or discards changes This section contains screen captures of BIOS Setup utility screens To access the BIOS Setup utility see Access the BIOS Setup Utility ...

Page 233: ... Example 18 01 04 01 System Date System Date Current date You can change the date setting Example Thu 03 05 2013 System Time Current time You can change the time setting Example 13 38 27 QPI Link Speed R O SLOW 6 4 GT s 7 2 GT s 8 0 GT s Intel Quick Path Interconnect QPI operational speed Total Memory R O Memory in gigabytes Example 64 GB DDR3 Current Memory Speed R O Memory speed Example 1333 MHz...

Page 234: ... ID brand CPU Signature Processor CPU information Example 306E7 Microcode Patch Software update microcode patch information Example 704 Max CPU Speed Maximum non turbo speed of the processor Example 2800 MHz Min CPU Speed Minimum speed of the processor Processor Cores Number of available processor cores Example 15 Intel HT Technology Indicates whether Intel Hyper Threading is supported Intel VT x ...

Page 235: ...ion D6 32 GB D7 32 GB D8 32 GB D9 32 GB D10 32 GB D11 Not present D12 32 GB D13 Not present D14 Not present D15 Not present D16 Not present Security Setting Configure the security setting Administrator Password Set the Administrator password BIOS Setup Utility 235 ...

Page 236: ...BIOS Setup Utility Screens 236 Sun Server X4 8 Service Manual December 2015 ...

Page 237: ...BIOS Setup Utility Screens BIOS Setup Utility 237 ...

Page 238: ...BIOS Setup Utility Screens Advanced Screen Legacy The following sections show the sub selections on the Advanced screen 238 Sun Server X4 8 Service Manual December 2015 ...

Page 239: ...er overflow attacks when combined with a supporting OS Oracle Solaris Oracle VM Windows Server Red Hat Enterprise Linux SUSE Linux Enterprise Server and VMware ESXi Hardware Prefetcher Disabled Enabled Enabled Enable the mid level cache L2 streamer prefetcher Adjacent Cache Line Prefetch Disabled Enabled Enabled Enable the mid level cache L2 prefetching of adjacent cache lines DCU Streamer Prefetc...

Page 240: ...by the CPU Enable or disable CPU C3 ACPI C2 report to the operating system Turbo Mode Disabled Enabled Displays only if Power Technology is set to Custom Intel SpeedStep is set to enabled and TurboMode is supported in the CPU Energy Performance Performance Balanced Performance Balanced Performance Optimize between performance and power savings Windows 2008 and later operating systems override this...

Page 241: ...VT100 VT UTF8 ANSI VT100 Select the emulation for the terminal VT100 ASCII character set VT100 Extends VT100 to support color function keys etc VT UTF8 Uses UTF8 encoding to map Unicode characters onto one or more bytes ANSI Extended ASCII character set Bits per Second 9600 10200 57600 115200 9600 Select the serial port transmission speed The speed must be matched on the connecting serial device L...

Page 242: ...e com goto x86AdminDiag docs TPM Support Disabled Enabled Enabled Enable or disable TPM support Only UEFI BIOS implements this setup option If disabled the OS does not show TPM TPM State Disabled Enabled Disabled Displays whether TPM Support is enabled Current TPM Status Information R O If TPM Support is disabled Current TPM Status displays TPM SUPPORT OFF If TPM Support is enabled Current TPM Sta...

Page 243: ...bnet Mask If the IPv4 Assignment is set to Static set the IPv4 subnet mask Example 255 255 255 0 IPv4 Default Gateway If the IPv4 Assignment is set to Static set the IPv4 default gateway Example 129 144 82 254 Commit Commit the IPv4 configuration settings IPv6 Configuration R O Static Dynamic Dynamic Current configuration of the IPv6 settings IPv6 addresses are written with hexadecimal digits and ...

Page 244: ...isabled When autoconfiguration is disabled only the Link Local address is set None of the autoconfiguration options to configure an IPv6 address are run Stateless When enabled the IPv6 Stateless autoconfiguration is run to learn the IPv6 addresses for the device Dhcpv6_stateless When enabled the Dhcpv6_stateless autoconfiguration is run to learn the DNS and domain information for the device Dhcpv6...

Page 245: ...BIOS Setup Utility Screens BIOS Setup Utility 245 ...

Page 246: ...BIOS Setup Utility Screens Advanced CPU Power Management Configuration 246 Sun Server X4 8 Service Manual December 2015 ...

Page 247: ...BIOS Setup Utility Screens Memory Configuration BIOS Setup Utility 247 ...

Page 248: ...BIOS Setup Utility Screens Advanced USB Ports 248 Sun Server X4 8 Service Manual December 2015 ...

Page 249: ...BIOS Setup Utility Screens Advanced Serial Port Console Redirection BIOS Setup Utility 249 ...

Page 250: ...BIOS Setup Utility Screens 250 Sun Server X4 8 Service Manual December 2015 ...

Page 251: ...BIOS Setup Utility Screens BIOS Setup Utility 251 ...

Page 252: ...BIOS Setup Utility Screens 252 Sun Server X4 8 Service Manual December 2015 ...

Page 253: ...BIOS Setup Utility Screens Advanced Trusted Computing BIOS Setup Utility 253 ...

Page 254: ...BIOS Setup Utility Screens 254 Sun Server X4 8 Service Manual December 2015 ...

Page 255: ...BIOS Setup Utility Screens Advanced Network Stack BIOS Setup Utility 255 ...

Page 256: ...BIOS Setup Utility Screens Advanced Legacy iSCSI 256 Sun Server X4 8 Service Manual December 2015 ...

Page 257: ...BIOS Setup Utility Screens Advanced BMC Network Configuration BIOS Setup Utility 257 ...

Page 258: ...BIOS Setup Utility Screens 258 Sun Server X4 8 Service Manual December 2015 ...

Page 259: ...BIOS Setup Utility Screens BIOS Setup Utility 259 ...

Page 260: ...I O virtualization settings VT d Disabled Enabled Enabled Enable or disable Intel Virtualization Technology for directed I O VT d If enabled ensures improved isolation of I O resources for greater reliability security and availability SR IOV Disabled Enabled Disabled Single Root I O Virtualization SR IOV is used to configure devices into multiple virtual devices that can be used on virtual OS inst...

Page 261: ...to disabled Option ROM for the card is not copied into memory and the execution of the Option ROM is inhibited Net 2 and Net 3 OpROM Enable Disabled Enabled Enabled Enable or disable Option ROM If set to enabled Option ROM for the card executes as normal If set to disabled Option ROM for the card is not copied into memory and the execution of the Option ROM is inhibited Add in Cards Enable or disa...

Page 262: ...ity Screens IO Setup Options Options Defaults Description OpROM Enable Disabled Enabled Enabled Enable or disable Option ROM for the internal host bus adapter HBA card 262 Sun Server X4 8 Service Manual December 2015 ...

Page 263: ...BIOS Setup Utility Screens BIOS Setup Utility 263 ...

Page 264: ...BIOS Setup Utility Screens 264 Sun Server X4 8 Service Manual December 2015 ...

Page 265: ...BIOS Setup Utility Screens BIOS Setup Utility 265 ...

Page 266: ...led BIOS automatically retries the PXE list present in the system when all PXE attempts have failed If disabled the system halts and displays the error message Network Boot Failed when all PXE boots failed If set to Boot List fail over to the main Boot Options Priority list Persistent Boot Support Disabled Allows devices to maintain a position in the boot priority list even after removal so that i...

Page 267: ...onfiguration screen and toggle OSA Internal Support to enable or disable booting OSA from the internal USB port Boot Option Priority Order of discovery by BIOS Move items up and down the list to change the boot priority order in legacy boot mode This list changes when the boot mode changes BIOS Setup Utility 267 ...

Page 268: ...268 Sun Server X4 8 Service Manual December 2015 ...

Page 269: ...powering off 104 cold service preparing the server 99 command line interface CLI See CLI complete power removal 101 106 107 component back side 23 designations 82 filler panels 92 locations 81 NAC names 89 serviceability requirements 79 connecting devices to server 73 connector locations 45 contacting support 76 cooling subsystem 47 zones 48 CPU module CMOD cover removing and installing 136 fan mo...

Page 270: ...s 82 installing 116 power 49 removing 113 fault management shell 92 Fault Remind circuit 28 faults clearing 92 filler panels 92 fmadm tool 92 front indicator module FIM installing 130 location 34 removing 129 full power mode 107 G graceful power off 101 107 H hardware faults diagnosing 58 heatsink and processor installing 168 location 28 removing 157 host bus adapter HBA battery replacing 208 inst...

Page 271: ...b interface 110 M memory slot designations 85 midplane assembly replacing 216 O on board test circuit 68 Oracle ILOM 71 Oracle System Assistant 33 45 overview back side components 23 chassis 20 CMOD 24 server 19 SMOD 29 storage drives 31 P Pc Check diagnostic tool 71 PCIe card installing 188 reference 194 removing 186 slot designations 87 ports locations 45 power modes shutdowns and resets 107 rem...

Page 272: ...wer mode 107 static prevention anti static mat 91 anti static wrist strap 90 storage drive backplanes 32 installing 179 overview 31 reference 182 removing 176 slot designations 86 support product 76 switches host reset 43 SP reset 43 system battery CR 2032 replacing 213 cooling subsystem 47 management subsystem 34 power subsystem 50 preparing for cold service 99 preparing for hot service 95 prepar...

Page 273: ...3 U U Boot diagnostic tool 71 USB flash drive internal installing 212 removing 210 USB ports internal 33 W warm service preparing the server 96 web interface controlling the Locator indicator 110 powering off 105 273 ...

Page 274: ...274 Sun Server X4 8 Service Manual December 2015 ...
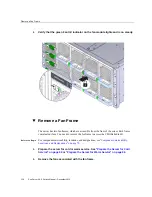
Reviews: