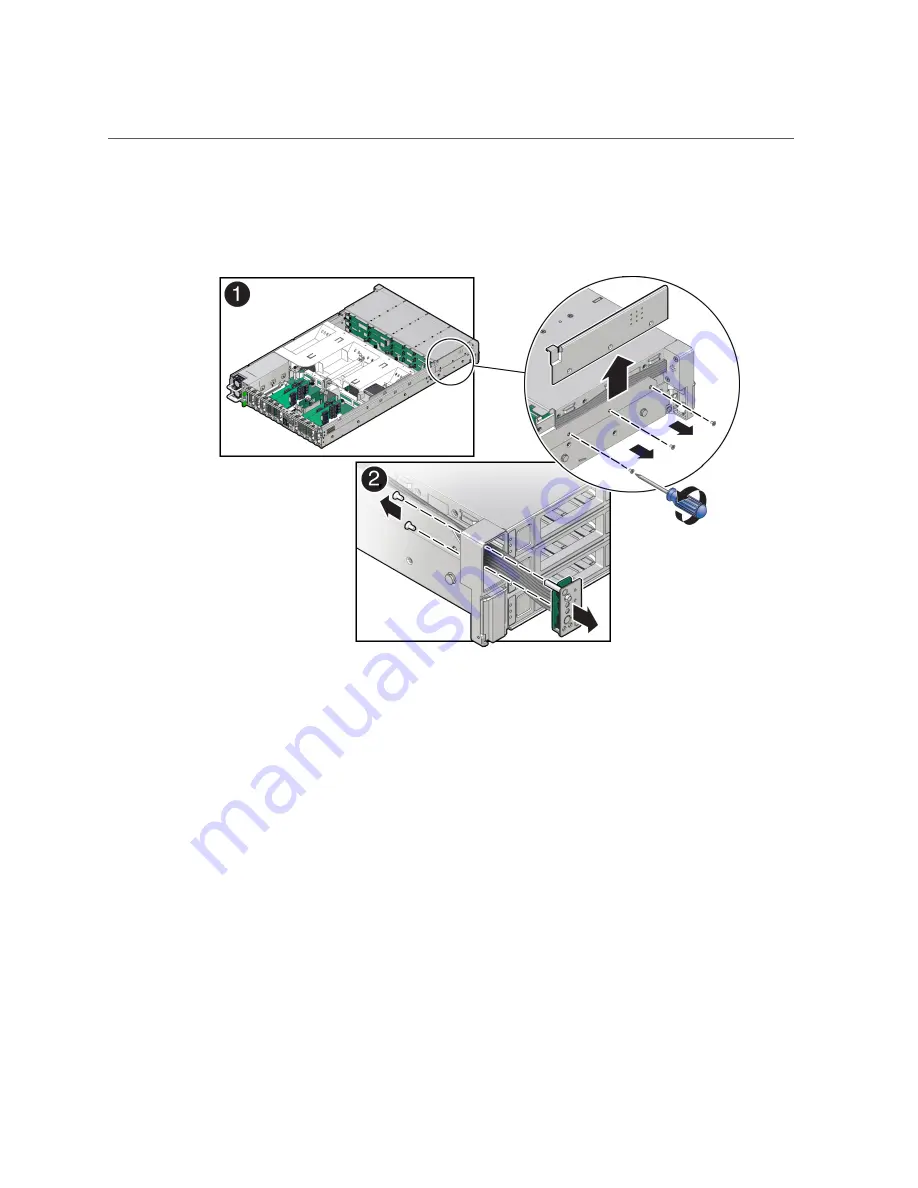
Remove the Front LED Indicator Module
3.
Remove the three No. 2 Phillips screws that secure the FIM cable and Temp
Sensor Access cover to the chassis [1].
4.
Lift up and remove the FIM cable and Temp Sensor Access cover from the FIM
cable and Temp Sensor Access cover slot [1].
Set aside the FIM cable and Temp Sensor Access cover.
5.
Remove the front LED indicator module [2].
a.
Remove the two No. 2 Phillips screws that secure the LED indicator module
to the server front panel.
b.
Remove the LED indicator module and cable from the server front panel.
Remove the LED indicator module cable by carefully pulling the cable through the cable
trough along the left side of the chassis.
Servicing the Front LED Indicator Module (FRU)
167
Summary of Contents for X7-2L
Page 1: ...Oracle Server X7 2L Service Manual Part No E72474 02 October 2017 ...
Page 2: ......
Page 12: ...12 Oracle Server X7 2L Service Manual October 2017 ...
Page 14: ...14 Oracle Server X7 2L Service Manual October 2017 ...
Page 48: ...48 Oracle Server X7 2L Service Manual October 2017 ...
Page 66: ...66 Oracle Server X7 2L Service Manual October 2017 ...
Page 84: ...84 Oracle Server X7 2L Service Manual October 2017 ...
Page 92: ...92 Oracle Server X7 2L Service Manual October 2017 ...
Page 110: ...110 Oracle Server X7 2L Service Manual October 2017 ...
Page 130: ...130 Oracle Server X7 2L Service Manual October 2017 ...
Page 138: ...138 Oracle Server X7 2L Service Manual October 2017 ...
Page 142: ...142 Oracle Server X7 2L Service Manual October 2017 ...
Page 156: ...156 Oracle Server X7 2L Service Manual October 2017 ...
Page 164: ...164 Oracle Server X7 2L Service Manual October 2017 ...
Page 172: ...172 Oracle Server X7 2L Service Manual October 2017 ...
Page 178: ...178 Oracle Server X7 2L Service Manual October 2017 ...
Page 218: ...218 Oracle Server X7 2L Service Manual October 2017 ...
Page 254: ...254 Oracle Server X7 2L Service Manual October 2017 ...


