Before switching on the power, set the unit’s volume control(s) to minimum.
Ensure the correct speaker load is connected at all times during operation.
Refer to the section entitled “SPEAKER OUTPUTS”
Use good quality shielded instrument cable to connect your instrument to your unit’s input.
To prevent excessive hum and electrical noise, operate your amplifier and instruments as
far away as possible from other electronic devices. Examples include: refrigerators, motors,
air conditioners, television sets, radio receivers etc.
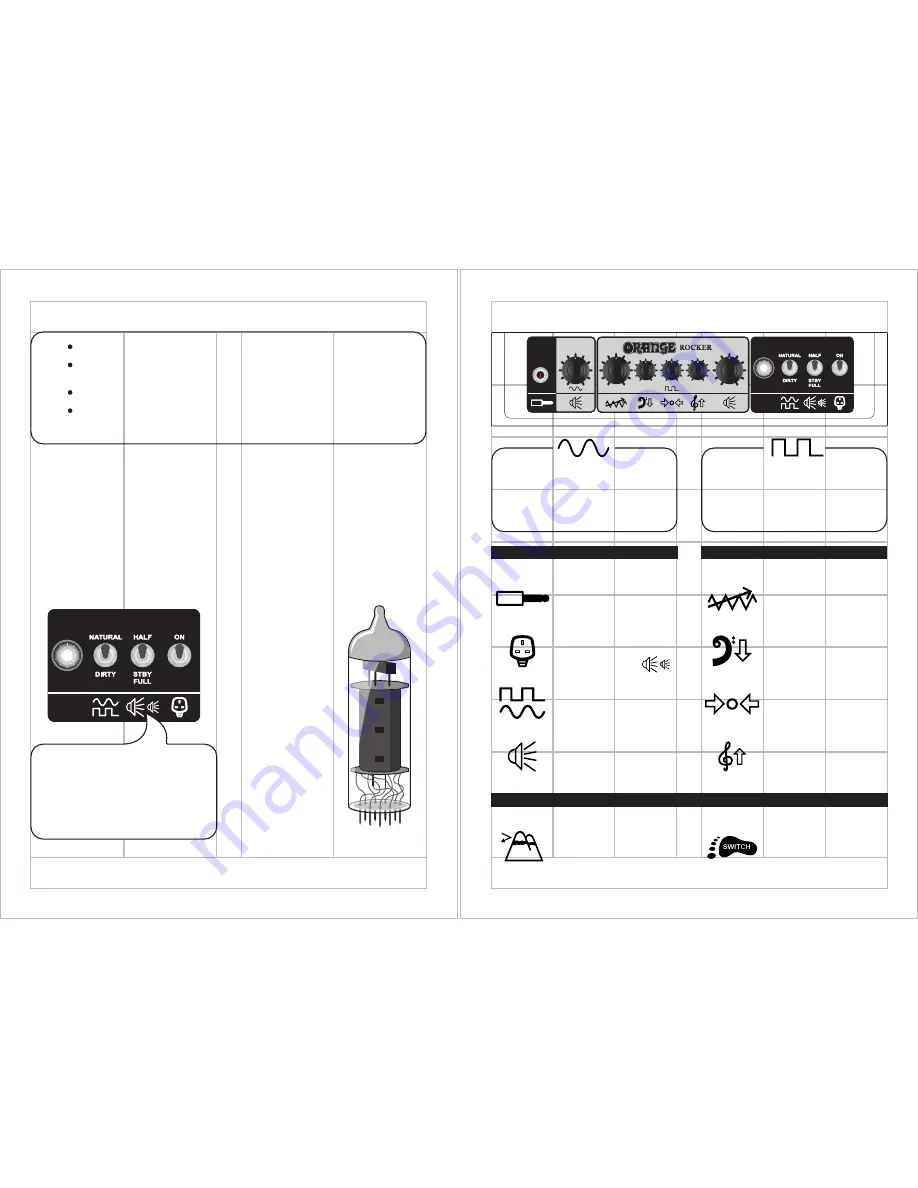
START UP PROCEDURE
FOR VALVE AMPLIFIERS
Before switching the
POWER
switch to the
ON
position,
ensure the
HALF/STBY/FULL
switch is set to the
STBY
(Startup Tension Bypass) mode.
Leave the amp in
STBY
mode for at least 2 minutes
prior to performance. This will help prolong the life of
the valves [tubes]. After 2 minutes, switch to play mode
(
FULL
or
HALF
power). Select the
STBY
mode during
breaks in performance.
SERVICING INFORMATION FOR
VALVE AMPLIFIERS
Periodic valve renewal should be considered part of
owning a quality valve [tube] amplifier. The rate of valve
wear is dependent on many factors, but if you notice a
change in the performance of your amplifier, it is likely a
result of valve decline. Valves can fail at any time.
Output valves (EL84, EL34, 6550 etc.) are subject to
more stress than preamp valves (12AX7, 12AT7 etc.)
and may require more regular replacement. Consult
your service centre/dealer for more information.
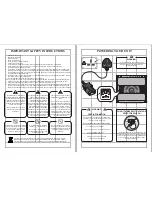
BASS
Adjusts the lower frequency response.
Increasing the bass produces deeper
sounds.
FX LOOP
Used to place external effects between the
amplifier’s preamplifier section and output
section. Connect the SEND jack to the input
of external effects. Connect the output of
external effects to the RETURN jack.
GAIN
Controls the (preamplifier) gain level.
Higher settings produce more
distortion. Note: When set to minimum,
no sound will be heard.
INPUT
¼” instrument jack socket.
VOLUME
Adjusts the volume level for either the
Natural or Dirty channel.
CHANNEL
Toggles between the Natural and Dirty
channel. This can be switched remotely
using an optional footswitch (see rear).
TREBLE
Adjusts the high frequency response.
Increase the treble for brighter tones
or reduce for a warmer sound.
MID
Adjusts the midrange response.
Increasing the mids creates
a fatter sound, whilst reducing
‘scoops’ the tone.
POWER
The lamp will illuminate to indicate the
power is switched to ON.
Refer to page 4 for the
HALF/STBY/FULL switch.
FOOT SWITCH
Connect a latching footswitch (e.g.
Orange FS-1
) to remotely select between
Natural and Dirty channels.
GENERAL USE
FRONT PANEL
ORANGE ICONS
REAR ICONS
DIRTY CHANNEL EQ
The
Natural Channel
gives the purest route
from guitar to speaker with just a single volume
control. It has no EQ controls but is voiced to
complement your guitar’s natural tone. As a
‘non-master’-style channel, the output valves
will begin to saturate into overdrive at high
volume settings.
The
Dirty Channel
can be set clean or
distorted by balancing where the gain and
volume controls are set. Lower gain
settings will produce cleaner tones.
Note:
The EQ controls only affect the
Dirty Channel.
Bias adjustment should
only be performed by
authorised service
personnel.
The fuse labelled "
HT
FUSE
" will blow in the
event of output valve
failure. The output valve(s)
should be replaced, and
the HT fuse replaced with
the correct 250V type.
The rating is indicated on
the product near the HT
fuse holder.
Our
Orange Valve Tester
can be used to help match
valves and check valve
health.
Visit orangeamps.com for
more information.
SELECTING STBY OR PLAY MODE:
OUTPUT (FULL / HALF)
This switch toggles between
FULL
and
HALF
power modes. In
HALF
power mode, the volume
will be reduced and output valve overdrive can be
achieved at lower output levels. The centre
position selects
STBY
mode.
Output valves should always be
replaced with matched sets, though
not all models require a bias
adjustment. Contact your
Orange dealer for more
information.
4
5


