

MAT NX3 Evo Flight Controller System
MAT Co., Ltd www.gdszmat.com
NX3 Evo Flight Controller System Manual
VERY IMPORTANT!
Please release or turn off the emergency switch when the plane become level
flight and under control. Emergency mode just for emergency situations.
Please use good quality BEC or ESC as power supply. Do not use Ni-MH and
dry cell batteries.
When use NX3evo in Delta wing or V-tail plane, please turn off mixers on your
transmitter, and set the DIP switch on NX3evo.
For the first flying, it’s better to keep a lower sensitivity (-20%~+20% gain,
10~14 o’clock is recommend) and then increase it gradually.
Check every axis gain direction before flight.
When you trigger the emergency switch, The elevator will move up and then
move down slowly. If it is not, please reset this function refer step 4.8 radio
stick direction calibration.
Must keep the plane level and stable when power on the system.
When switching on the radio control system it is essential to keep the
transmitter aerial at least 15 cm away from the receiver aerials at all times.
Otherwise,NX3evo will read the wrong center position of receiver signal .
The Controller has to re-learn center position after installation,or replacing a
new radio system, or making a trimming(or Sub-Trim)change within the
transmitter, otherwise the servos may move to one side automatically.To do
this,just quickly flip the flight mode switch twice within 1 second!
1. Features:
NX3evo provides four levels of flight mode:
1. Beginner, 2.Practice, 3.Promotion, 4.Expert.
Four Model Types supported:
single aileron, dual ailerons , delta and V-tail.
Two kinds of Gain Control Method supported:Master Gain from the radio,
Independent Axis Gain from the Variable resistor on the Controller board.
Emergency mode guarantee safety flight .
Automatic aileron leveling.
3D AVCS flight, Attitude locking.
Provide Y-wiring for aileron.
2. Specifications:
Voltage range: DC 4.5 – 6V
Response Frequency: 100Hz
Operating Temperature: 0-50°C
Size: 43x28x15mm
Weight: 11g
3. Packing List:
NX3evo Flight Controller Board
NX3evo Manual
Connector wires
Double-sided paste
Mini Screwdriver
4. Installation:
WARNING: PLEASE READ THE FOLLOWING STEPS VERY
CAREFULLY BEFORE YOU START TO INSTALL A NEW PLANE!
Step 1:Configure the plane without NX3evo.
Create a new model in your transmitter. Do not engage any mixer on your
transmitter.Assign two switches for NX3evo.One is for AUX(flight mode change),two
or three steps. Another is for Emergency(Rebound Toggle Switch is better).Make
sure all servos moves smoothly.
Step 2: mount
NX3evo need to be
firmly mounted near
the gravity center of
the
plane
with
provided double-tape . Please make sure the long side of NX3evo is in
line with the fuselage. And the logo side should face up. After mounting, please
check again whether the board is firmly attached to the aircraft.
Step 3: DIP configure
1.
If you are a beginner, please turn the switch (T) to the right.
2.
If you want yaw attitude locking, please turn the switch (Y) to the right. It is
especially designed for 3D flight, the aircraft will try to lock yaw attitude
when there is no command sent by the radio during flight. Such as self
hover, take off is not straight.
3.
For delta-wing plane, please turn the switch (D) to the right.
4.
For v-tail plane, please turn the switch (V) to the right.
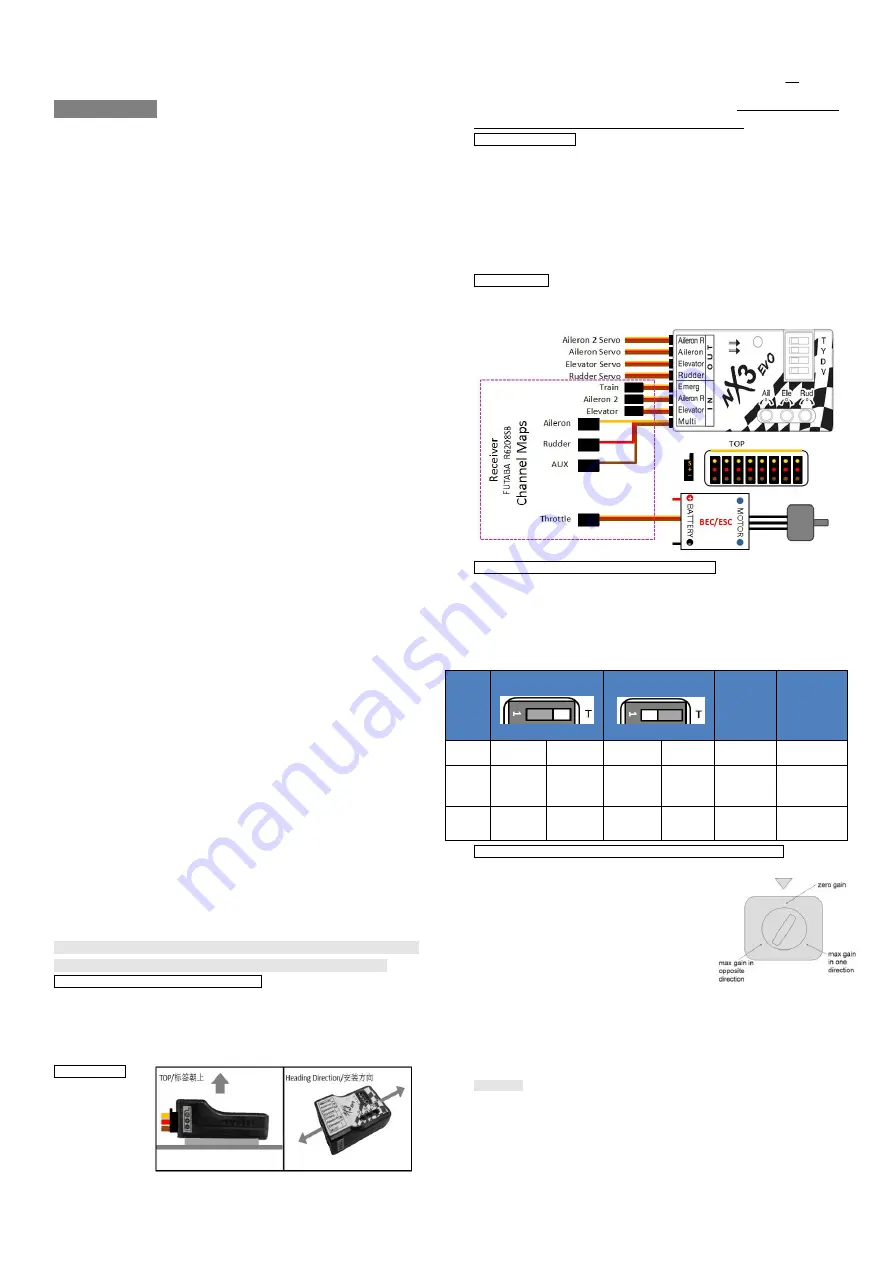
Step 4: Wiring
Connect NX3evo and the receiver using wires in the package according the following
figure.The controller requires at least 4 receiver channels, and up to 7 channels.
Step 5: AUX Channel or Master Gain channel Setting
NX3evo use AUX channel to change flight mode.The
travel of AUX channel also
control the Master Gain of NX3evo.Decrease the AUX travel will decrease all three
axes correction. NX3evo will be in
Beginner
Level or
Expert
Level if AUX channel do
not connect to the receive
r.We strongly recommend that you using the remote master
gain control to make it much more convenient for gain adjusting during the flight.
Step 6:Individual Correction Gain and Correct Direction Configuration
Using the provided screwdriver to adjust the gain
pots on NX3evo board control the correctional gain
(sensitivity) and correct direction for the following
controls: pitch (ELE), roll (AIL) and yaw (RUD)
axis. You'd better start with a lower sensitivity for
your first flight (-20%~+20% gain was recommend)
and then increase it gradually. The aircraft will
become vibrative if the gain is too large.
Before configure the Correct Direction, please switch to Practicing Level or
Promotion Level at first, power on the system, pick up the airplane and check it by
following the three steps below:
AILERON Quickly move the right wing upward around the roll axis, the right
aileron will flap up and the left flap down.
‘ T ’ be right side
‘ T ’ be left side
Emergency
Signal With
100
mode
Beginner
Practicin
g
Promotio
n
Expert
Close
Emergency
Mode
AUX
Signal
Width
-100 ~ 0
0 ~ 100
0 ~ 100
-100 ~ 0
0
-100 ~ 100
LED
Status
forever
on
Fast
Flash
Fast
Flash
forever
on
off
Slow Flash


