background image

6 (20)

General

This Installation and Maintenance Guide introduces the operation, installation, maintenance and use of the Oras 

7483/7491/7492/7493/7494 thermostatic faucet. Please read the instructions carefully prior to installation 

and save them for reference where servicing may be needed. If any fault or malfunction occurs in the faucet, 

seek the best possible advice at an expert HVAC store.

Operation

Oras 7483/7491/7492/7493/7494 is turned on and off from the flow control knob, which is the lower one. The 

temperature adjustment knob above is equipped with a stop button. The limit can be passed by simultaneously 

pressing the stop button and turning the knob. Temperature is factory preset to 38°C.

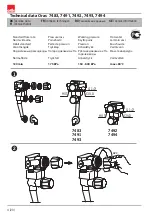
Installation (figure 1)

–  Hot water is connected to the left and cold water to the right.


  Incoming water must not be cross-connected!

Temperature adjustment (figure 2)

–  Pull off the temperature adjustment knob.

–  Turn on the water.

–  Adjust water temperature as required by turning the temperature adjustment knob.

–  Press the knob back in place so that the stop button is against the limiter shoulder (faces up).

Cleaning/changing the litter filters (figure 3)

–  Close the water inlet to the faucet.

–  Unscrew the litter filters.

–  Clean the litter filters. If necessary, change for new ones.

–  Remount the faucet in the shower cubicle.

–  Open the water inlet to the faucet to check that the faucet works correctly.

Changing the headpart (figures 4)

–  Close the water inlet to the faucet.

–  Pull off the flow control handle.

–  Unscrew the plastic nut.

–  Unscrew the headpart from the faucet body (17 mm wrench).

–  Position the new headpart in place.

–  Reassemble in reverse order.

Servicing the thermostatic element (figure 4)

–  Close the water inlet to the faucet.

–  Pull off and detach the temperature adjustment knob and limiter. Use SW 38 mm box wrench (e.g. Oras  

  box wrench no. 910003) or open-end spanner to unscrew the grooved locking nut. 

–  Pull out the thermostatic element.

–  Clean the element and its filters under running water using e.g. a soft brush.

  The element must be replaced if damaged.

–  Lubricate the O-rings with silicone lubricant and replace the element in the faucet.

–  Screw the grooved locking nut back in place.

–  Place the limiter back over the stem so that the limiter shoulder is in line with the 38° mark on the faucet  

  (see figure 4).

–  Remount the temperature adjustment knob, open the water inlet, check for faultless operation and adjust  

  the temperature if required.

• Technische Daten • Technical data • Tekniske data • Datos técnicos • Tehnilised andmed • Tekniset tiedot 

• Technische gegevens • Données techniques • 

Tehniskie dati

 • 

Techniniai duomenys

 • Teknisk data 

• 

Dane techniczne

 • Òåõíè÷åñêèå äàííûå • Tekniska data  • 

Technická data 

!

Summary of Contents for 7483

Page 1: ...Installation and Maintenance Guide ...

Page 2: ......

Page 3: ...3 20 English 6 Suomi 8 Français 10 Norsk 11 Русский 13 Svenska 15 ...

Page 4: ...kk Varmtvann Нормативный расход воды Потеря давления кПа Рабочее давление кПа Макс температура горячей воды Normaflöde Tryckfall Arbetstryck Varmvatten 12 l min 175 kPa 150 800 kPa max 80 C COLD HOT G 1 2 COLD HOT G 1 2 7483 7491 7493 7492 7494 38 C Technical data Oras 7483 7491 7492 7493 7494 DKTekniske data FI Tekniset tiedot FR Données techniques RUТехнические данные SE Teknisk information 1 2 ...

Page 5: ...5 20 7492 7494 178295 178796V 178780V 178794V 178783V 109089V 178765 178750 7483 7491 7493 22 mm 20 22mm 109089V 109898 178799V pcs Oras no 1 178750 1 178765 1 178780V 1 109898 2 178295 3 4 ...

Page 6: ...changing the litter filters figure 3 Close the water inlet to the faucet Unscrew the litter filters Clean the litter filters If necessary change for new ones Remount the faucet in the shower cubicle Open the water inlet to the faucet to check that the faucet works correctly Changing the headpart figures 4 Close the water inlet to the faucet Pull off the flow control handle Unscrew the plastic nut ...

Page 7: ... faucet has diminished Shower strainer is dirty No water comes from the faucet The litter filters are blocked Check the water inlet to the faucet The faucet causes a banging sound in Water pressure is too high the water supply pipes Adjustment was unnecessarily swift ...

Page 8: ...aisin karalle siten että rajoitinnuppi tulee rajoittimen olaketta ylöspäin vasten Paina lämmönsäätökahva paikoilleen Roskasiivilöiden puhdistus kuva 3 Sulje vedentulo hanalle Kierrä roskasihdit irti Puhdista sihdit tarvittaessa vaihda uusiin Kiinnitä hana suihkukaappiin Avaa vedentulo hanalle ja tarkista moitteeton vedentulo Käyttöventtiilin vaihto kuva 4 Sulje vedentulo hanalle Irrota määränsäätö...

Page 9: ...Oire Syy Virtaama hanasta ajan myöten Suihkun siivilä likainen heikentynyt Hanasta ei tule vettä Säätöosan sihdit tukossa Hanalle ei tule vettä Hana aiheuttaa kolahtelua putkistossa Vedenpaine liian korkea Säätöliike tarpeettoman nopea ...

Page 10: ...er la température désirée en tournant le bouton de température remettre le bouton en place de telle sorte que l arrêt se trouve contre la butée face vers le haut entretien des filtres figure 3 couper l eau dévisser les filtres les rincer Si nécessaire les changer remonter les filtres ouvrir l eau et contrôler si tout est correct Entretien de l élément thermostatique figure 4 couper l eau retirer l...

Page 11: ...temperatur Plasser temperaturrattet ved sperregrensen og press det tilbake på plass Rengjøring utskifting av smussfilter fig 3 Skru av vannet Skru ut smussfiltrene Rengjør smussfiltrene Ved behov skiftes det til nye Monter sammen igjen Skru på vannet Kontroller at kranen virker som den skal Utskifting av kranoverdel fig 4 Skru av vannet Ta godt tak I mengderattet og trekk det av Skru av plastmutte...

Page 12: ...sjsilen er tilstoppet Smussfiltret er delvis tilstoppet Kranen gir ikke vann Smussfiltret er tilstoppet Kontroller at det kommer vann frem til kranen Kranen forårsaker bankende Vanntrykket er for høyt lyder i røropplegget Temperaturjusteringen skjedde for raskt ...

Page 13: ...туры обратно на шток таким образом чтобы кнопка ограничителя находилась вверху и примыкала к буртику ограничителя надавив на рукоятку регулировки температуры установите ее на свое место Очистка сетчатых фильтров рис 3 перекройте подачу воды на смеситель вывинтите сетчатые фильтры очистите фильтры либо замените их при необходимости на новые установите смеситель в душевую кабину откройте подачу воды...

Page 14: ... поступает из смесителя Вода не поступает на смеситель Засорение фильтрующих сеток узла регулировки С течением времени количество подаваемой воды уменьшается Засорение душевой сетки Смесительвызывает стук в трубопроводе Слишком быстрое регулирующее перемещение ...

Page 15: ...begränsningsskuldran knappen pekande uppåt Rengöring Byte av smutsfilter bild 3 Stäng av vattentillförseln till blandaren Lossa på smutsfilterinsatserna som sitter vid vattenanslutningarna Rengör filtren under rinnande vatten Byt vid behov Återmontera filterinsatserna och blandaren Öppna vattentillförseln och kontrollera blandningsfunktionen Byte av kranöverdel Bild 4 Stäng av vattnentillförseln t...

Page 16: ...m Orsak Flödet från blandaren minskar Duschhuvudet är fyllt med föroreningar Smutsfiltren I blandaren är förorenade Inget vatten kommer ur blandaren Smutsfiltren är blockerade Kontrollera att vatten kommer fram till blandaren ...

Page 17: ...17 20 ...

Page 18: ...18 20 ...

Page 19: ......

Page 20: ...land and in Olesno Poland Likewise the raw material and the components used in production are sourced from European suppliers For more information visit www oras com Det Norske Veritas Certification OY AB certifies that the Quality Management System of Oras Oy in Rauma Finland conforms to the ISO 9001 the Environmental Management System to the ISO 14001 standard and the Occupational Health and Saf...

Reviews: