background image

14

EN

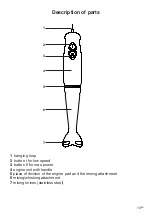
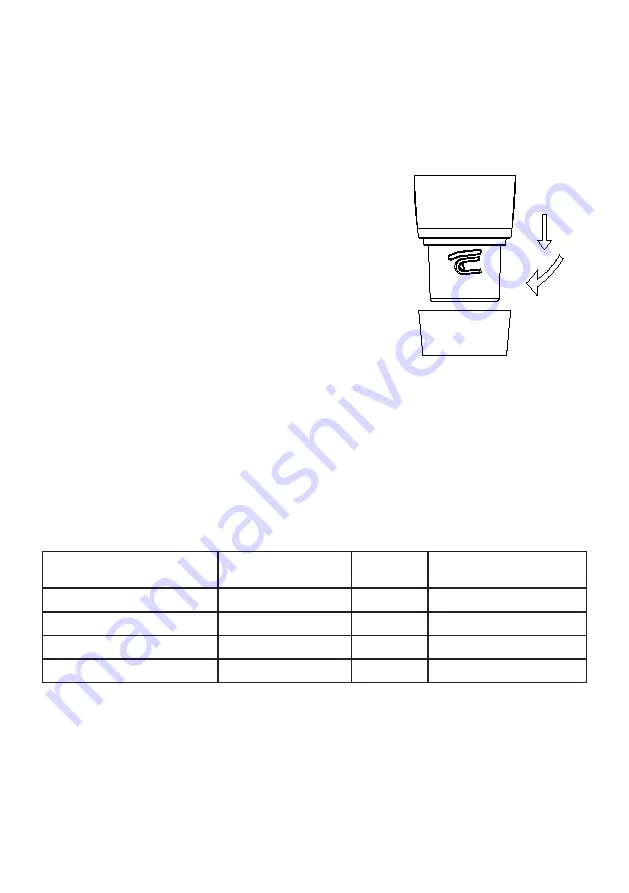
Assembling the mixing attachement and 

using with a engine unit 


Follow the steps below to prepare the machine for operation.

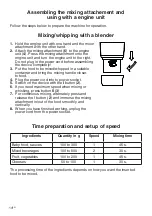
Mixing/whipping with a blender

1. 

Hold the engine unit with one hand and the mixer 

attachment with the other hand.

2. 

 Attach the mixing attachment (

6

) to the engine 

unit (

4

). Press the mixing attachment onto the 

engine unit and turn the engine unit to the right. 

Do not plug in the power cord before assembling 

the device completely!

3. 

 Put the food to be mixed/whipped in a suitable 

container and bring the mixing handle closer.

  to food.

4.

  Plug the power cord into to power socket.

5.

  Switch on the device with the 

I

 button (

2

).

6

.  If you need maximum speed when mixing or 

whisking, press button 

II

 (

3

).

7.

  For continuous mixing, alternately press and 

release the I button (

2

) and immerse the mixing 

attachment in/out of the food smoothly and 

vertically.

8.

  When you have finished working, unplug the 

power cord from the power socket.


Time preparation and setup of speed

Ingredients

Quantity in g

Speed

Mixing time

Baby food, sauces  

100 to 300

1

45 s.

Mixed beverages  

100 to 500

2

30 s.

Fruit, vegetables 

100 to 200

1

45 s.

Cheeses 

50 to 100

1

30 s.

The processing time of the ingredients depends on how you want the inserted 

food to be mixed.

Summary of Contents for RM-600

Page 1: ...1EN RM 600 Instruction manual Kitchen hand mixer EN RM 600...

Page 2: ...production conversion transmission distribution or use of electricity From the point of view of the purpose of using electricity the concept of electrical equipment in the strict sense of the word wil...

Page 3: ...vice in an industrial environment or outside environment Always keep the operating environment clean and well lit Do not place the device on an unstable surface Overriding or dropping the device may r...

Page 4: ...se any adapters or modify the socket in any other way Do not use inappropriate or damaged soclets To avoid electrical shock plug the power cables into properly grounded electrical outlets If the devic...

Page 5: ...only when under the supervision or guidance of the responsible person have been instructed to use the appliance in a safe way and understand the potential hazards Cleaning and user maintenance can be...

Page 6: ...ecialist workshop By doing so it is possible to achieve safety operational reliability and increased service life Do not disassemble the electric appliance The appliance works with a dangerous voltage...

Page 7: ...ecautions can be avoided if the following precautions are observed when operating and operating the device Danger of tearing or puncture of your fingers This symbol means that the product is made with...

Page 8: ...any way during transportation or use Do not use non original and incomplete parts of the device and its accessories There is a risk of serious injury There is a risk of electric shock Location Instal...

Page 9: ...container cover Only fill the container primary filling with the uncovered container when the appliance is turned off If you fill the foodstuff in the container during the operation of the appliance d...

Page 10: ...children Never leave your device freely accessible and do not leave it with a loose cord Children could download the device for a network cord Do not store the appliance with a wrapped cord around you...

Page 11: ...d or not working do not use the appliance Do not use the safety parts components for switching on or off switch off the device The machine s operating time is 1 minutes After 1 minutes stop operation...

Page 12: ...rial To remove any dirt from the device that may have formed during the packaging process clean the inside knives and cover with a dry lint free cloth When cleaning be careful not to injure yourself w...

Page 13: ...3 4 6 7 5 1 hanging loop 2 button I for low speed 3 button II for max power 4 engine unit with handle 5 place of division of the engine part and the mixing attachment 6 mixing whisking attachment 7 m...

Page 14: ...ing the mixing handle closer to food 4 Plug the power cord into to power socket 5 Switch on the device with the I button 2 6 If you need maximum speed when mixing or whisking press button II 3 7 For c...

Page 15: ...minutes Premixing produces a slurry Do not overfill the mixing bowl Fill the liquid container first then solid unless prescribed otherwise When mixing drinks you can put all the ingredients in the co...

Page 16: ...k to mix cheese and eggs and to quickly create mayonnaise or puddings Do not use the mixing rod to knead the dough Complete mixing Always add the food first into smaller pieces about 2 cm and mix Remo...

Page 17: ...n any part of the machine Wash the attachment immediately after use to prevent food residues from drying out Use a dish brush Never immerse the engine unit in water or any other liquid Wipe the engine...

Page 18: ...man health that would otherwise be caused by inappropriate disposal of this product For more detailed information about recycling of this product please contact your local authority your household was...

Reviews: