background image

15

EN

6

  Before adjusting the rest of the hair, try the iron on a small part of the hair and 

then adjust the temperature setting up or down as necessary.

  If you find that you need a higher temperature setting when straightening your 

hair, simply adjust the temperature to a higher temperature.

  If you find that your hair needs a lower temperature, lower it.
  Since the iron is already hot, it may take a few minutes to cool down. Repeat 

for other hair strands as needed.

7

   To create ripples, turn the wrist to turn the iron towards or away from the head 

while pulling the iron along the strand of hair.

8

   Repeat the process with all hair parts, working with the lower layers first, then 

continue with the top and side.

  When you have finished making adjustments, turn the unit off by pressing the 

ON/OFF switch for about 2 seconds, and then unplug the power cord from the 
wall outlet.

10 

Place the machine on a heat-resistant surface until it cools down.

11

 Adjust the hair with the desired product as necessary.

Automatic safety shutdown

After about one hour of operation, the iron switches off automatically for thermal 
protection.
Activate the iron again by pressing the ON/OFF switch.
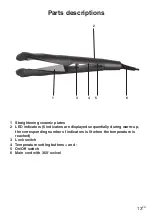
Hinge lock

This iron has a hinged hinge lock that makes it easy to store the iron.
To lock the iron, simply close the jaws and set the lock switch (3) to the locked 
position.
To unlock, slide the lock switch (3) to the unlock position.

Summary of Contents for Tenera

Page 1: ...Ceramic hair iron Tenera Tenera Instruction manual EN...

Page 2: ...view of the purpose of using electricity the concept of electrical equipment in the strict sense of the word will include the following categories household electric appliances information and commun...

Page 3: ...lame dripping or splashing water vibration and excessive mechanical stress insects animals and plants aggressive and chemical substances The operating environment of the device must always be in accor...

Page 4: ...RCD with a rated operating current not exceeding 30 mA To ensure the safety and correctness of the electrical installation consult a qualified electrician Only use a power cord with a plug mains lead...

Page 5: ...al equipment is installed connecting the protective covers are dismantled the electrical parts must not be accessible to the user when the installation is finished 1 4 Safety of persons This appliance...

Page 6: ...ecialist workshop By doing so it is possible to achieve safety operational reliability and increased service life Do not disassemble the electric appliance The appliance works with a dangerous voltage...

Page 7: ...Danger of damage to equipment or other damage to property This symbol alerts users that if not following safety instructions while using and operating the device Danger of burning from hot surfaces Th...

Page 8: ...nd free hair Dry your hair first with a towel Do not use the appliance to trim synthetic hair Do not use hair care equipment to treat animal hair Also take care with respect to possible parasite trans...

Page 9: ...risk of electrical short circuit There is a risk of electric shock If you use the appliance in the bathroom disconnect the power cord plug from the mains after use since the proximity of water in the...

Page 10: ...om the power supply The device contains parts that are very hot during operation Do not touch the hot surface of the device Only touch the handles Parts and accessories of the device that are warming...

Page 11: ...tion manual If you notice any unusual occurrences sounds odors smoke etc during use of the device switch off the device immediately and disconnect it from the power supply Have the appliance checked b...

Page 12: ...ture ready in 15 seconds Electronic temperature setting on LED 150 230 C ON OFF button High quality ceramic plates smooth gliding Automatic shutdown after 1 hour Long power cord in swivel joint Therma...

Page 13: ...2 LED indicators 5 indicators are displayed sequentially during warm up the corresponding number of indicators is lit when the temperature is reached 3 Lock switch 4 Temperature setting buttons and 5...

Page 14: ...mbol disappears 6 After the desired temperature has been set the device is ready for use in about 15 seconds when the temperature is reached and the corresponding indicators remain lit Use the device...

Page 15: ...t the process with all hair parts working with the lower layers first then continue with the top and side 9 When you have finished making adjustments turn the unit off by pressing the ON OFF switch fo...

Page 16: ...s become trapped Unplug the machine and allow it to cool before cleaning Wipe the machine with a soft clean cloth Store the device in a suitable case Warning Never immerse the device in water or any o...

Page 17: ...17EN Technical specifications Power supply 230 V 50 Hz Power 50 W Operating temperature 150 230 C Dimensions W x D x H 3 7 x 3 7 x 29 cm Weight 0 3 kg Subject to change...

Page 18: ...man health that would otherwise be caused by inappropriate disposal of this product For more detailed information about recycling of this product please contact your local authority your household was...

Reviews: