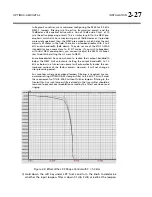
OPTIMOD-AM DIGITAL
INSTALLATION
2-17
For the following adjustments, use the appropriately labeled soft button to choose
the parameter you wish to adjust. To change a parameter (like an output level), you
must usually hold down the soft button while turning the knob. However, if there is
only one parameter on a screen, you can change this with the knob alone. (You do
not have to hold down a button.) Let the text on the screen guide you through the
process.
1.
Make sure that the transmitter is turned off.
This prevents transmitter damage caused by excessive modulation. You will set
the modulation level later in Quick Setup.
2.
Press the front-panel Setup button.
3.
Press the Quick Setup soft button when its label appears on the display.
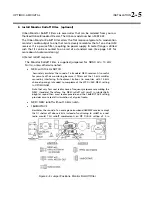
Quick Setup presents a guided sequence of screens into which you must insert in-
formation about your particular requirements. In general, the screens are self-
explanatory.
Use the
N
EXT
and
P
REV
buttons to navigate between screens. These buttons will
flash to indicate that they are active.
4.
Set the time, date, and Daylight Savings Time.
[Skip this step if you will be using an Internet timeserver to set time, date, and
Daylight Savings Time. See
Synchronizing Optimod to a Network Time Server
on
page 2-55. To skip this step, press the
N
EXT
button four times.]
A)
Press the
N
EXT
button.
The set time screen appears.
B)
Hold down the appropriate soft button while turning the knob to enter the
hour, minute, and seconds. Enter seconds slightly ahead of the correct time.
C)
Wait until the entered time agrees with the correct time. Then press the
E
NTER
T
IME
button to set the clock.
D)
Press the
N
EXT
button.
E)
Hold down the appropriate soft button while turning the knob to enter the
day, month, and year.
F)
Press the
N
EXT
or
E
NTER
D
ATE
button.
G)
Turn the knob to specify the date at which Daylight Savings Time begins in
your area.
H)
Press the
N
EXT
button.
I)
Turn the knob to specify the date at which Daylight Savings Time ends in your
area.
Summary of Contents for Optimod-AM 9400
Page 1: ...Operating Manual OPTIMOD AM 9400 Digital Audio Processor Version 1 2 Software...
Page 7: ...Operating Manual OPTIMOD AM 9400 Digital Audio Processor Version 1 2 Software...
Page 52: ......
Page 204: ......
Page 232: ......
Page 260: ......
Page 261: ...OPTIMOD AM DIGITAL TECHNICAL DATA 6 29...
Page 267: ...OPTIMOD AM DIGITAL TECHNICAL DATA 6 35 CPU Module...
Page 273: ...OPTIMOD AM DIGITAL TECHNICAL DATA 6 41 RS232 BOARD PARTS LOCATOR...
Page 275: ...OPTIMOD AM DIGITAL TECHNICAL DATA 6 43 8300 POWER SUPPLY PARTS LOCATOR...
Page 284: ...6 52 TECHNICAL DATA ORBAN MODEL 9400 DSP BOARD PARTS LOCATOR DRAWING 32170 000 14...
Page 292: ...6 60 TECHNICAL DATA ORBAN MODEL 9400 DISPLAY BOARD PARTS LOCATOR...
Page 293: ...OPTIMOD AM DIGITAL TECHNICAL DATA 6 61 DISPLAY BOARD...


