background image

SF 0440 


ASSEMBLY  


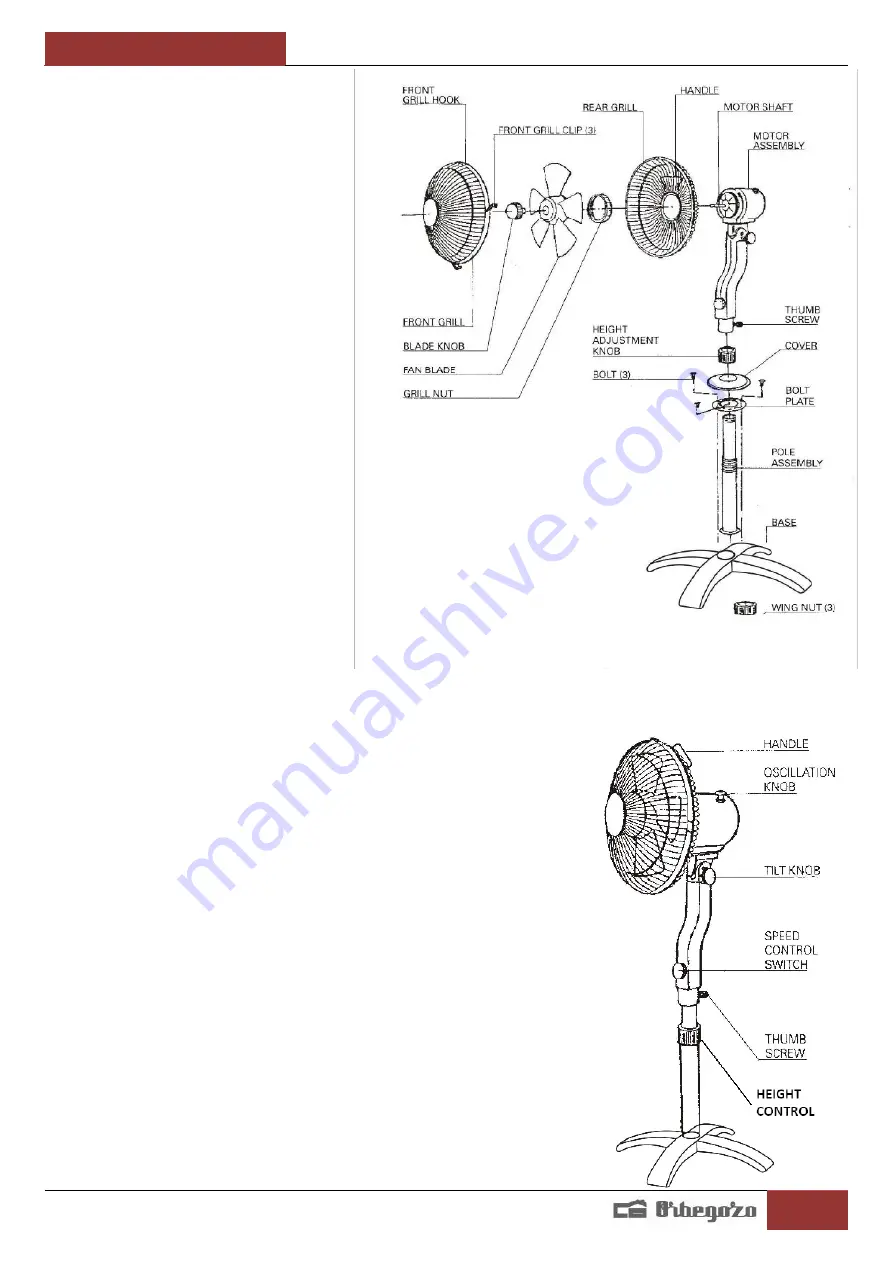
1. Remove all parts from the carton: 


Motor assembly, including: 

-


Grill nut and blade knob 


Grill set, front and rear 


Fan blade 


Pole assembly  


Base 


Component pack, including: 

-


Bolts  

-


Wing nuts 

-


Bolt plate  

-


Cover 


2. Assemble fan head 


Remove the grill nut and blade knob 

from the motor assembly, note that 
the blade knob is reverse threaded. 

Turn clockwise to remove from the 

motor shaft. 


Place the rear grill over the motor 
shaft and onto the motor. Assembly 

nothing that the handle should be 

positioned toward the top of the 
fan. The small plastic pin of the 

motor assembly should be aligned 

with the hole in the rear grill. 

Reattach the grill nut, turning 
clockwise to secure the rear grill to 

the motor assembly. 


Align the motor shaft with the “D” shaped hole of the fan blade. Fully insert the motor shaft into the fan 

blade, then secure with the blade knob, turning counter-clockwise. Do 
not overtighten. 


Place the front grille facing the rear and joins with the locking ring. 

Tighten the screw ring so that the grid is firmly united. 


3. Base assembly 

1.


Forms a cross with the base and insert the tube through the center of 

the cross and secure with the nut. 

2.


Lengthen the tube and join with the motor body. Tighten the screw 

to secure the union. 

 
4. Final assembly 


Twist the thumb screw at the bottom of the motor assembly counter-

clockwise until no threaded portion is visible within.  


Place the chrome end of the pole assembly within the hole at the 
bottom of the motor assembly and fully insert. If the pole will not fully 

insert, the thumb screw must be further loosened. Twist the thumb 

screw clockwise to tighten the motor assembly to the pole and fan 

assembly is now complete.  


OPERATION 


Place the assembled fan on a flat, level, firm and dry surface. 


Plug the power cord into a polarized 230 volt AC wall outlet. 

Summary of Contents for 8436011054312

Page 1: ...mejores resultados y la máxima seguridad de uso Read this manual carefully before running this appliance and save it for reference in order to obtain the best results and ensure safe use Veuillez lire attentivement ce manuel avant d utiliser cet appareil et conservez le pour toute consultation future C est la seule façon d obtenir les meilleurs résultats et une sécurité optimale d utilisation Leia...

Page 2: ...y su cable fuera del alcance de los niños menores de 8 años 4 PRECAUCIÓN Para la seguridad de sus niños no deje material de embalaje bolsas de plástico cartón polietileno etc a su alcance 5 Si el cable de alimentación está dañado debe ser sustituido por el fabricante el servicio técnico o cualquier otro profesional cualificado 6 No desconecte nunca tirando del cable 7 No lo ponga en funcionamiento...

Page 3: ...o asegúrese de colocarlo sobre una superficie plana y estable para evitar que vuelque NO USE el ventilador en una ventana La lluvia puede ocasionar un peligro de naturaleza eléctrica No deje el ventilador en funcionamiento cerca de donde se haya recogido agua para evitar posibles riesgos de carácter eléctrico Utilice este ventilador únicamente para su uso debido Desconecte el aparato cuando no est...

Page 4: ...e girarse hacia la derecha para sacarla del eje Coloque la rejilla posterior sobre el eje y sobre el motor La manija debe quedar en la parte superior del ventilador El pequeño pin del motor debe estar alineado con el orificio en la rejilla posterior Vuelva a colocar la tuerca girándola hasta la derecha para fijar la rejilla posterior al motor Alinee el eje con el orificio en forma D de las aspas I...

Page 5: ...ángulo de aproximadamente 900 y de arriba abajo 450 aproximadamente CUIDADO LIMPIEZA Y MANTENIMIENTO Las aspas y las rejillas se deben limpiar regularmente para su mejor funcionamiento Desconecte el ventilador y siga las instrucciones de montaje en sentido inverso para quitar las aspas y las rejillas antes de limpiarlas Limpie con un paño húmedo y seque con una toalla seca Nunca sumerja ninguna pi...

Page 6: ... reach of children less than 8 years old 4 WARNING In order to ensure your children s safety please keep all packaging plastic bags boxes polystyrene etc out of their reach 5 If the supply cord is damaged it must be repaired by the Authorized Service Agent 6 Never pull on the cord when unplugging 7 Do not use the unit with a damaged cord or plug or if it is not working properly 8 Do not handle the...

Page 7: ...rical hazard Make sure to keep the fan far away from humidity chemical articles and oil Use fan only for intended use as described in instruction manual Unplug from outlet when not in use when moving fan from one location to another and before cleaning Avoid contacting moving parts Do not let cord hang over edge of table or counter or touch hot surfaces Do not hang or mount fan on a wall or ceilin...

Page 8: ...aft into the fan blade then secure with the blade knob turning counter clockwise Do not overtighten Place the front grille facing the rear and joins with the locking ring Tighten the screw ring so that the grid is firmly united 3 Base assembly 1 Forms a cross with the base and insert the tube through the center of the cross and secure with the nut 2 Lengthen the tube and join with the motor body T...

Page 9: ...tion pull up on the oscillation knob CARE CLEANING STORAGE The fan blade and grill set should be cleaned regularly for most efficient operation Unplug the fan then reserve the assembly procedure to remove those parts from the motor assembly before cleaning Wipe with a damp cloth then towel dry Never immerse any fan components in water Wipe the fan only with a dry or slightly moist cloth then immed...

Page 10: ...appareil 3 Gardez l appareil et le câble à la portée des enfants de moins de 8 ans 4 ATTENTION Par mesure de sécurité vis à vis des enfants ne laissez pas les emballages sac en plastique carton polystyrène a leur portée 5 Si le cordon d alimentation est endommagé adressez vous à un service technique agréé 6 Ne débranchez jamais en tirant du cordon 7 Ne jamais le faire fonctionner si le cordon ou l...

Page 11: ... Ne laissez pas le câble trîner sur une table ou dans un coin et ne le laissez pas au contract d objets chauds Ne suspendez pas le ventilateur Ne l accrochez pas à un mur ou au plafond Lors du nettoyage assurez vous de ne pas l éclabousser et n utilisez pas d huile d alcool ou de produits chimiques qui pourraient causer une déformation du corps du ventilateur et provoquer des risques électriques É...

Page 12: ...r dans le sens des aiguilles d une montre pour le sortir de l axe Placez la grille arrière sur l axe et sur le moteur La manette doit rester sur la partie supérieure du ventilateur Le petit axe du moteur doit être aligné avec l orifice de la grille arrière Remettez l écrou en le tournant dans le sens des aiguilles d une montre pour fixer la grille arrière au moteur Alignez l axe sur l orifice en f...

Page 13: ...r tourne d un côté à l autre avec un angle d environ 90º et de haut en bas environ 45º NETTOYAGE ET ENTRETIEN Pour un meilleur fonctionnement l hélice et les grilles doivent être nettoyées régulièrement Débranchez le ventilateur et suivez les instructions de montage en sens inverse pour retirer l hélice et les grilles avant de les nettoyer Nettoyez avec un chiffon humide et séchez avec une serviet...

Page 14: ...de 3 Mantenha o aparelho e o seu cabo fora do alcance de crianças menores de 8 anos 4 PRECAUCÃO Para a seguranca dos seus filhos nao deixe partes da embalagem sacos plasticos papelao esferovite etc ao alcance dos mesmos 5 Se o cabo de ligação estiver danificado recorra a um serviço técnico autorizado 6 Nunca desligue o aparelho puxando pelo cabo 7 Não ponha em funcionament se o cabo ou a ficha est...

Page 15: ...que se de que a ventoinha se encontra numa superfície estável e plana quando estiver a funcionar para evitar a queda da mesma NÃO utilize a ventoinha colocada sobre o parapeito de uma janela A chuva pode criar um risco de choque eléctrico Não deixe a ventoinha a funcionar perto de uma área onde se acumulou água para evitar um potencial risco eléctrico Mantenha a ventoinha afastada da humidade arti...

Page 16: ... da Ventoinha Retire a porca da grelha de protecção do conjunto do motor tendo em mente que o botão da lâmina é de rosca invertida Rode no sentido dos ponteiros do relógio para retirar da haste do motor Coloque a grelha de protecção traseira por cima da haste do motor e sobre o conjunto do motor tendo o cuidado de posicionar a pega por cima da parte superior da ventoinha O pino plástico pequeno do...

Page 17: ...inha a oscilar pressione o botão de oscilação situado na parte superior do conjunto do motor A cabeça do motor irá oscilar de um lado para o outro num ângulo de aproximadamente 90º e de cima para baixo aproximadamente 45º CUIDADOS LIMPEZA E ARMAZENAMENTO A lâmina da ventoinha e as grelhas de protecção devem ser limpas regularmente para garantir um funcionamento mais eficiente Desligue a ventoinha ...

Reviews: