A016.17.51256
Noviembre, 2002
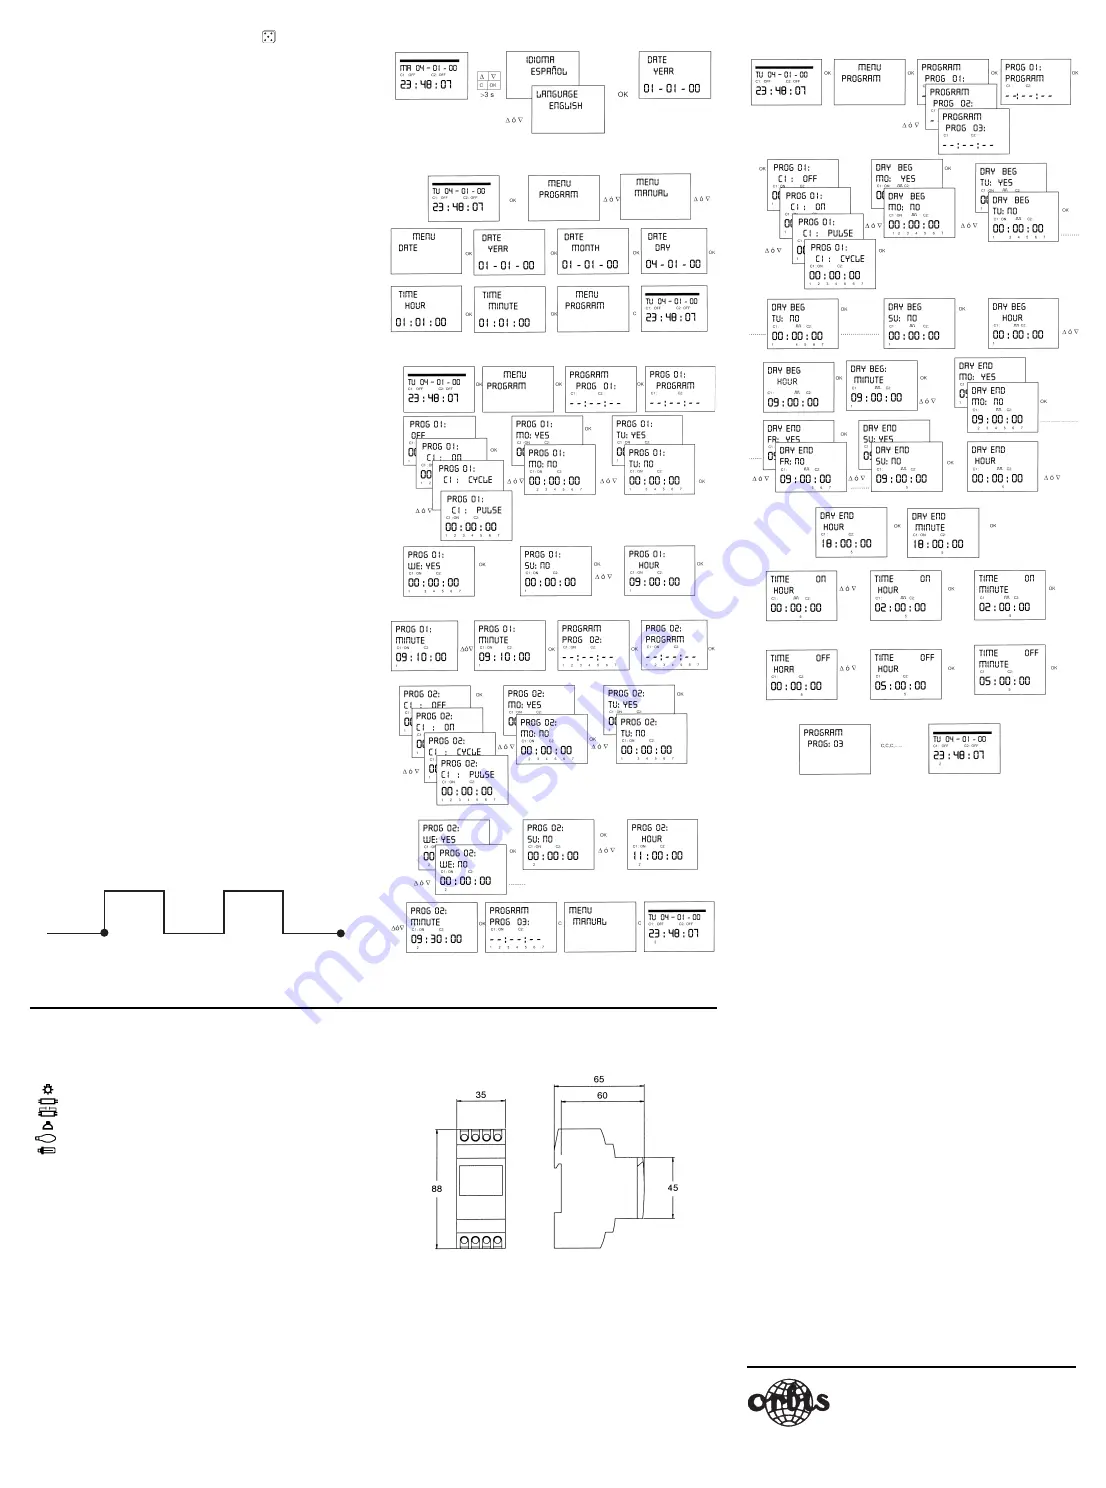
DIMENSIONS
LANGUAGE SELECTION
PROGRAMMING ON: Monday 09:10 OFF: Tuesday 11:30
PROGRAMMING CYCLE. START DAY: Monday 09:00. END DAY: Friday 18:00. ON: 2h OFF: 5h.
CLOCK SETTING
Monday 9:00 h
2h20min. OFF
Time ON
Time OFF
Begin day
Day end
Friday 13:00 h
Time ON
ORBIS TECNOLOGÍA ELÉCTRICA, S.A.
Lérida,61
Tel.: + 34 91 567 22 77
E-28020 MADRID
Fax: + 34 91 571 40 06
E-mail: info@orbis.es
http://www.orbis.es
TECHNICAL FEATURES
Power supply:
As indicated on the device
Switching capacity:
2x16 (10)A/250V~
Maximum recomended loads:
Incandescent lamps.
3000 W.
Uncompensated fluorescent lamps. 1200 W.
Compensated fluorescent lamps.
1200 W. 150 μF.
Low- voltage halogen lamps.
1000 VA.
Halogens (230 V.).
2500 W.
Low-consumption lamps-
10X23 W.
Contact type and material:
Changeover AgSnO
2
Power consumption:
8 VA 2 circuit (approx.1 W)
Number of programs:
50
Type of programs:
ON OFF
PULSE (1 to 59 seconds)
CYCLES (from 1 minute to 23hours
59 minutes, in ON or OFF times)
Switching accuracy:
Better than 1 second
Operating accuracy:
≤ ± 1s/day at 23ºC
Reserve battery:
5 years. (Lithium Battery)
Working temperature:
-10 ºC to +45 ºC
Protection type:
IP 20 according to EN 60529
Protection class:
II according to EN 60335 when
mounting as intended
random programs has been selected, the symbol will be displayed
on display.
In random mode, programmed switches are not carried out.
COUNTER
To monitor the length of time (number of hours) the circuit C1 or C2 has
been active (C1 ON) or (C2 ON), selecting the EXTRAS COUNTER
option displays the number of hours to 4 figures (up to 9999 hours).
This counter is not zeroed when the device is reset.
In normal operating mode, press “OK“ and use the
Δ
and
∇
keys to find
EXTRAS COUNTER. Pressing “ OK “ again brings up COUNTER C1 on
display and the number of hours the circuit has been on to four figures.
Use
Δ
and
∇
to select COUNTER C2.
Press “ C “ repeatedly to go back to normal operation.
If you wish to erase the counter, from the display showing the number
of " ON " hours, press “ OK “ and CONT C1 CLEAR or CONT C2 CLEAR
will be displayed on display. Press “OK“ again and the display will show
CLEAR C1 YES or CLEAR C2 YES. Use
Δ
and
∇
to choose between
YES and NO and confirm pressing “ OK “. Press the “ C “ key repeatedly
to go back to normal operating mode.
12 (AM – PM) or 24-HOUR TIME MODE
You can choose between the time being displayed in AM : PM or
24-hour format. In normal operating mode, press “ OK “ and use
Δ
and
∇
to find EXTRAS 12/24H. From this menu, choose 12H or 24H and
confirm with “ OK “. Press the “ C “ key repeatedly to return to normal
operating mode. If the 12h function has been chosen, AM or PM will be
shown on display, depending on the current time.
CYCLE PROGRAMMING
A cycle is a sequence of repetitive switches. Each programmed cycle
takes up two memory spaces (PROG X, PROG X+1).
Go into the MENU PROGRAM and press “ OK “. Use the
Δ
and
∇
keys
to choose a program (PROG XX), press “ OK “ again and PROG (XX)
PROGRAM will be displayed. Confirm with “ OK “ and C1:ON will be dis-
played. Select CYCLE. To programm cycles in circuit 2, select “ ----- “
and validate by pressing key “ OK “, then displays shows C2: ON, with
keys
Δ
and
∇
select CYCLES. Press “ OK “, and you will see DAY BEG
MO: YES (to allow you to select the starting day for the cycle). If you
want it to begin on Monday, press “ OK “, otherwise use the
Δ
and
∇
keys until DAY BEG MO: NO appears on the display. Press “ OK “ to
accept and repeat the operation for the other days of the week, selec-
ting and confirming them in the same way.
When you have chosen the days, you need to select the start time for
the cycle, beginning with the hour. Use the
Δ
and
∇
keys to enter the
hour and confirm with “ OK “ Enter the cycle start minutes in the same
way, and when you confirm “ OK “, DAY END MO: YES (to allow you to
select the last day for the cycle) will be displayed. Repeat the same pro-
cedure to enter the days, hours and minutes for conclusion of the cycle.
Next, the cycle connection time (TIME ON ) needs to be programmed.
Enter the figures for hours and minutes (maximum 23 hours 59 minu-
tes.- minimum 0 hour 1 minute) and then the cycle disconnection time
(TIME OFF) in hours and minutes (maximum 23 hours 59 minutes.-
minimum 0 hour 1 minute). (See exemple )
Before programming, check that the next memory program is free. It is
it not free, option CYCLE will not then be available. CYCLE programs
are not permited in memory program 50. Do not program averlaped
cycles, as during the execution of one cycle, the overlaped cycle will not
start.
Cycles are shown in chronogram as ON from begining to the end.


