background image

Página 4 de 6 

ƒ


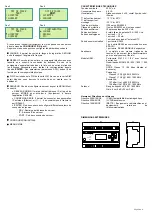
NOMINAL: Changes the ESDONI to NOMINAL status. 

ƒ


OFF: Changes the ESDONI to DISCONECTED status. 

ƒ


REDUCED 1: Changes the ESDONI to REDUCED 1 status. 

ƒ


REDUCED 2: Changes the ESDONI to REDUCED 2 status. 

ƒ


REDUCED 3: Changes the ESDONI to REDUCED 3 status. 

ƒ


REDUCED 4: Changes the ESDONI to REDUCED 4 status. 

 
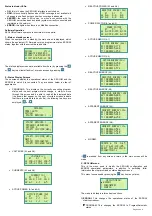
Each ESDONI status change requires confirmation via the keypad in 
order to avoid false activations as shown in the following example: 


If OK is entered, the ESDONI will change its status to PROGRAM. 


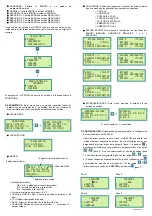
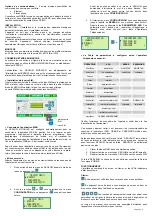
2) PARAMETERS.

 This menu allows the display of all configuration or 

measurement parameters, providing more complete information than 
the status screens. 


ƒ


DATE/TIME 


ƒ


POSITION 


ƒ


MODEM 


  Modem status:  

1 to 4 –modem start-up status. 
El 5 – waiting for GSM network registration. 
El 6 – registered in the GSM network. 

  Internal modem temperature: in ºC. 

  GSM coverage: in dBm. Optimum coverage greater than -85 

dbm. 

  IP: dynamic IP assigned to the equipment. 

  SERV: WEB platform server address. 

  CONNECTION: Server connection status. 1 – connected / 0 – 

disconnected. 


ƒ


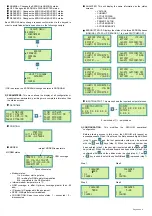
ANALYZER. This will display the same information as the status 
screens. 

-


VOLTAGE 

-


CURRENT 

-


ACTIVE POWER 

-


REACTIVE POWER 

-


POWER FACTOR  

-


ACTIVE ENERGY 1 

-


ACTIVE ENERGY 2 


ƒ


ESDONI STATUS. Displays the status of the three ESDONI phases 
(NOMINAL, START-UP, REDUCED 1 to 4, and SWITCHED OFF). 


ƒ


INPUTS/OUTPUT. This menu shows the input and output statuses. 


0 – switched off / 1 – switched on. 


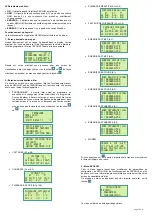
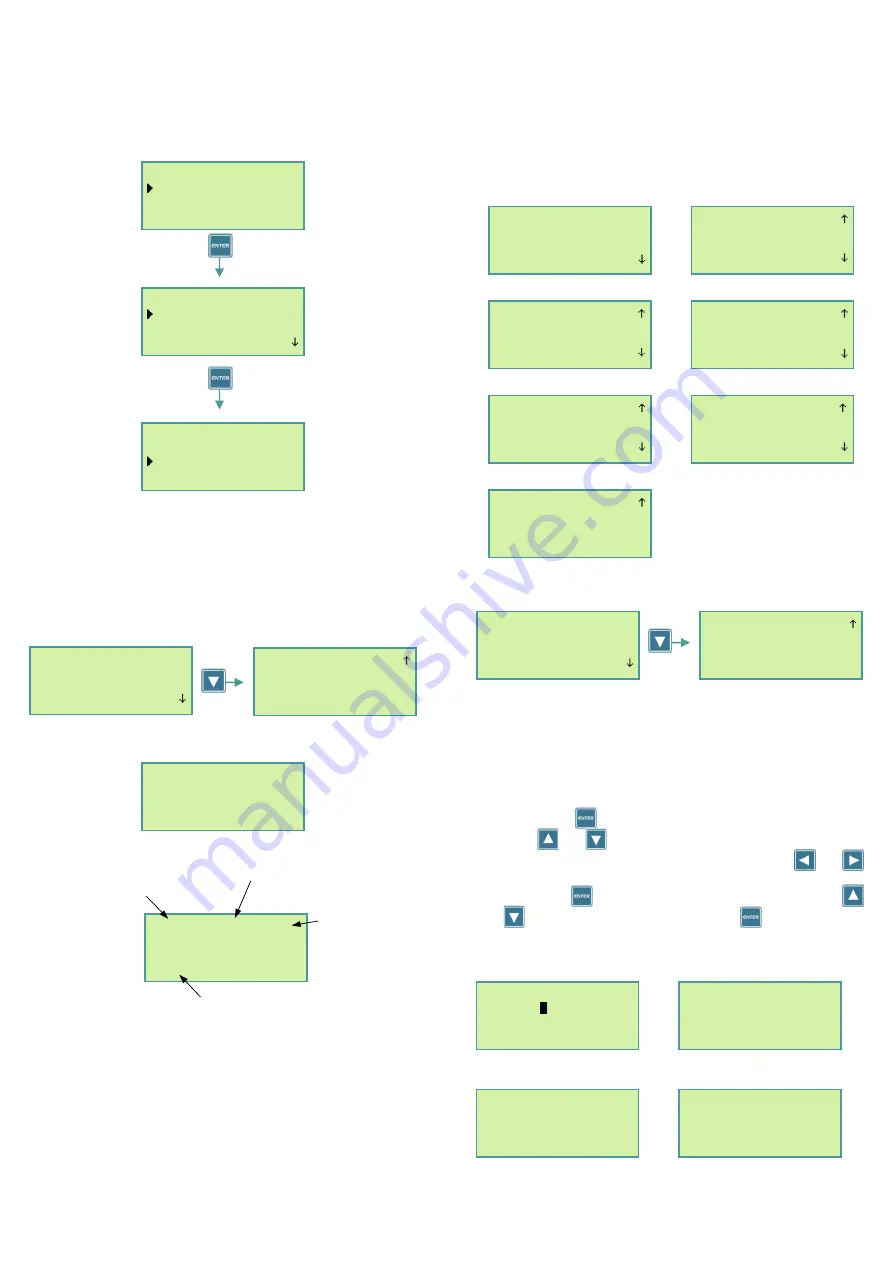
3) CONFIGURATION.

 This modifies the XEOLUM operational 

configuration.  
 
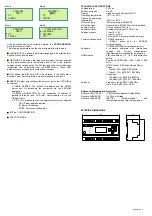
Before allowing access to this menu, the XEOLUM will request an 
access password. When it is entered, the first password digit will flash 

(step 1), press 

 and the first password number can be entered 

with the


 and 

 keys (step 2). When the desired number has 

been entered (step 3), the next digit is selected with the 

 and 


keys (step 4). When the entire password has been written (step 5) it is 

confirmed with 

 and the edition mode is exited (step 6). The 


or 

 key is used to select the option 

OK

 and 

 is pressed (step 7). 


Step 1 

Step 2 


Step 3 

Step 4 


Xeolum menu 

 ESDONI  

> Parameters 
> config 

       esdoni 

 program  

> Nominal 
> off                 

WANT TO CHANGE 

Program 

 OK  

> cancel 

     Time/date 
Time; 14;56;05        

date; 12/05/12 MO 
DAWN; 07;06;00        

Time; 14;56;05        
date; 12/05/12 Mo 
DAWN; 07;06;00 
DUSK; 21;17;00  

      Position 
Lat; 40.528183 
Long; -3.656806 

MODEM; 6  T34  C-65 


IP; 176.81.199.205 
SERV; 70.210.110.20 
CONNECTION; 1


MODEM status 

Internal MODEM temperature 

GSM coverage 

Connection status 

   esdoni Status     
Phase r       v;0.00  
 ESTATE; ---         
 Alarm; DISCONECTED   

Phase r      v;0.00   
 ESTATE; ---         
 Alarm; DISCONECTED   
Phase s      v;0.00   

 ESTATE; ---          
 Alarm; DISCONECTED   
Phase s       v;0.00  
 ESTATE; ---          

 Alarm; DISCONECTED   
Phase s       v;0.00  
 ESTATE; --- 
 Alarm; DISCONECTED   

Phase s      v;0.00   
 ESTATE; ---         
 Alarm; DISCONECTED   
Phase t      v;0.00   

 ESTATE; ---          
 Alarm; switched off  
Phase t       v;0.00  
 ESTATE; ---          

 Alarm; DISCONECTED   
Phase T       v;0.00  
 Status; --- 
 Alarm; DISCONECTED 

  Inputs/outputs 
Inputs 
0 0 0 0 0 0 0 0 0 0   
outputs               

Inputs                
0 0 0 0 0 0 0 0 0 0   
outputs 
0 0 0 0    

      password 
        

0

000 

> OK 
> CANCEL 

      password 
        _000 
> OK 
> CANCEL 

      password 
        5000 
> OK 
> CANCEL 

      password 
        5_00 
> OK 
> CANCEL 

Summary of Contents for XEOLUM MODULAR

Page 1: ...el sistema modo normal reducido test etc Modificar la programaci n del reloj astron mico Modificar las tensiones en los diferentes periodos de reducido as como los tiempos de arranque Modificaci n los...

Page 2: ...o de reposo pulsando 2 Con las teclas o seleccionamos el men CONFIGURACI N y pulsando entramos en l Antes de poder acceder a este men el XEOLUM nos pedir que introduzcamos el password de acceso Para i...

Page 3: ...y A2 FACTOR DE POTENCIA A1 y A2 ENERGIAS ACTIVAS A1 ENERGIAS ACTIVAS A2 ENERGIAS REACTIVAS A1 ENERGIAS REACTIVAS A2 ENERGIAS APARENTES A1 ENERGIAS APARENTES A2 MODEM Si pulsamos desde cualquier panta...

Page 4: ...tradas y salidas 0 desconectada 1 conectada 3 CONFIGURACI N Desde donde podemos cambiar la configuraci n de funcionamiento del XEOLUM Antes de poder acceder a este men el XEOLUM nos pedir que introduz...

Page 5: ...STICAS T CNICAS Tensi n nominal 230 V c a Consumo propio 4 8 VA Visualizador Alfanum rico 4x20 cristal liquido retroiluminado T de funcionamiento 10 C a 45 C T de transporte y almacenamiento 20 C a 6...

Page 6: ...SALIDA LINEA L N MANDO REDUCIDO 230 Vc a N R S T ENTRADA LINEA ENTRADA SALIDA A CIRCUITOS N L1 L2 L3 1 2 3 N L 4 5 6 N L 1 2 3 4 5 6 CONTACTOR 230V L N Corriente A2 R S T CN4 C M ESTATIC 18RE CN1 1 2...

Page 7: ...e start up times Modify the alarm warning thresholds Incorporated astronomical clock function The equipment includes a built in astronomical clock that allows the time zone to be automatically program...

Page 8: ...nu and press to enter it Before allowing access to this menu the XEOLUM will require an access password This is entered by following the steps described in the CONFIGURATION menu description 3 Select...

Page 9: ...ENERGY A1 ACTIVE ENERGY A2 REACTIVE ENERGY A1 REACTIVE ENERGY A2 APPARENT ENERGY A1 APPARENT ENERGY A2 MODEM If is pressed from any screen a return to the main screen will be made 3 XEOLUM menu This...

Page 10: ...off 1 switched on 3 CONFIGURATION This modifies the XEOLUM operational configuration Before allowing access to this menu the XEOLUM will request an access password When it is entered the first passwor...

Page 11: ...CATIONS Voltage rating 230 Vac Self consumption 4 8 VA Display Alphanumeric 4x20 backlit LCD Operating temperature 10 C to 45 C Transport and storage temperature 20 C to 60 C Protection type IP20 acco...

Page 12: ...T R S T TENSIONES V CORRIENTE I R S T R S T TENSIONES V CORRIENTE I SALIDAS 230V AC A B G Tx Rx G RS485 1 RS485 2 RS232 GND A B G 1 2 3 4 A1 A2 N R S T N LINE OUTPUT L N DIMMING CONTROL 230 Vc a N R...

Page 13: ...onnect s Datalogger Changer l tat de fonctionnement du syst me mode normal r duit test etc Modifier la programmation de l horloge astronomique Modifier les tensions dans les diff rentes p riodes de r...

Page 14: ...mode de repos en appuyant sur 2 Avec les touches ou nous s lectionnons le menu CONFIGURATION et en appuyant sur nous entrons dans celui ci Avant de pouvoir acc der ce menu le XEOLUM nous demandera d...

Page 15: ...NTS A1 et A2 PUISSANCE ACTIVE A1 et A2 PUISSANCE R ACTIVE A1 et A2 FACTEUR DE PUISSANCE A1 et A2 NERGIES ACTIVES A1 NERGIES ACTIVES A2 NERGIES R ACTIVES A1 NERGIES REACTIVAS A2 NERGIES APPARENTES A1 N...

Page 16: ...0 d connect e 1 connect e 3 CONFIGURATION D o nous pouvons changer la configuration de fonctionnement du XEOLUM Avant de pouvoir acc der ce menu le XEOLUM nous demandera d introduire le mot de passe d...

Page 17: ...RISTIQUES TECHNIQUES Tension nominale 230 V c a Consommation propre 4 8 VA Visualisateur Alphanum rique 4x20 cristal liquide retro illumin T de fonctionnement 10 C 45 C T de transporte et stockage 20...

Page 18: ...R S T TENSIONES V CORRIENTE I R S T R S T TENSIONES V CORRIENTE I SALIDAS 230V AC A B G Tx Rx G RS485 1 RS485 2 RS232 GND A B G 1 2 3 4 A1 A2 N R S T N SORTIE LIGNE L N COMMANDE R DUITE 230 Vc a N R S...

Reviews: