11
(56)
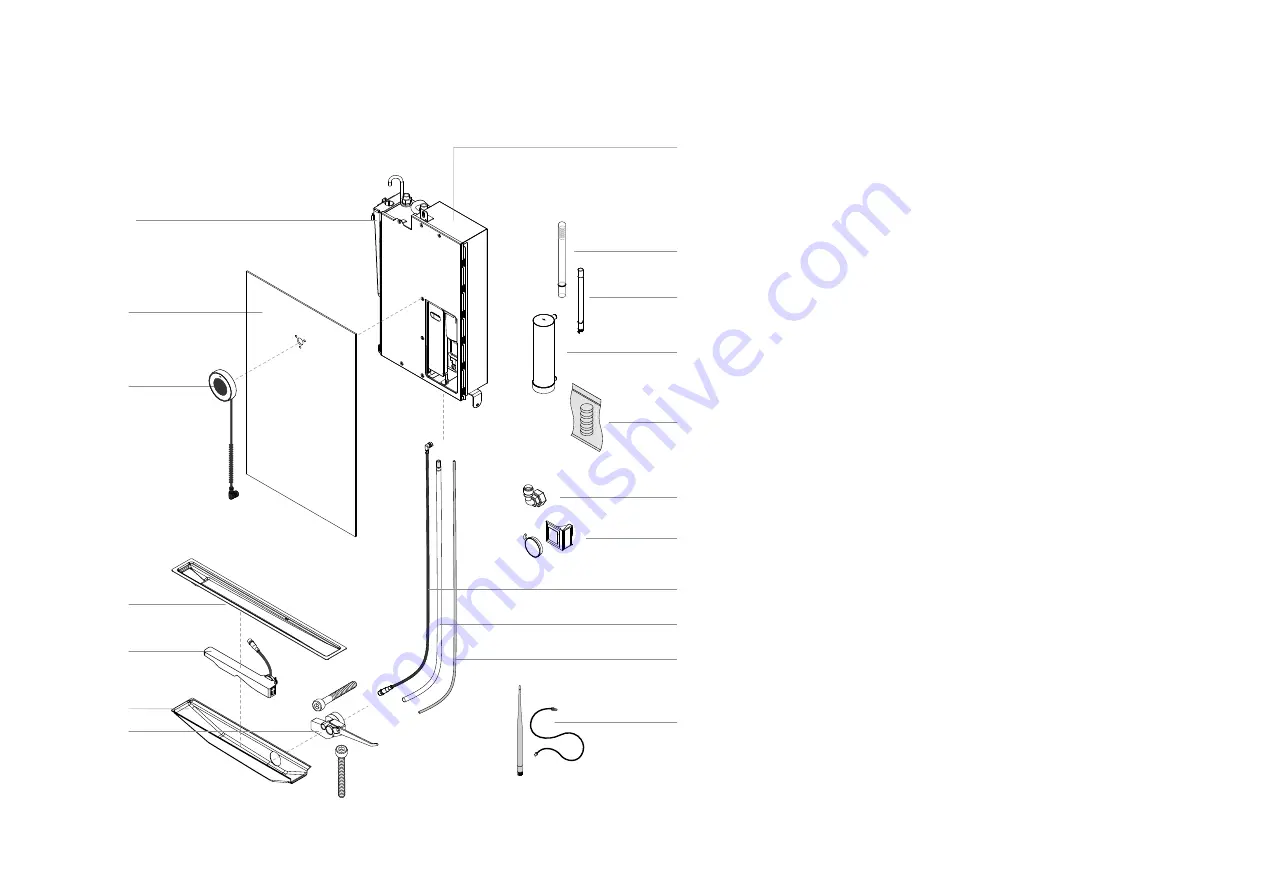
C O M P O N E N T OV E R V I E W
Ins
talling the Sho
w
er Unit
1
2
14
15
16
17
3
18
13
4
5
6
12
7
8
9
10
11
1.
2.
3.
4.
5.
6.
7.
8.
9.
10.
11.
12.
13.
14.
15.
16.
17.
18.
Hose Connection
Indo Core
Indo Panel
Panel Lock + Magnetic Key
Funnel
Smart Sensor Unit
Sensor Tank
Sensor Cable
Recirculation Hose
Flush Hose
Smart Sensor Lock
+ half thread M4 (3 Hex), x1
+ full thread M4 (3 Hex), x1
WiFi Cable and Antenna
Air Gap Tank
Quartz Glass
UV Lamp
Filter Capsule
Descaling tablet
Control Dial
Ins
talling the Sho
w
er Unit
Summary of Contents for Oas
Page 1: ...Oas Indo Shower Unit Installation Oas Indo EU 190528 ...
Page 2: ...2 56 Introduction Safety Messages This manual applies to model OS8732 Ei2 ...
Page 10: ...10 56 INSTALLING THE SHOWER UNI T watch video https bit ly 2QNFVLP ...
Page 12: ...12 56 Installing the Shower Unit Remove Panel Template x8 M3 5 5mm driver ...
Page 13: ...13 56 Installing the Shower Unit ...
Page 14: ...14 56 270 mm Installing the Shower Unit ...
Page 15: ...15 56 Installing the Shower Unit Apply lubricant ...
Page 17: ...17 56 Installing the Shower Unit x1 Full thread M4 3 Hex ...
Page 18: ...18 56 Installing the Shower Unit Tighten with pliers to secure water tightness ...
Page 19: ...19 56 Installing the Shower Unit ...
Page 21: ...21 56 Installing the Shower Unit ...
Page 22: ...22 56 Installing the Shower Unit ...
Page 23: ...23 56 Installing the Shower Unit ...
Page 24: ...24 56 Installing the Shower Unit ...
Page 25: ...25 56 Installing the Shower Unit x1 M8 Socket Head ...
Page 26: ...26 56 Installing the Shower Unit Make sure to have correct alignment against thread ...
Page 28: ...28 56 Installing the Shower Unit Provided by client ...
Page 29: ...29 56 Installing the Shower Unit ...
Page 30: ...30 56 Installing the Shower Unit ...
Page 31: ...31 56 Installing the Shower Unit ...
Page 32: ...32 56 Installing the Shower Unit ...
Page 33: ...33 56 Installing the Shower Unit Mount Indo Panel x8 M3 5 5mm driver ...
Page 34: ...34 56 Make sure the gasket is placed in the circular groove Installing the Shower Unit ...
Page 35: ...35 56 Installing the Shower Unit ...
Page 36: ...36 56 x3 M4 Hex 2 5 mm Installing the Shower Unit ...
Page 37: ...37 56 Installing the Shower Unit ...
Page 38: ...38 56 Make sure to have correct alignment against thread Installing the Shower Unit ...
Page 39: ...39 56 Installing the Shower Unit ...
Page 40: ...40 56 Installing the Shower Unit ...
Page 41: ...41 56 Installing the Shower Unit ...
Page 42: ...42 56 Installing the Shower Unit ...
Page 43: ...43 56 Adjust Indo Panel angle Installing the Shower Unit Secure Adjust x2 M3 nut x2 M3 nut ...
Page 44: ...44 56 Installing the Shower Unit Adjust Indo Panel depth ...
Page 45: ...45 56 Installing the Shower Unit Shower Unit installed Next step Installing the Shower Head ...
Page 46: ...46 56 INSTALLING THE SHOWER H E AD ...
Page 51: ...51 56 Apply lubricant to PEX Hose inside of Shower Head Arm Installing the Shower Head ...
Page 52: ...52 56 Installing the Shower Head Shower Head installation completed ...
Page 54: ...54 56 INSTALLING THE HAND SHOWE R ...
Page 55: ...55 56 1 2 1 2 Hand Shower Shower Hose COM PONE NT OVERVIEW Installing the Hand Shower ...
Page 56: ...56 56 Installing the Hand Shower ...
Page 57: ...C E R T I F I E D S PA C E T E C H N O L O G Y ...


