ORBITALUM TOOLS GmbH
D-78224 Singen www.orbitalum.com
[REV. 20200310] OHX25P_BA_847060201_00__INH-02_EN
48
Setup and assembly
HX 12P, HX 25P
ENGLISH
8.7.2 Unclamping the weld head (after the welding process)
1. Open the swivel clamp.
2. Hold the weld head with 2 hands.
3. Press the blue switch. To support withdrawal a vacuum is present at the clamping piston for approximately 3 seconds so that it
can be returned to its initial position more easily.
4. The weld head can now be removed from the heat exchanger tube.
8.8
carrying out the gas and coolingliquid function test
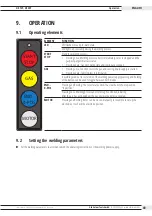
1. Press the
GAS
button to carry out the function test of the gas and cooling-liquid supply.
2. At the initial operation or if the weld head is not filled, wait 1 minute until the weld head is filled with cooling liquid.
3. Press the
GAS
button to terminate the function test.
8.9
connecting the accessories
The Orbitalum original accessories are available under the following sources:
• Catalog “Orbital Welding”
• Orbital welding power supply and accessories
• HX and ORBIWELD accessories
X
Connect suitable accessories.
8.10 configuring the welding procedure
X
Configure the welding procedure in accordance with the operating instructions of the welding power supply.
The weld head is ready to use.
8.11 calibrating the motor
If several weld heads of the same type are in use, Orbitalum Tools GmbH recommends that the motors be calibrated before use.
The calibration of the motors ensures that saved programs on all the weld heads produce the same result.
X
Calibrate the motors in accordance with the ORBIMAT operating instructions.

