background image

ORBIMAT 180 SW

  |  Operating instructions 


Operation

(17.09.18) OW_ORBIMAT_180SW_BA_850060202_00_EN 

 orbitalum tools

 GmbH, D-78224 Singen, www.orbitalum.com, Phone +49 (0) 77 31 792-0

        47

3.  Select the procedure.

If an unsaved procedure is loaded in the RAM, another procedure cannot be loaded. A warning is 
displayed:  
"

Cancel

": The procedure call is cancelled. The main menu appears.  

"

No

": The unsaved procedure is not saved, and any adjustments made are lost. The selected proce-

dure is called up.  
"

Yes

": The unsaved procedure is saved. The main menu appears.

If unsaved procedures are saved or adjustments were rejected:

4.  Call up the procedure again.

The selected program appears in the display.

8.5 

Locking machine with a login

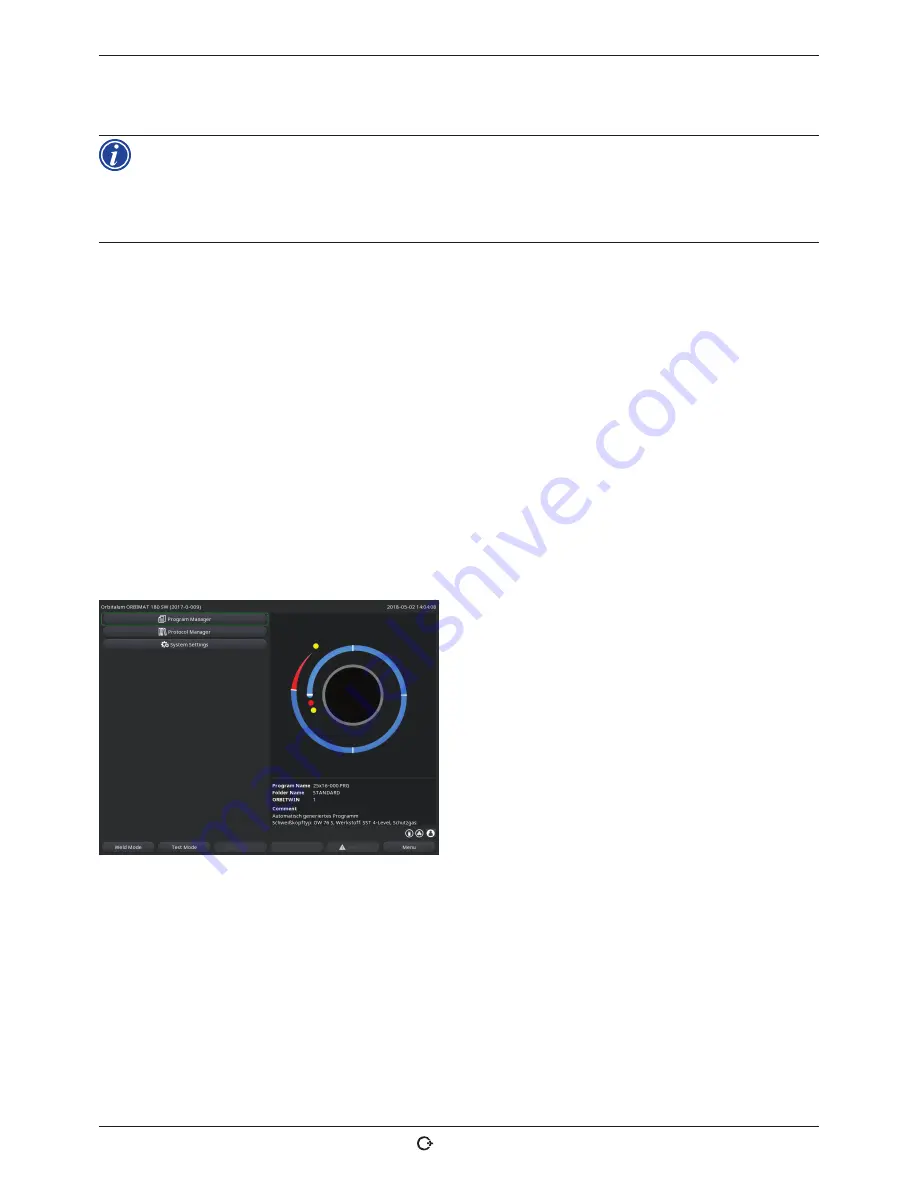
The machine disposes of two views of the main menu:

Long form

Procedure programming mode. Procedures can be changed, and sensors and monitoring functions can be activated/deacti-
vated.

Short form

Production mode. All functions which lead to changes in the existing procedures cannot be executed in the "Short menu" 
and are not displayed. Sensors and monitoring functions cannot be deactivated.

The saved data are largely protected against loss or 
change.

Recommendation


X

Create backup copies of the data of the internal 
memory at regular intervals.

Fig. 20: 

Main menu (Short form)

1.  Touch the login icon at the bottom right in the screen. 
 
A virtual keyboard is displayed. 

2.  Enter the password and confirm by pressing the rotary knob.


X

Login icon highlighted in blue = Logged in.

3.  To log out touch the login icon at the bottom right in the screen. 


X

Icon highlighted in blue becomes gray = Logged out.

Summary of Contents for ORBIMAT 180 SW

Page 1: ... the machine Orbital Welding Power Supply ORBIMAT 180 SW Machine No Code 850 060 202 EN Translation of original operating instructions To ensure safe working read the operating instructions before commissioning Retain the operating instructions for future reference ...

Page 2: ...ed in particular the rights of duplication and distribution as well as translation Duplication and reproduction in any form print photo copy microfilm or electronic require the written permission of Orbitalum Tools GmbH ...

Page 3: ...15 3 3 Warning signs 16 4 Scope of application 17 4 1 Accessories 17 4 1 1 ORBICAR W trolley 17 4 1 2 ORBICOOL Active 17 4 1 3 ORBITWIN switching unit 18 4 1 4 ORBmax oxygen meter 18 4 1 5 Remote control with cable 18 4 1 6 OCL 30 coolant 18 4 1 7 ORBIPURGE forming set 18 4 1 8 Paper rolls and ribbon cartridges 18 5 Technical specifications 19 6 Storage and transport 20 6 1 Gross weight 20 6 2 Pre...

Page 4: ...PC with the OrbiProgCA supplementary software 60 8 11 Updating and backup functions for the software 60 8 12 Updating software components 61 8 13 Saving software components 61 8 14 Restoring software components 61 8 15 Working in other languages 61 8 15 1Changing the language 61 8 15 2Printing data in another language 62 8 15 3Creating a new operating language 62 8 16 Importing programs from other...

Page 5: ...s if the safety measures are not observed WARNING Potentially hazardous situation that may result in death or serious injuries if the safety measures are not observed CAUTION Potentially hazardous situation that may result in slight injuries if the safety measures are not observed NOTE Potentially hazardous situation that may result in material damage if the safety measures are not observed 1 2 Fu...

Page 6: ...ert Gas under observance of tried and tested procedures and without physical contact to the line No No Yes According to Directive 2013 35 EU 2 2 Using the machine 2 2 1 Proper use The orbital welding power supply is intended solely for the following utilization Utilization in combination with an orbital weld head of the company Orbitalum Tools GmbH or with a compatible third part device in combina...

Page 7: ...ces marked with the adjacent symbol may not be disposed of with household waste in accor dance with EU directives By actively using the offered return and collection systems you are doing your part to reuse and recycle used elec tronic devices Used electronic devices contain parts that must be handled selectively according to the EU directive Separate collection and selective treatment are the bas...

Page 8: ... the cable X X Repair and maintenance work on the electrical equipment may only be carried out by a qualified electrician X X Do not carry the machine by the hose package or the cable and do not use the machine to pull out the plug except in an emergency Protect the cable against heat oil and sharp edges chips 2 6 Personal protective equipment The sole act of operating the welding power supply doe...

Page 9: ...X Use only permissible materials in the welding area WARNING Danger of scalding through hot emitted liquids as well as hot plug connections during heavy opera tion X X Heed the safety precautions of the technical supervisor person in charge of safety 2 7 3 Tripping over the hose package CAUTION If a hose package is connected there is the danger that persons may trip over it and be injured WARNING ...

Page 10: ...ower tools X X Ensure that the connecting plugs of the machine fit into the outlet X X When connecting use a residual current circuit breaker 30 mA 2 7 6 Danger through incorrect handling of pressure tanks WARNING Various injuries and damage to property X X Heed safety regulations for pressure tanks X X Heed safety data sheets for pressure tanks 2 7 7 Damage to eyes through radiation WARNING Durin...

Page 11: ...ARNING Manifold injuries and damage to property through system for example ORBICAR welding carriage gas bottle welding power supply cooling unit tipping over from the application of force from outside X X Set up the machine so that it stands securely against external influences X X Keep moving masses at least 1 meter away from the machine 2 7 12 Danger of explosion and fire DANGER Danger of explos...

Page 12: ... 12 orbitalum tools GmbH D 78224 Singen www orbitalum com Phone 49 0 77 31 792 0 17 09 18 OW_ORBIMAT_180SW_BA_850060202_00_EN 3 DESCRIPTION 3 1 ORBIMAT 180 SW 1 4 2 5 6 7 8 9 10 11 12 13 14 15 16 17 18 19 20 3 26 27 31 32 25 24 28 29 30 21 23 22 33 34 ...

Page 13: ...n for weld head signal line 14 Connection socket Gas Connection for gas hose to the weld head 15 Coolant connection blue Connection for coolant supply line 16 Eye strain relief Strain relief weld head to the power source 17 Coolant connection red Connection for coolant return line 18 Weld current socket Connection weld head 19 Weld current connection Connection weld head 20 Ventilation slot Ventin...

Page 14: ...th standard functions as softkeys Examples The push switch Item 6 is usually assigned the Menu function meaning pressing it brings you directly to the main menu regardless of which sub menu currently ap pears in the display The push switch Item 3 is assigned the Save function This allows a pro cedure change to be saved rapidly 1 2 3 4 5 6 3 2 2 Operation via touch screen Rapid and efficient operat...

Page 15: ... values Turn the rotary knob X X Saving the value and exiting the field Briefly press the rotary knob 3 2 4 Operation via an external keyboard Navigating to a menu item field in the display X X Press the UP and DOWN arrow buttons Selecting the menu item field X X Press the ENTER key Setting a parameter Entering a value X X Highlight a field The field appears in red X X Entering a value Change with...

Page 16: ...BIMAT_180SW_BA_850060202_00_EN 3 3 Warning signs The warning signs and safety signs located on the machine must be observed Image Position on machine Meaning Code Hood inside Read the safety instructions 871 001 057 Rear panel Before opening the unit disconnect the mains plug 850 060 025 Side left Caution Only use Orbitalum coolant 884 001 001 ...

Page 17: ...l time operating system without power down sequence Automatic weld head recognition and resulting parameter modification Motor current monitoring of the drive motors Capacity to store over 5 000 welding procedures providing systematic and clear procedure management thanks to the creation of folder structures Welding data logging and printout of actual values Integrated system printer Possibility o...

Page 18: ...ands important for welding to the power source It is not required when working with enclosed orbital weld heads 4 1 6 OCL 30 coolant 1 canister already included in the scope of delivery of the ORBIMAT 180 SW power source Anti freeze pre mix for ORBIMAT power sources and cooling units to avoid freezing of the cooling water Protects up to 30 C 22 F outside temperature Increased ser vice life of comp...

Page 19: ...ncrements Weld current reproducibility 0 5 Rated current at 100 duty cycle A DC 160 Rated current at 60 duty cycle A DC 180 Weld voltage min V DC 10 Weld voltage max V DC 20 Open circuit voltage max V DC 85 Ignition power max Joule 0 9 Ignition voltage max kV 10 Output control Rotation motor voltage max V DC 24 PWM signal Wire feeding motor voltage max V DC 24 PWM signal Rotation motor current max...

Page 20: ... Pump out coolant before transporting WARNING Danger of injury through high weight of the orbital welding power supply The orbital welding power supply has a weight of 28 0 kg 61 73 lbs X X Always lift the orbital weld head with two persons or use a suitable means of transport X X When lifting the machine do not exceed the permissible total weight of 25 kg for men and 15 kg for women 6 2 Preparing...

Page 21: ...ps pumping out after approx 30 seconds 3 In the main menu call up the System settings menu item by turning the rotary knob 4 Briefly press the rotary knob The System settings sub menu appears Fig 1 Main menu long form 5 Navigate to the Service menu item 6 Briefly press the rotary knob The desired selection appears Fig 2 Sub menu System settings 7 Select the Coolant pump on menu item 8 Briefly pres...

Page 22: ...witched off 10 Check the fill level indication and abort the process when the tank is empty NOTE When the pump runs dry this is accompa nied by an audible increase in speed X X Abort the process immediately Fig 4 Coolant Pumping out If the coolant does not exit the hose within a maximum of 10 seconds 11 Stop drainage as prolonged dry running can damage the pump 12 Check the coolant level 13 Check ...

Page 23: ...ant OCL 3018 850 030 010 1 Bottle Operating instructions with calibration certificate 850 060 201 1 Set QuickStart guide 850 060 020 1 Pc Subject to modifications 7 2 Checking the scope of delivery X X Check delivery for completeness and damage caused by transport X X Report any missing parts or damage caused by transport to your supplier immediately 7 3 Accessories optionally available ORBICAR W ...

Page 24: ...skin X X During operation wear eye protection to EN 170 and skin covering safety clothing X X At closed weld heads ensure proper working order of the eye protection WARNING Hot leaking liquids and hot plug connections during heavy operation Danger of scalding X X Heed the safety precautions of the technical supervisor person in charge of safety CAUTION Hot surfaces of the weld head and weld points...

Page 25: ...ction DANGER Improper access to and opening of the ORBIMAT system Electric shock X X Disconnect the system from the mains X X Remove all the external devices connected to the system weld heads etc X X If the machine was in operation beforehand allow it to cool down sufficiently X X Allow only a professional electrician to access the electrical system Never connect an opened system to the mains net...

Page 26: ...ht glass at the left hand side panel of the power source 3 2 3 Use of other cooling units such as compressor cooling device type ORBICOOL Active 1 Fill in coolant in accordance with the operating instructions of the unit 2 Connect the coolant hoses at the front connectors of the power source to ensure the coolant flow and temperature monitoring by the power source 7 5 2 Connecting Remote control d...

Page 27: ...Does the machine not start the first time it is switched on X X Check whether the pilot light in the main switch is lit up Is the pilot light not lit up There is a problem with the power supply no voltage plug not inserted X X Check whether the power plug is properly inserted X X Have the power supply checked Is the STOP indicator on the front panel lit up With external remote control connected EM...

Page 28: ...menu item Language 3 Select the desired language and confirm with the rotary knob Fig 5 Setting the language 7 5 5 Setting the measuring units The operating system can be set to Metric or Imperial measuring units The factory setting is Metric Changing the measuring unit 1 In the main menu call up the menu item System settings by turning the rotary knob and confirm by pressing 2 Subsequently call u...

Page 29: ... appears Field Return to main menu Fields Weld head model to Wall thickness Parameter entry Field Wire feed Welding with without filler wire Calculate program Calculation of the procedure with the entered parameters Fig 7 Sub menu Auto programming 8 1 2 Configuring weld head 1 Select the Weld head field and briefly press the rotary knob The following display appears A list of the weld heads which ...

Page 30: ...firm by briefly pressing the rotary knob 8 1 3 Configuring material X X Select the Material field and briefly press the rotary knob The following display appears Materials in the list Carbon steel Stainless steel Titanium Fig 9 Selecting the material 1 Select the material 2 Confirm by briefly pressing the rotary knob 8 1 4 Configuring protective gas 1 Select the Gas type field and briefly press th...

Page 31: ...arger which might require carrying out your own weld tests Auto programming can be helpful here because you can enter the thickness of the bluntly joined root face usually 1 5 2 5 mm 0 059 0 098 as the wall thickness first and then manually improve the auto programmed procedure calculated in this way 2 Select the value by pressing the rotary knob 3 Enter values via the external keyboard or the rot...

Page 32: ...eld current of the application If lower currents are used the use of 2 4 mm 0 094 electrodes can lead to a worsening of the ignition characteristics and wandering of the arc at the electrode X X Ensure good grinding of the electrode Use an appropriate electrode grinding device such as the ESG Plus tungsten grinder recommendation WARNING Sharply ground and pointy electrodes Danger of injury X X Sto...

Page 33: ...vated by pressing it and keeping it pressed for 3 seconds With the remote control of the weld head X X Press the gray Motor button until the desired position is reached Only one rotation direction is possible here With an additional remote control optional available as accessory X X Press the MOTOR or MOTOR button The rotor turns in the selected direction as long as a button is being pressed With ...

Page 34: ...undefined mixture of both gases in the welding pocket and thus to uneven weld penetration X X Do not use classic forming gases with up to 30 hydrogen content A small amount of hydrogen which ends up in the welding pocket from inside the pipe via the pipe joint can lead to considerably greater penetration as the hydrogen releases additional energy during combustion Values gained from experience An ...

Page 35: ... wire LP speed Display of the process parameters of the procedure The values can be changed during the welding process The changes are saved by pressing the rotary knob keyboard ENTER to the current welding process The changes are not yet saved in the procedure Fields with a gray background cannot be edited Fig 13 Display during running welding process Graphic Display of the weld sequence After st...

Page 36: ...nected remote control The entire machine is disconnected from the mains network immediately and completely both poles No other functions are carried out here The gas flow is interrupted immediately The current weld becomes unusable Stopping a running process X X Press softkey 1 STOP or X X Press the STOP button on the connected remote control or X X Press the red START STOP button on the weld head...

Page 37: ... run of the parameters X X Observe the effects of the adjustment and carry out further adjustments if necessary 8 3 2 Making percental changes Reason Welding result even but weld seam penetrated too lightly or too strongly The percentage change affects all levels sectors on high and low pulse current After the test run the Scale weld field is highlighted in the display 1 Highlight a field 2 Adjust...

Page 38: ...heads The adjustment of the gas times gas pre purge time and gas post purge time may be necessary to optimize the results of the welding process The space to be filled with gas also depends on the weld head size and pipe diameter It may therefore be necessary to shorten the gas pre purge time for smaller weld heads If the seam with closed weld heads is bare and nearly free of annealing colors righ...

Page 39: ...rmed due to immediate switch off from being formed Is a longer or shorter run out of the weld seam desired X X Increase or decrease the value 1 Ignition current Using the go further to gas pre purge time go further to start delay time but tons select adjust and save parameters 2 Final current and current slope off Using the go further to gas post purge time go back to weld seam end buttons select ...

Page 40: ...s welded up to the end with 50 A HP or LP as programmed Within 10 of the sector time meaning 10 of 10 sec 1 sec the current is reduced linearly from 50 A to 45 A For the remaining sector time in sector 2 9 sec the current remains constant at 45 A Auto programming uses these linear transitions This reduces the number of sectors The effects to be compensated for by a change in current e g heating of...

Page 41: ...hine is started the values corresponding to the seconds appear Fig 17 Converting the slope time from percent to seconds 8 3 9 Adjusting pulse times Pulse times in most application cases 0 05 to 0 5 seconds Auto programming calculates the pulse times from the wall thickness Adjusting the pulse times affects the seam ap pearance A shorter pulse time yields a finer scale 1 In the main menu select Man...

Page 42: ...es offset wall thickness air gap etc At a somewhat lower speed irregularities such as minor fluctuations in the pipe wall thicknesses are tolerated by the process For auto programming middle values are therefore provided If a higher weld speed is required for an application X X Increase the current to introduce the same energy per section into the process again For different weld speeds in the sec...

Page 43: ...f the time corresponds to the duration of the current slope off wire continues to be fed during the entire slope off time Since the introduced energy declines as the current slopes off the wire feed should stop when there is no longer a melt pool Wire retract Time during which the wire running direction is reversed at the end of the wire feed so that the wire does not rest on the pipe when turning...

Page 44: ...t the bottom edge of the process representation 3 Ensure that the pointer is positioned correctly For this purpose compare value in the sector list end sector 1 90 with the degree information 4 Briefly press the rotary knob The sector border is displayed in green Fig 19 Sector list Pointer position for 90 5 Move sector border to the desired position with the rotary knob 6 Briefly press the rotary ...

Page 45: ...anual Adjust programming Divide into levels The sector list appears on the left in the display five sectors in the example see Fig 19 The process sequence ap pears on the right 2 Move the pointer to the 90 position with the rotary knob 3 Ensure that the pointer is positioned correctly For this purpose compare value in the sector list end sector 1 90 with the degree information 4 Briefly press the ...

Page 46: ...name The name of the folder in which the procedure is saved appears in the Folder field in the display 1 Press softkey 3 Save A prompt appears 2 Confirm the prompt with Yes 3 The procedure is saved with the adjustments Saving an adjusted procedure under a new name 1 Press the Save button in the main menu 2 Press New folder button or select an existing folder If New folder was pressed 3 Select the ...

Page 47: ...login The machine disposes of two views of the main menu Long form Procedure programming mode Procedures can be changed and sensors and monitoring functions can be activated deacti vated Short form Production mode All functions which lead to changes in the existing procedures cannot be executed in the Short menu and are not displayed Sensors and monitoring functions cannot be deactivated The saved...

Page 48: ...he machine with a login The main menu Long form appears in the display 2 In the main menu select System settings Program settings 3 Select and highlight the Scale weld limit field and enter a percentage value or If no adjustment is desired Enter the value 0 4 Save the procedure 5 Lock the machine with a login 8 6 Tacking function 1 Select the basic adjustments 2 Use the rotary knob to select the A...

Page 49: ...this angle accordingly the starting point of welding is moved back to the original position X X Recommendation Run the procedure in test mode and check the movement of the rotor when doing so Fig 21 Tacking function Selection field Weld After Tacking optional Select this option to prefasten the workpieces in order to avoid any possible material distortion during the welding process At an activated...

Page 50: ...nually Gas monitoring by the sensor does not occur until the end of the time of the second gas duct i e at the start of the pressure compensation Using this function together with open type weld tongs has no advantage and is of no use The flowmeter outside the power source in the supply line has to be opened completely Controlling is carried out in the power source It has to be ensured that the pr...

Page 51: ...educed or eliminated The control unit does not have its own power supply It is connected to the machine via the connection socket and is thus ready for operation Connecting the unit 1 Connect the unit to the BUP Control connection socket of the machine 2 In the main menu select System settings System adjustments 3 Select the Yes option for External input for abort The signal from the oxygen meter ...

Page 52: ...rrent and pulse times As programmed in sector 1 The machine remains in sector 1 during the entire manual welding procedure any pro grammed sector times and rotation angles are meaningless Gas pre purge ignition current slope off and gas post purge As programmed Sensors for gas and coolant monitoring Active during manual operation weld current is monitored Speed monitoring Deactivated programmed we...

Page 53: ...the rear of the machine Internal printer driver character set PCL 3 8 8 6 External monitor HDMI HDMI connection Can be selected freely on the rear of the machine The machine display is not switched off when an additional monitor is connected 8 9 Monitoring functions 8 9 1 General information The machine monitors the following parameters Gas quantity Coolant quantity Temperature of the power sectio...

Page 54: ...d deviation of the high pulse current HP If the specified deviation 5 A is reached a warning message appears Fig 25 Limit values Example 60 A is programmed for the high pulse current in a sector During the process a value of 55 A 5A is mea sured A warning message appears High pulse current too low The process continues running The operator can carry out further measures for example manual initiati...

Page 55: ...ress softkey 2 Manage 3 Use the rotary knob to mark either a folder or an individual log If a log procedure is to be deleted from a further folder the message Cancel the selection is displayed when the new folder file is selected X X Yes Selection is cancelled The check mark is removed at all the files previously marked X X No Selection is retained Subsequently new files can be added to the select...

Page 56: ... executed The files are copied X X No Process is not executed The selection is retained X X Cancel Process is not executed The selection is removed Moving data 1 In the main menu select the Program Manager 2 Press softkey 2 Manage 3 Navigate to the desired directory or the desired file and mark it by pressing the rotary knob 4 Use the rotary knob to navigate to the desired target directory 5 Press...

Page 57: ...ype electrode etc and comments for example a description of the seam preparation an angle setting of the electrode with adapter about a procedure can be entered for the operator This information may be required for ensuring consistent results when the procedure is executed These notes and com ments are procedure based Entering notes and comments Several possibilities are available for entering not...

Page 58: ... Remove the USB medium and insert it again The USB stick recognition can take up to 30 seconds Write read logs to from memory cards Logs are always saved on the external memory card as they are generally only used externally for example on a PC with the OrbiProgCA program Activating logs for a weld process D D Connect the USB medium 1 In the main menu press softkey 1 Weld or softkey 2 Test 2 Selec...

Page 59: ...ust like on a PC Procedure overview Here you are provided with a tabular overview of all the procedures available on the machine however without the procedure parameters One procedure Here you have to select an individual pro cedure via the folder structure which is then printed Log file overview Prints the tabular overview of all the available procedures Fig 30 Overview of the log files of a proc...

Page 60: ...edure and log files generated by Orbitalum welding units of the entire ORBIMAT series 180 SW 160 250 C 165 300 CB 165 300 CA can be saved and printed on an external PC In the case of data from the CA and SW units procedures can also be edited and the adjusted procedures transferred back to the machine All the procedures and logs can be printed in the PDF format or exported as xls files 8 11 Updati...

Page 61: ...ing header list and language files 1 Connect the USB stick 2 In the main menu select System data Save 3 Select the software component 4 Follow the instructions on the display 8 14 Restoring software components In case of problems with new program versions or a faulty update the software can be reset to the version previously used 1 In the main menu select System data Restore 2 Select the software ...

Page 62: ...ng a procedure on the machine 1 Change the language of the software to the desired language 2 Print the procedure Printing the procedure on a PC 1 Save the procedure to a USB stick 2 Open the procedure on the PC with the OrbiProgCA software and set the language 3 Print the procedure Printing a log 1 Change the language of the software to the desired language 2 Save the log 3 Print the log 8 15 3 C...

Page 63: ...lder The data are transferred and converted in the internal memory of the machine The original procedure names com ments etc are retained on the USB stick 8 17 Special keyboard commands The following commands can be entered on the external or virtual keyboard VER Display the software version SER Display the service screen SLO Switches the slope representation from standard to seconds 8 18 Operatio...

Page 64: ...the machine blue without the coolant sensor in the return line being able to interrupt the process To protect the pump against dry running this process is limited in time to approx 30 seconds 4 Select Cancel when the coolant is fully pumped out to avoid unnecessary dry running of the pump If the tank is not pumped empty X X Start the process again For further information please refer to the Commis...

Page 65: ...librated heads generally mean deviations under 1 A message appears Save new calibration data 2 If the deviation is less than 1 Confirm message with No 3 If the deviation is greater Confirm the message with Yes and save the value The machine is aware of the fault of the current connected weld head and compensates for it in the process Fig 32 Motor calibration WARNING When a display appears see Fig ...

Page 66: ...nal printer 1 Switch on the Internal printer on button The button for the is activated 2 Open the printer hood and cover of the printer 3 Remove the empty cardboard roll with the shaft Remove any paper still present in the printer by pressing the button on the printer line feed Do not pull on the paper here 4 Slide a new paper roll onto the shaft and insert it into the recess of the housing provid...

Page 67: ...Print test page button A test page with a mixed character set is output on the respectively activated printer internal or external 9 1 6 Service screen View the current status of all digital or analog input and output signals of the control computer Digital In Current values of the digital inputs of the computer Digital Out Current values of the digital outputs of the computer Analog In Current va...

Page 68: ...ad 9 2 2 Annealing colors inside outside Possible causes Annealing colors arise only as a result of a reaction between the base material and another substance under the effect of a high temperature introduced into the material by the arc This other substance can take the form of oxy gen humidity or other impurities Parts of grinding disks that remain on the workpiece as residue Annealing colors at...

Page 69: ... side or moving back and forth Possible causes and remedies When welding pipe and molded part Marangoni effect The sulfur content tends to be high with materials for machining The effect is seen on one side of the pipe joint with the result of a seam which is heavily asymmetrical to the joint The root inside the pipe is then often formed completely outside an next to the pipe joint If the seam reg...

Page 70: ...annot be ruled out Information on possible electrical fault sources see chap 9 3 p 71 List of error messages Possible causes Poor electrode quality worn or scaled electrode Poor ground contact open heads ground terminal Worn weld current plug poor contact Rusty or soiled pipe surface No gas wrong gas never use carbon dioxide even if it is mixed with argon or gas pre purge time too short Arc gap to...

Page 71: ...outside the welding process if the coolant was switched on using the gas coolant button and no coolant is flowing 04 Error in ext input A device connected to an external error input triggered the error If a device is not connected to the external error input X X Deactivate the monitoring function in the system adjustments 05 Current fault Used in connection with a deviation of the weld current Exa...

Page 72: ... your specialist dealer or Orbitalum 14 Arc has cut out Arc ignition was successful but the arc cut out during the process Causes Interruption of welding circuit contact problems ground terminal Currents too low low pulse may not be under 5 A for standard applica tions Excessively low final current Arc gap too large Strong draft causes arc to cut out 15 Short circuit current flowing but no volt ag...

Page 73: ...last used program is loaded It this not possible because the USB stick has been removed for example the default procedure is loaded X X Contact Orbitalum if the problem cannot be solved 36 The procedure cannot be saved A problem occurred while saving the procedures The error appears in plain text see Messages 18 through 29 or as a two digit number 37 File with inverter characteris tic cannot be op...

Page 74: ...buttons in the weld head are not working X X Contact the Orbitalum service 46 Incorrect weld head con nected The currently connected weld head is not the same as the weld head in the started procedure X X Select the connected weld head in the procedure or X X Connect the weld head selected in the procedure to the machine Are the weld head models identical but the message appears nevertheless X X C...

Page 75: ...2 does not light up Coolant pump off LED 3 does not light up Coolant flow does not exist 9 5 Temporarily deactivating sensors and monitoring functions 9 5 1 Sensors Certain sensors can be deactivated temporarily This can make sense for example when a defective gas sensor is present and work is to continue Greater attention is required when continuing work with the machine The sensors cannot be dea...

Page 76: ...as flow sen sor Coolant flow sensor 3 To deactivate the warnings and the process aborting select the option No at Use of parameter limits 4 Select the option Yes at External input for abort and a connected external device 5 Press softkey 3 Save Fig 35 System adjustments 9 6 Setting the date and time 1 In the main menu select System settings System adjustments The following display appears 2 Highli...

Page 77: ...opping up of the coolant may be necessary if the weld heads are changed frequently 1 After changing a weld head ensure that it is completely filled with coolant let run for approx 3 minutes button GAS Coolant 2 Check the coolant level and refill if necessary X X If anti freeze is used Supplement with the coolant appropriately X X Wipe off the display with a slightly damp cloth Do not use cleaning ...

Page 78: ...lowing activities before storage 1 Clean the machine 2 Remove the coolant For this purpose loosen the coolant return line of the weld head on the back of the unit and pump out the coolant supply into a container with the pump Storage conditions Relative humidity 70 Temperature range 20 40 C protected from dust 10 3 Servicing Customer service To order spare parts refer to the separate spare parts l...

Page 79: ...erie Baujahr Year Anno Année Año ist entwickelt konstruiert und gefertigt in Übereinstimmung mit folgenden EG Richtlinien was designed constructed and manufactured in accordance with the following EC guidelines è stata progettato costruito e commercializzato in osservanza delle seguenti Direttive a été dessiné produit et commercialisé selon les Directives suivantes ha sido proyectado construido y ...

Page 80: ...mbH Josef Schuettler Str 17 78224 Singen Germany Tel 49 0 77 31 792 0 Fax 49 0 77 31 792 500 UNITED KINGDOM Wachs UK UK Sales Rental Service Centre Units 4 5 Navigation Park Road One Winsford Industrial Estate Winsford Cheshire CW7 3 RL United Kingdom Tel 44 0 1606 861 423 Fax 44 0 1606 556 364 ASIA CHINA Orbitalum Tools New Caohejing International Business Centre Room 2801 B Building B No 391 Gui...

Reviews: