5
The Finder Scope:
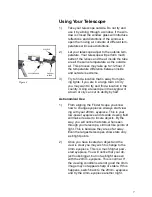
The Finder scope (A) is a small telescope that sits
on your telescope tube. It magnifies objects 5 times
and has a light collecting lens that is 24mm. in
diameter.
When you look through the Finder Scope you will
see an
upside down image
. This is normal and you
will quickly get used to it.
The viewing field of the finder scope is much wider
than that of your telescope and if you properly align
the Finder Scope it will make it easier for you to
precisely aim your telescope where you want.
Installing Your Finder Scope:
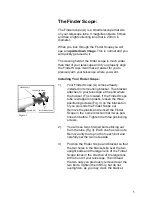
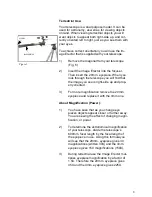
1) Your Finder Scope (A) comes already
installed in its mounting bracket. This bracket
attaches to your telescope at the end where
the focuser (F) is located. If the Finder Scope
tube is wrapped in plastic, loosen the three
positioning screws (Fig. 3) on the bracket un
til you can slide the Finder Scope out.
Remove the plastic and reinsert the Finder
Scope in the same direction that it was posi
tioned in before. Tighten the three positioning
screws.
2) You will see two chromed bolts sticking out
from the tube (Fig 3). Each one has two nuts.
Remove only the top nut from each bolt and
carefully set the two nuts aside.
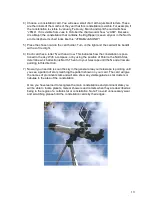
3) Position the Finder Scope and bracket so that
the two holes in the bracket slip over the two
upright bolts and the larger lens of the Finder
Scope faces in the direction of the large lens
at the front of your telescope. Then thread
the two nuts you previously removed over the
two bolts. Tighten them firmly, but do not
overtighten, as you may crack the bracket.
CHROMED BOLT
POSITIONING SCREWS
POSITIONING SCREW
CHROMED BOLT
Figure 3


