background image


10

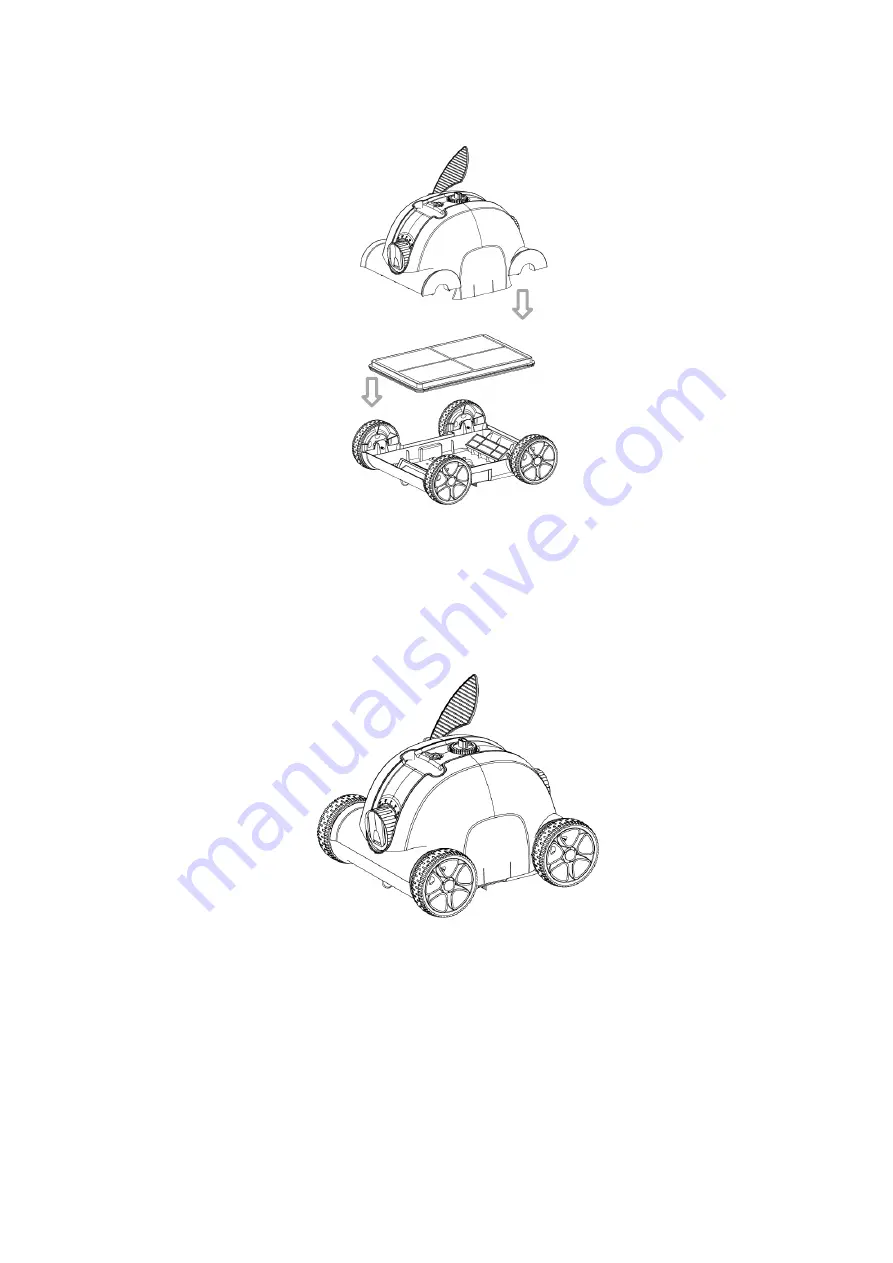
d.  Reassemble the cleaner   


e.  Push the clips on 


5. 

Installation and removal of swing plate               


The swing plate can be removed by poking the base buckle upwards and 

installed by inserting it into the base. 


Summary of Contents for HJ1103J

Page 1: ...BATTERY POWERED POOL FLOOR CLEANER HJ1103J For SWIMMING POOL OF FLAT FLOOR USER MANUAL Subject to update by manufacturer without prior notice ...

Page 2: ... it is outside of the water 8 The power line must be connected to a leakage protective and earthed socket when charging 9 Do not operate the cleaner when there are people in the pool 10 Always clean and wash the filter tray after use 11 Power off the cleaner when maintaining cleaning or not using it 12 The cleaner should be stored in a cool and ventilated place away from direct sunshine 13 Charge ...

Page 3: ... the over discharge protection voltage due to the self discharge of battery if not charging the battery for a long time which will lead to fatal damage to the battery if continuing too long Please be careful 19 Prohibit charging the battery under the condition of fire or extreme heat Do not use or store the cleaner near the heat source 20 Prohibit piercing the cleaner shell with nails or other sha...

Page 4: ......

Page 5: ...1 Contents I Introduction 1 II Appearance characteristics structure 1 III Specifications 1 IV Operation instruction 2 V Trouble Shooting 11 VI Packing list 12 VII Warranty 12 ...

Page 6: ......

Page 7: ...before use so that you can use it correctly II Appearance characteristics structure III Specifications 1 Working voltage 12 6V 2 Power 50W 3 Working cycle 60 min 4 Rated input voltage of adapter 100Vac 240Vac 5 Input power of adapter 47Hz 63Hz 6 Rated output current of adapter 1 8A 7 Charging time 3 4h 8 Battery capacity 5000mAh Top cover Filter tray Chassis Swing plate Floating handle Brush ...

Page 8: ... 16 Max water depth 2 0m 17 Size 400 L 360 W 270 H mm 18 Weight 5 5kg 19 Storage condition Short term less than 1 month 20 60 75 RH Medium term less than 3 months 20 45 75 RH Long term more than 3 months 20 20 75 RH 20 Swimming pool slope max 15 IV Operation instruction 1 Precautions a Put into or lift out from pool with the cleaner bottom toward the wall to avoid any possible scratch to the pool ...

Page 9: ...embled with its chassis d Power off the cleaner after use e Do not touch the wall to avoid scratching the wall or damaging the cleaner when putting into or lift out from pool f It is necessary to stay on the water surface for 10 15 seconds until water flows out from the cleaner to the pool before being placed on the ground ...

Page 10: ...nd home power with adapter and charging line to charge the battery Clean the charging port before charging Red charging indicator light indicates the battery is charging Green charging indicator light indicates charging is finished Turn the switch knob to OFF before charging Adaptor indicator Statut Red Charging Green Charging finished d Turn the switch knob to ON after putting it into water then ...

Page 11: ...hile the cleaner is power off Please timely clean the filter tray after use 3 Functions and adjustment of nozzles There are two nozzles on the cleaner one of them opens once the other closes Water flows out through the open nozzle to thrust the cleaner to move forward Adjust the nozzle by turning it to control the moving route a Settings of nozzle angle and moving route Sketch the nozzles of the c...

Page 12: ...6 b Recommended three CYCLEs and nozzle settings Setting One default setting 0 20 for most of pools Nozzle angle Moving route ...

Page 13: ...7 Setting Two 0 40 when the cleaner does not have a full coverage of pool Nozzle angle Moving route ...

Page 14: ...nd pools Nozzle angle Moving route Note above are recommended settings and different settings might apply to specific pools So the operator can set according to the principle of nozzle settings and the actual situation of the pool ...

Page 15: ...9 4 Clean the filter tray a Open the cleaner by clips b Take off the filter tray c Clean the filter tray and chassis ...

Page 16: ...10 d Reassemble the cleaner e Push the clips on 5 Installation and removal of swing plate The swing plate can be removed by poking the base buckle upwards and installed by inserting it into the base ...

Page 17: ...ot work and the indicator light does not work Battery protection Charge the battery and power on the cleaner to watch whether the indicator light is on If not contact after sale service The adapter indicator light does not work Adapter damage Contact after sale service The cleaner does not have a full coverage of pool Unsuitable nozzle angle Adjust nozzle angle Special pool shape Adjust nozzle to ...

Page 18: ...ry Warranty Information 1 The warranty period is 24 months of use on the motors and electrical parts from the date of purchase and established under the terms of the Consumer Code and the legal guarantee against hidden defects and vices in any case applies in the conditions of the articles in the country of purchase 2 The warranty is void if the product is handled or repaired by foreign nonqualifi...

Page 19: ...13 5 Any claim made or repair made during the warranty period will be subject to mandatory presentation of the invoice ...

Reviews: