4
INTRODUCTION
Thank you for choosing the Orchid DX200 phone. We hope that you find the following guide
helpful in getting the most out of your purchase.
SETTING UP
Wall mounting (if required)
Drill 2 holes 9cm apart, be careful to avoid any pipes or wiring.
Using the 2 screws provided wall mount the phone.
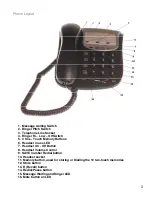
Remove the "Wall mount" tab located under Hook switch (15) and replace it in a reverse position.
This will secure the handset when replaced in the cradle.
Ringer Volume and Pitch
On the underside rear there are 2 switches to adjust the Volume and pitch of the ringer for
incoming calls.
OPERATING INSTRUCTIONS
Storing and Dialling the phone memories
To Store and dial the 3 one-touch memories:
Lift the handset, press the STORE button, Dial the number to be stored, press the STORE
button and then the M1 button. Repeat for M2 and M3.
Up to 24 digits can be stored per memory.
To Dial a one-touch memory lift the handset and press the M1, M2 or M3 button
To store and dial the two-touch memories:
Lift the handset, press the STORE button, Dial the number to be stored, press the STORE button,
press the MEMORY button followed by Dialpad button 1 to 0. Repeat as required.
To Dial one of the 10 two-touch memories lift the handset and press the MEMORY button and
then the Dialpad button 1 to 0.
Summary of Contents for DX 200
Page 1: ...Model DX 200 User Guide ...


