background image

11 


damage such as bending and twisting. 


  Check all areas of the machine for damage and have parts repaired or replaced if 

necessary. 


Using the machine on slopes 


  When operating on slopes, serious accidents can be happened if you slip and the 

machine rolls over. Be especially careful when working in such areas and stop 
operating the machine immediately if you feel there is any danger at all. 

  Do not operate the machine on slopes of more than 

20°.


  Maintain a constant speed on the slope and refrain from unnecessary gear shifting as 

there is a risk of falling and slipping. 

  There is a risk of collapse and falling from the shoulder when driving on the shoulder 

between a flat area and a sloped area.  Operate the machine on flat safe ground. 

  Do not change directions on a slope. The machine could roll over, causing injury and 

accidents. 

  Do not operate the machine on wet slopes. It is easy to slip on wet grass and suffer 

injury and accidents. 

  Watch for holes in the ground and protruding tree roots. Also watch for obstructions 

that could be hidden in long weeds and brush. You can lose control of the steering 
wheel, causing injury and accidents. 

  When operating on slopes, do not leave the machine with its clutch off or the speed 

change lever in neutral. The machine could run out of control, causing injury and 
accidents. 


Children  


  When operating this machine, be particularly aware of children. Children are often 

interested in mowers and may be drawn to you. As children may not be concentrating 
on their surroundings, tragic accidents can occur if you take your eyes off of them. 
Please be keenly aware of the following points: 

  Do not allow children to come into the area where you are working. Make sure that 

young children are securely in the care of an adult other than the operator. 

  Switch off the engine immediately if children enter the area where you are working. 

  Do not allow children to operate the machine. Check and obey local laws which may 

place age limits on the operation of machinery. 

  Be careful when approaching blind corners, bushes, and trees which block your line of 

sight. Such obstructions can hide children from view.


WARNING

WARNING

Summary of Contents for RM982F

Page 1: ...se this machine please ask the retailer to explain the Safest way to operate it Please keep these operating instructions and the warranty safe so that they may be easily referred to at anytime OREC Am...

Page 2: ...ese instructions Machine Regulations This machine is designed to cut overgrown weeds and brush it is not a lawn mower Therefore it doesn t offer the same quality cut as a finishing mower This machine...

Page 3: ...to Lubricate Each Part 34 How to Inspect Maintain and Adjust Each Part 34 How to clean the air filter 34 How to inspect and adjust the spark plug 35 How to inspect fuel lines 35 How to clean the fuel...

Page 4: ...ntenance and inspections as recommended in this manual Warning Labels The warning labels are attached to the machine to draw attention to potentially serious dangers Please be sure to fully understand...

Page 5: ...l be slightly different In the case that these warning symbols become difficult to see please replace them so that they can be easily seen and understood 0259 82400 0220 70800 2 NOTICE 0220 70700 0259...

Page 6: ...situations When lending this machine to another person When lending this machine to another person it is the owner s responsibility that the following conditions are met The owner should explain how t...

Page 7: ...away from vehicles Fuel spills can cause fire and other accidents Do not remove the refueling nozzle from the fuel tank until you have finished refueling Fuel spills can cause fire and other accidents...

Page 8: ...machine in any way will void the warranty Orec America Inc will bear no responsibility for damage or injury caused by alterations or modifications Do not change or tamper with the safety apparatus Ins...

Page 9: ...s When you identify areas on the machine that are in need of maintenance please turn off the machine and ensure that the repairs are completed before starting the machine again Always check that the t...

Page 10: ...ease the blade clutch and switch off the engine Taking precautions can avoid injury and accidents Take care to move and turn the machine gently Stop the blades when not cutting weeds or brush Taking s...

Page 11: ...protruding tree roots Also watch for obstructions that could be hidden in long weeds and brush You can lose control of the steering wheel causing injury and accidents When operating on slopes do not l...

Page 12: ...d Poorly fitted covers could open during operation and cause serious injury Check that all nuts and bolts are securely tightened Perform comprehensive inspection and adjustment of parts such as the dr...

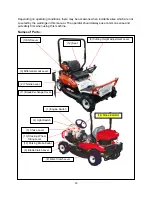
Page 13: ...use common sense and put safety first when using this machine Names of Parts 14 Slope Indicator 4 Light Switch 13 Steering Wheel Tilting Lever 3 Choke Lever 5 Cutting Height Adjustment Lever 2 Throttl...

Page 14: ...at a slow speed when the light is turned on 5 Cutting Height Adjustment Lever This machine can be set to any height between 3 1 80mm and 6 3 160mm Press the cutting height lock button with your thumb...

Page 15: ...machine with the drive clutch lever ON When you need to move the machine with engine OFF move the lever to the OFF position It enables you to move the machine manually The drive clutch lever is locat...

Page 16: ...ension can be adjusted by the strength of the spring force of the suspension adjustment bolt Tightening the bolt makes stronger and loosening the bolt makes weaker After the engine has started it will...

Page 17: ...recommended 1 Take off the front bumper and front cowl 2 Install a battery and connect cables to positive first then negative 3 Put the front cowl on then place the front bumper 4 Install the steering...

Page 18: ...18 6 Take off the nuts from seat slide guide 7 Set the seat on the seat receiver at the proper hole Fix the seat with the nuts at the proper position 6 7 Seat Receiver...

Page 19: ...ition and the cutting height adjustment lever is in the MOVE position the engine does not stop even if you stand up from the seat However if you stand from the seat at other positions the engine will...

Page 20: ...not to spill fuel If the fuel is spilled please wipe it clean For use on slopes please be aware that fuel even at or just below max fill level may spill out when placed at an angle 2 Check the fuel l...

Page 21: ...height adjustment lever is all the way in the up position The blade clutch lever will be moved back to the OFF position if the cutting height adjustment lever is all the way up After confirming that...

Page 22: ...ure warning light During the engine rotation the light will turn red when the pressure of the engine oil is dangerously reduced If the light turns on while driving please take the following actions 1...

Page 23: ...ease start at a slow speed How to Drive 1 Move the drive clutch lever to the ON position 2 Start the engine Refer to page 19 for how to start the engine 3 Move the throttle lever to the HIGH position...

Page 24: ...n it may drag the inner tire during turning increase the turn rotation decrease air pressure in the tire and cause strain on many parts These factors may cause damage to the machine 1 Always put in th...

Page 25: ...navoidable choose a location that has adequate lighting If it is hard to see the position between the ramp and the tire there is a danger of falling Turn off the truck s engine pull the emergency brak...

Page 26: ...y may get caught up in a rotating blade and this may cause serious injury After turning off the engine and making sure that the rotation of the blade has stopped remove any grass or foreign material w...

Page 27: ...ncrease the rotation of the engine 4 Adjust the cutting height adjustment lever to approximately 5 130mm height Refer to the alignment lever on the scale display Refer to Working of each part page 14...

Page 28: ...to move the cutting height lever in order to disengage the blade lever but you should only do this in an emergency If you do this often the blade belt gets sudden shock and becomes damaged For non eme...

Page 29: ...engine damage In this case stop working and wait until the grass is dry Working in rainy weather is very dangerous The blade comes to the inside of the cover both left and right sides during the blade...

Page 30: ...ine on a flat open surface Switch on the engine and warm it up to confirm it is working properly Then switch off the engine allow it to cool down and remove the spark plug cord After switching off ple...

Page 31: ...ubrication 1 Prepare a suitable container for discarded oil After loosening the oil inlet plug remove the drain plug from the rear left side of the engine with the tool M17 The oil can be discharged s...

Page 32: ...tighten the oil filter plug Refer to How to start the engine page19 5 After operating the engine at low speed for about 2 minutes check for any oil leaking from the oil filter mounting surface 6 Stop...

Page 33: ...he machine will vibrate and will not move smoothly Repeat this step until the machine moves smoothly 6 The HST oil level may change after the air bubbles are gone Always keep the oil level as you can...

Page 34: ...Remove the foam and paper elements Be careful not to put dust or debris into the carburetor 3 Wash the foam element with a pH neutral detergent After washing be sure to squeeze out all the water and...

Page 35: ...engine is the V type 2 cylinder Check and change the two plugs at the same time Do not clean or replace only one plug as this causes engine trouble Tighten by hand first and then use a plug wrench If...

Page 36: ...nd bolts back to the original position For cleaning the engine coolant it is easier to blow mud grass and dust off with compressed air to hold up the seat Please refer to the following How to adjust e...

Page 37: ...of these belts requires special tools and techniques Adjustment of the drive belt Drive belt should always be taut If the drive belt slips while driving change the position of the tension spring and a...

Page 38: ...g the annual inspection table After adjusting turn the parking brake pedal to the LOCKED position Make sure that the machine doesn t move when you push it back and forth or does not move on a slope wh...

Page 39: ...e shift lever only when the position of the shift lever is off of the guide indicator 1 Turn the shift lever to the NEUTRAL position 2 Adjust by turning the turnbuckle which is connected the shift lev...

Page 40: ...e machine and park it on a concrete or other hard surface Material stuck to the machine can freeze and cause damage If it is on a flat area without putting the parking brake in LOCK use wheel blocks t...

Page 41: ...he glass in the blade cover can be relatively easy to clean before the grass dries out At this time please cover the engine s electrical parts vaporizer air cleaner and muffler outlet to protect them...

Page 42: ...blades the blade stay is a consumable part Even if you do not see a bend or an abrasion exchange the blades every 100 hours of use or every two years whichever comes first More frequent inspection of...

Page 43: ...l not perform as when unit was initially purchased 1 Sharpen the blade as follows When you polish the blade hold the blade firmly If the blade is sharpened parallel to the original blade it will cause...

Page 44: ...e cell motor is weaker than usual this means the battery is dead or dying Recharge for between 5 and 10 hours as follows When handling the battery please beware of fire sparks and short circuits The b...

Page 45: ...gravity is over 1 270 68 F 20 C and continues for more than one hour at a constant level 2 Terminal voltage is over 15V and continues for more than one hour at a constant level 3 The gas is generated...

Page 46: ...local laws and regulations for disposing of old batteries Battery Type U1R type 12V 270CCA or greater Specifications Reference Values Name Brush Rover 4WD Model RM982F Length x Width x Front Height i...

Page 47: ...n Rubber Battery 1 16 Allen Wrench 3 8 1 For HST Oil Drain Bolt Consumable Parts No Part Name Part Code Quantity Note 1 Blade 80 1483 821 00 2 2 Blade Stay 0244 51100 1 3 Attaching bolt Set 0244 78210...

Page 48: ...rty Loosening of the attachment of cylinder head and manifolds Gas leak cracking noticeable corrosion Tightened to the correct torque not loose Valve tappet clearance Clearance looks straight Compress...

Page 49: ...y Body Cracking or deformed nuts and bolts are loose or have fallen off The frame is not cracked or deformed There is no loosening and missing of bolts nuts Cover Cracking deformity corrosion The cove...

Page 50: ...nt parts will be supplied is nine 9 years from the time the last OREC product is produced However even during the supply period it may be necessary to consult with OREC when seeking to purchase specif...

Page 51: ...the product due to everyday use are excluded from the warranty Expendable components including but not limited to such as belts blades filters spark plugs bags wheels hoses cables wires brake pads an...

Page 52: ...rica com warranty Warranty Claim Procedure Should this Orec product fail due to a defect in materials and or workmanship the owner should use the following procedure to make a warranty claim 1 The own...

Reviews: