background image

Before operating the machine

Do not remove any parts of this machine that have been fitted as standard. To prevent accidents,
be sure to use all covers and parts in the same state as they have been fitted.

DO NOT try to modify this machine (including modification of the protective cover and
safety cover) as this can cause injury and accidents. 
Altering this machine in any way will void the warrant.  Orec America Inc. will bear no 
responsibility for damage or injury caused by alterations or modifications.

Do not automatically change or tamper with the safety apparatus. Inspections should be 
performed periodically to ensure the safety apparatus is working correctly.

For reasons of safety, use OREC's recommended accessories and attachments that are best 
suited to the ground you are working on and the type of work you are performing.

This machine can not be ridden -- do not try to ride it or allow children or pets to ride on it. This 
can cause injury to people/pets and damage to the machine.

Wear suitable clothing when operating this machine. Please wear the following items to protect
against injury and reduce the possibility of accidents.

Long sleeves, long pants

Protective glasses

Non-slip shoes

Gloves

Helmet

Ear protectors

In particular, avoid wearing items such as cuffs, hems of loose clothing, and jewelry. Such items 
can become entangled in the machine, causing injury and accidents. Long hair should be tied
up inside a helmet.

Ensure that no part of your body comes into contact with the moving blades of this machine
There is the possibility of serious injury such as the severing of hands and feet.

Be sure that there are no people, animals or vehicles close by. Not taking these precautions can 
avoid injury and accidents.

Before you start mowing, remove any rocks or branches that could be thrown and cause injury to
bystanders or damage to the machine.

Use this machine during daylight or with sufficient artificial light. Do not operate this machine at
night when poor visibility will not allow you to have a complete grasp of your surroundings. Not
being able to notice dangerous objects and bystanders is a common cause of injury and 
accidents.

DO NOT operate this machine in places where there are dangerous drops, ditches or
embankments. Accidents can be caused by the machine tipping over.

Do not use this machine on wet grass. It is easy to slip on wet grass, causing injury and
accidents.

Caution during operation

During operation, blades, chains and belts are hidden by a cover, be sure to keep hands and feet
well away. The engine is also hot.  Therefore touching these parts can cause serious injury such  
as the severing of hands and feet.

During operation, the rotating blades come right to the edge of the blade cover. 

DO NOT

put your hands inside the cover to try to clear grass, etc. Not taking these precautions can cause 
injury.

Make sure the front guard is properly attached before operation. 

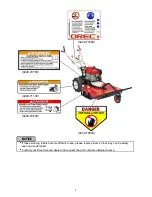
DANGER

WARNING

DANGER

WARNING

8

Summary of Contents for SH72

Page 1: ... the engine manual is included as a set with the owners manual Please read both carefully For any questions about this manual please contact your OREC dealer the distributor in your country or go to http www orecamerica com 0220 72000 Samurai walk behind mower OWNER S MANUAL SH72 Samurai Mower 1 ...

Page 2: ...s machine is designed to cut overgrown weeds and bush and is not a lawn mower Therefore it can not offer the same quality cut as a finishing mower This machine is designed mainly for commercial and agricultural users Definitions and Signs In these instructions the following signs and definitions are used to indicate the level of danger that exists Please obey the following warnings and have a full...

Page 3: ...pection Replacement and Lubrication 24 2 Checking and adjusting the spark plug 25 3 Spark arrester optional equipment 26 4 Cleaning the air filter 26 5 Tire pressure adjustment 27 6 Adjusting each wire 27 7 Belt Inspection 28 8 Inspecting the blade brake 29 9 Inspecting and replacing blades 30 6 Regarding Long term Storage 31 7 Specifications 32 8 Tools 32 9 Consumable Parts List 32 10 Optional Eq...

Page 4: ...ttention to particularly serious dangers Please be sure to fully understand the meaning of each warning label before operating this machine Read the safety and operating manual Remove all objects that could be thrown by the mower blades Beware of thrown objects Keep body parts away from rotating parts Always wear safety glasses or goggles and ear protection while operating the machine Do not use o...

Page 5: ...71100 0220 70900 0220 70800 If these warning labels become difficult to see please replace them so that they can be easily seen and understood Contact your Orec America dealer and request the part numbers indicated above NOTICE 5 ...

Page 6: ...til they have a comprehensive understanding of the machine s operation and safety guidelines Furthermore the owner should lend these instructions to the new operator together with the machine When lending this machine to a person who can not read English the owner should take responsibility for completely explaining its safe operation Before lending this machine to another person the owner holds r...

Page 7: ... Any additions or modifications will also void warranty claims Do not try to alter the position of the engine governor or change the set rotation speeds Do not run the engine in a place that is poorly ventilated Engine exhaust gas is odorless and contains carbon monoxide which can cause death or serious illness Do not allow highly flammable substances near the engine or the path of the exhaust as ...

Page 8: ...g injury and accidents Long hair should be tied up inside a helmet Ensure that no part of your body comes into contact with the moving blades of this machine There is the possibility of serious injury such as the severing of hands and feet Be sure that there are no people animals or vehicles close by Not taking these precautions can avoid injury and accidents Before you start mowing remove any roc...

Page 9: ...d When reversing there is a danger of being trapped between the machine and a wall or falling from drop offs Exercise caution when operating the machine alongside fences buildings and trees The machine s handlebars can be taken from your control if you come into contact with obstacles possibly causing injury and accidents Do not leave the machine unattended with the engine running When leaving the...

Page 10: ...of children Children are often interested in mowers and may be drawn to you As children may not be concentrating on their surroundings tragic accidents can occur if you take your eyes off them Please observe the following precautions at all times Please operate machine at least one hundred 100 feet away from children Do not allow children to come into the area where you are working Make sure that ...

Page 11: ... covers could open during operation and cause serious injury Please make sure that all components such as nuts and bolts have been properly secured after maintenance Perform comprehensive inspection and adjustment of such parts as operator presence blade clutch brake throttle and gear change Be sure to check that the bolts in the wheels and blades are tightly fastened Make sure that the detachable...

Page 12: ...hown in Figure may looks slightly different from your machine 1 Drive clutch lever Parking brake 6 Speed change lever 5 Diff lock lever 4 Throttle lever 3 Blade clutch lever 2 Blade clutch lock lever 7 Cutting height 8 Front guard 9 Front wheel 12 ...

Page 13: ...lever OFF When you are operating on a slope or soft ground where the tire on one side may slip and it may be difficult to go in a straight line when unloading from a truck or when you really want to operate the machine in a straight line switch the diff lock lever on to stop the tires from moving left and right to increase the machine s ability to move forward in a straight line There is a danger ...

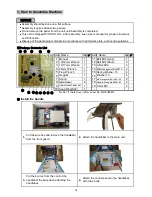
Page 14: ... 1 2 10 12mm Wrench 1 12 Bolt M12 Short 2 3 14 17mm Wrench 1 13 U Nut M12 3 4 24mm Wrench 1 14 Mini Hexagonal Nut M10 4 5 Plug Wrench 1 15 Spring Washer 10 4 6 Goggles 1 16 Washer 10 4 7 Spring 1 17 Mini Hexagonal Bolt M10 20 4 8 Axle Cover 2 18 Handle Fixing Bolt M8 45 2 9 Adjustment Lever set 1 19 U Nut M8 2 10 Snap Ring S22 1 No Ref 8 Axle Cover after serial No WL10J00013 Install the handle 3 P...

Page 15: ...nger bolt Next connect the front arm and the other part of the frame with the adjustment lever SET do not tighten the nuts all the way leaving them a bit loose 1 Drive Clutch Lever Black Put the drive clutch wire inside through the wire holder 2 Drive Clutch Lever Black Put the brake wire outside through the wire holder it makes the job easier when the lever is squeezed 3 Blade Clutch Lever Red Ho...

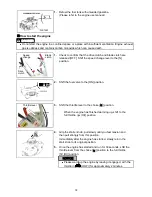
Page 16: ...fixing Front Guard optional 1 Fasten the skids with Washer Bolt and Nut 2 Attach the Front Guard with Bolt and Unut 1 Peel the tape from the axle 2 No need after serial No WL10J00013 3 Lift the handle to install the tire without dropping the key 4 Atattch Snap ring into the ditch on the axle Please ensure that the snap ring is firmly attached to the end of the axle 16 ...

Page 17: ...overfill with oil Prep 2 Check fuel Under no circumstances should you smoke operate firearms or use any open flame while using gasoline as gasoline is extremely flammable Also please be careful of static electricity as gasoline is highly volatile and exposure to electricity may cause fire or an explosion Please refuel in a place that can be well ventilated As gasoline is a highly volatile substanc...

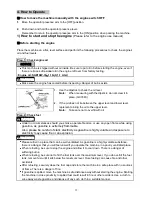
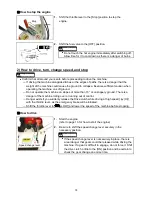
Page 18: ...n 3 Shift the throttle lever to the choke position When the engine has finished warming up shift to the full throttle HI position 4 Grip the starter knob pull slowly until you feel tension and then pull strongly from this position Immediately after the engine has started slowly return the start knob to its original position 5 Once the engine has started and run for 30 seconds shift the throttle le...

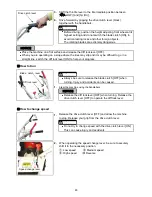
Page 19: ... more than 15 or on slippery ground There is a danger of the machine rolling over or running out of control Danger exists if you suddenly release the Drive clutch while driving at high speed HI with the throttle lever as the emergency brake will be initiated Shift the throttle lever to LOW and lower the speed of the machine before stopping How to drive 1 Start the engine refer to page 13 for how t...

Page 20: ...ock lever ON to help your progress How to trun Always be sure to release the blade clutch OFF when turning Injury and accidents can be caused 1 Steer the machine using the handlebars Release the diff lock lever OFF when turning Release the drive clutch lever OFF to operate the diff lock lever How to change speed 1 Release the drive clutch lever OFF and allow the machine to stop Release your grip f...

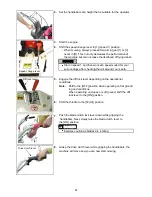
Page 21: ...by an unattended machine running out of control 3 Mowing Please read the safety guidelines again pages 4 10 and check the precautions related to your work environment and safety When using the machine for the first time choose a flat area free from rocks and foreign objects and slowly cut a path by going over the area in a straight line If the engine stops dues to a large quantity of grass reduce ...

Page 22: ...age the diff lock lever depending on the operational conditions Note Shift to the OFF position when operating on flat ground in good conditions When operating on slopes or soft ground shift the diff lock lever to the ON position 6 Shift the throttle to the HI position 7 Push the blade clutch lock lever down while gripping the handlebars Next slowly raise the blade clutch lever to the ON position E...

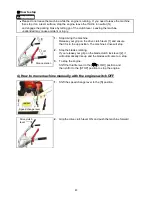
Page 23: ... and ensure that it is in the up position The machine s drive will stop 2 Stop the blades rotating If you release your grip on the blade clutch lock lever 2 it will automatically rise up and the blades will come to a stop 3 To stop the engine Shift the throttle lever to the LOW position and then shift it to the STOP position to stop the engine 4 How to move machine manually with the engine switch ...

Page 24: ...nsmission oil inspection change and refill Refill Release the oil gauge on the left side of the transmission case and put in 1 7 qt 1 6 liters of transmission oil 90 Inspection Push down on the handlebars to raise the machine and check if there is any oil in the transmission by looking through the oil gauge gauge window A Note Be careful not to over tighten the fuel cap Please rotate the gasket ri...

Page 25: ...te If the oil filler cap and drain plug are loose oil could leak out Be sure to fasten them securely Lubrication of parts Grease or lubricate these parts approximately every 30 hours There is a real danger of damage to the engine if you neglect to lubricate it Please lubricate the parts indicated in the pictures below 2 Checking and adjusting the spark plug 1 Remove the spark plug with a plug wren...

Page 26: ...lacement time approx Take care to clean the filter more frequently when operating in an environment with a lot of dust or grime 1 Release the wing nut and filter cover 2 Remove the paper and foam elements and check them for damage Note Replace with new parts if damaged 3 Wash the foam element with a pH neutral detergent After washing be sure to squeeze out all the water and allow it to dry After t...

Page 27: ... the brake pads are worn out Please inspect the brake pads For reasons of safety replace the parking brake before 100 hours of operation has elapsed Drive clutch wire If the V belt slips and the machine becomes over loaded even when you grip the handlebar with the drive clutch lever Loosen the lock nut and move the adjust nut in the direction of B If the machine still moves when the drive clutch l...

Page 28: ...ection time After the first 2 3 hours of operation and then every 30 hours of operation thereafter Before working on the machine stop the engine and remove the spark plug cord Not taking this precaution could lead to serious injury and accident Please dispose of used belt properly Before Inspecting the Belts When inspecting the engine belt please be sure to remove the transmission pulley cover A W...

Page 29: ...e spark plug cord to its original position and run the engine for around 2 minutes with the blade clutch lever and drive clutch lever both in the ON and OFF positions to confirm that the belt in operating normally After confirming set nuts bolts and covers securely to their original positions 8 Inspecting the blade brake If you release the blade clutch lever but the blades fail to stop rotating wi...

Page 30: ... which tighten the blades This prevents accidents caused by wear and tear on the nuts and bolts Never use nuts and bolts that are not recommended for this specified purpose 1 Stop the engine and remove the spark plug cap 2 Push the machine s handlebars down to raise the cutting part of the machine Do not neglect a decline in the machine s performance Promptly make repairs to avoid permanent damage...

Page 31: ...he machine There is a danger of burns Also take care to dispose of fuel in accordance with local laws and regulations 1 Empty fuel from inside the fuel tank and the carburetor To remove fuel from inside the carburetor remove the drain screw from underneath and allow any fuel to flow out 2 Clean away any fuel on the outside of the engine or machine with a rag 3 Please replace the engine oil Refer t...

Page 32: ...de Bar blade Type SH72 Total length Total width 87 4 33 5 40 6 2220 850 1030mm Total height Inch Clutch system Drive Blade Belt tension clutch Speed Forward MPH 1 0 97 2 1 45 3 2 17 Backward MPH R 0 91 Size of V belt Drive belt LA 36 Blade belt LB 45 Weight 262 4 lb 119kg Size of Tire 400 7 φ15 75in 400mm Engine Model HONDA GXV340 Type T2DN4 Power PS 6 6Kw 8 9Ps Oil 1 16qt 1 1L Fuel tank capacity ...

Page 33: ... quality Loosening damage to Harness connections are suitable not electrical wire connections loose or damaged There are no cracks in the ceramic the electrodes are not worn and there are no carbon deposits Dirtying of air filter element Air filter element is not dirty ゝ ゝ ゝ Element breakage Element is not torn or worn out ゝ ゝ ゝ Grass etc clogged in the recoil cover Accumulation of grass in There ...

Page 34: ... and nameplate are attached and not damaged If you do not understand any of these points please consult with the retailer where you purchased this machine Inspection Content Body Body Frame is not cracked or deformed Nuts and bolts have not fallen off Levers Wires When moving or loading there is no damage loosening rattling and nothing has fallen off ゝ ゝ ゝ ゝ ゝ Cover No cracking deformity or corros...

Page 35: ...the blade cover Grass accumulation in the pulley Clean the pulley Belt wear and tear Replace with a new belt Gear position is misaligned Adjust gear rod Transmission is in poor condition Repair transmission Blade is poorly balanced Repair blade Blade is broken Replace with a new blade or repair Grass has accumulated inside the blade neck guard Breakage Blade axis is bent Replace blade axis Belt br...

Page 36: ...e Poor quality fuel Replace with good quality fuel Overfilled with engine oil Adjust to correct fuel level Air filter element is clogged Clean the element Return the choke bar completely Put it in the position Overfilled with engine oil Adjust to correct fuel level Cylinder or piston ring is worn out Replace the ring Return the choke bar completely Put it in the position Poor quality fuel Replace ...

Page 37: ... have a request for replacement parts after this period has passed please consult with OREC for prices and availability If you have any questions please talk to staff at the point of purchase or at our head office At that time please inform us of your machine s model type serial number and engine type Position of identifying seal Orec America Inc 19428 66th Ave South Q 102 Kent WA 98032 USA MODEL ...

Page 38: ...elts blades filters spark plugs bags wheels hoses cables wires brake pads and flappers are excluded from the warranty This warranty does NOT cover tire replacement or repair caused by punctures from outside objects such as nails thorns stumps or glass During the warranty period the warranty holder is responsible for equipment transportation charges and transportation expenses needed to process the...

Page 39: ...ner should use the following procedure to make a warranty claim 1 The owner must take the machine to the dealer from whom they purchased the machine or to an authorized Orec America dealer 2 The owner must present the warranty registration sheet or the invoice or receipt received at time of purchase 3 The warranty claim will be taken and verified by the Orec Dealer or distributor service manager a...

Reviews: