background image

7

T

S

et-

U

C

leaner

STEP 5: 

Unscrew the

cleaner cartridge cap from
a STEEMER Full Release™
Carpet Cleaner cartridge.
Insert the cleaner cartridge
into the docking bay
(Figure 9) on the side of
the cleaner. The directions
on the cleaner cartridge
must be facing you. Rotate
the white locking lever on
the cartridge from left to
right to lock and seal the
cartridge in the cleaner.

STEP 6: 

Plug in the power

cord. Test and reset the
A.L.C.I. Iocated near the
plug. To test, press the test
button to shut off power.
To reset the A.L.C.I.,
simply push in the red
reset button on the plug
(Figure 10).

9

10

Always vacuum thoroughly before using
the ORECK STEEMER carpet cleaner. It
provides excellent carpet cleaning on
carpeted surfaces that are free of surface
debris.

To achieve best results, high traffic areas and carpet
stains should be pretreated prior to cleaning. We
recommend STEEMER Full Release™ Professional
Spot & Stain PreCleaner.

CAUTION:

Before cleaning a carpet for the

first time, test a small area for color fastness.

Pour a small amount of STEEMER Full Release™
Professional Carpet Cleaner on a clean white cloth
and blot carpet. Examine this cloth for color removal;
if color appears on the cloth, the carpeting is not
colorfast and should not be cleaned with the ORECK
STEEMER wet extraction process.

This product is not recommended for use 

on carpets made from silk, velvet, wool
and some cotton blends.

T

P

repare 

C

arpet

O

perating 

I

nstructions

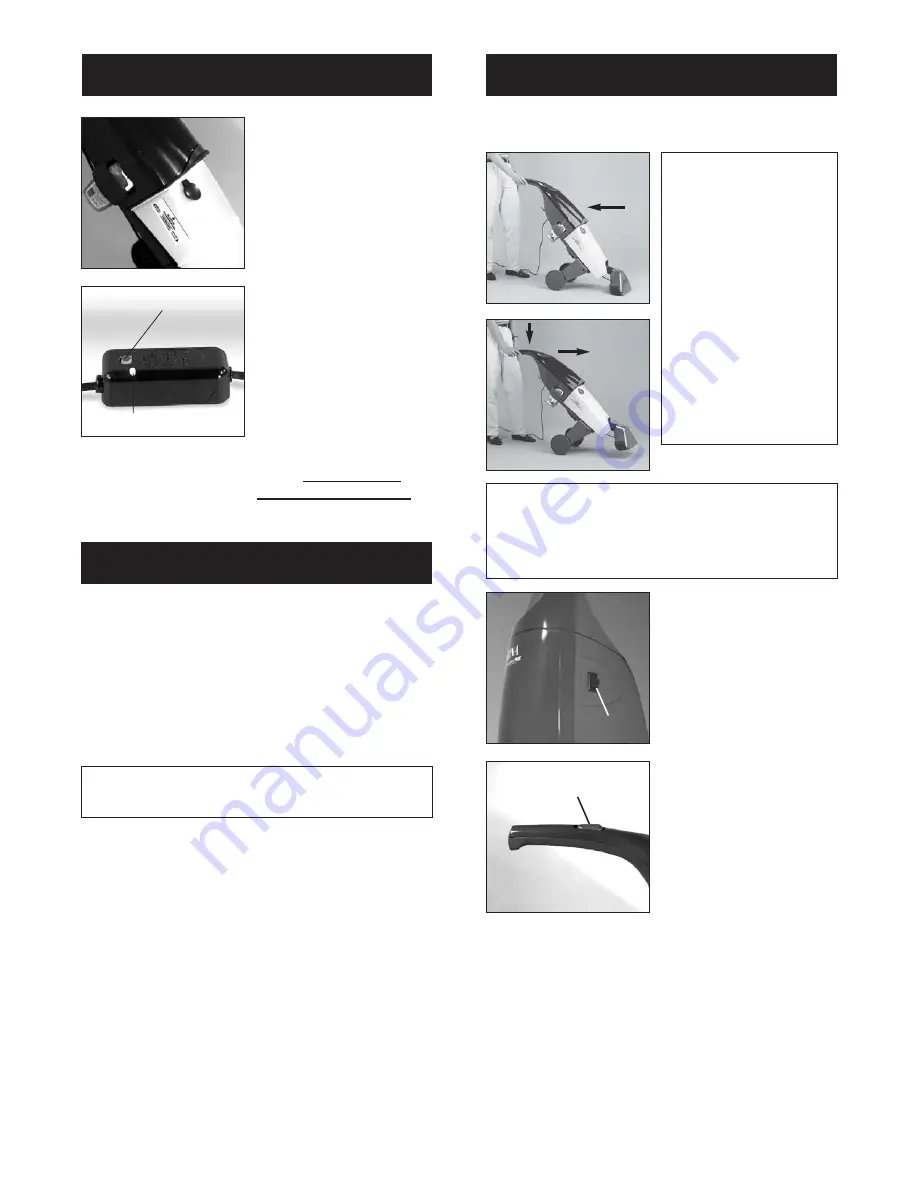
TO CLEAN CARPET

(Figures 11 and 12)

WARNING:

Do not push forward!

Pull the cleaner
towards you to clean.
This cleaner has been
specifically designed
to place the nozzle
deep into the carpet.
(Figure 11). 
Push down gently on
the handle to lift the
nozzle out of the
carpet, to move
forward and reposition
the cleaner (Figure 12).

11

12

IMPORTANT:

Adjust the speed of the cleaning

stroke to your carpet conditions. Heavily soiled
or stained carpets will require slower strokes.
Avoid oversaturating the carpet.

Test Button

Reset Switch

STEP 1: 

Place On/Off

power switch in the “On”
position. (Figure 13).

STEP 2: 

To clean the

carpet, press the gray
button in the handle
(Figure 14) and slowly
pull the cleaner backwards
(Figure 11). Pressing the
button releases the cleaner
and water mixture onto
the carpet. As you pull the
nozzle over the sprayed
carpet, the nozzle extracts
the solution from the carpet
and stores the dirty water
in the recovery tank. To
move forward, slightly tilt
the nozzle off the floor
and roll the cleaner forward
(Figure 12). Repeat Step 2
working in small overlapping
rows for even cleaning
until the entire room has
been completed.

13

On/Off Switch

14

Cleaner Spray Button

Summary of Contents for Steemer XLS465

Page 1: ...USER S GUIDE IMPORTANT SAVE THIS BOOKLET Includes Warranty Safety Warnings Parts List Operating Instructions Accessories List Trouble Diagnosis S I M P L Y A M A Z I N G XLS465 XLS465A ...

Page 2: ...r cord Do not unplug by pulling on cord To unplug grasp the plug not the cord Do not handle plug or appliance with wet hands Do not put any object into openings Do not use with any opening blocked keep free of dust lint hair and anything that may reduce air flow Keep hair loose clothing fingers and all parts of body away from openings and moving parts Do not use to pick up anything that is burning...

Page 3: ...y Reinsert the plug if it has slipped out of the outlet The A L C I may have tripped off due to fluctuations in household current Press the reset button and restart the unit PROBLEM SOLUTION Warranty ORECK MANUFACTURING COMPANY ORECK gives you the following limited warranty for this product only if it was originally purchased for use not resale from ORECK or an ORECK Authorized Retail Dealer ORECK...

Page 4: ...R MODELS 4 Large nonmarring easy to steer Wheels 5 Easy Lock in Cleaner Cartridge 7 Hand held Nozzle and Hose Assembly 8 25 Power Cord 9 A L C I Safety Plug with Reset and Test Buttons 10 Shampoo Cleaner Spray Button 11 Translucent Upper Supply Tank 12 Translucent Lower Recovery Tank 13 Tank Latch 14 Transparent Nozzle Cover 15 Motorized Scrubbing Brush 16 Quick connect fitting for Nozzle and Hose...

Page 5: ...ing the wheels in until they snap into place ASSEMBLY STEP THREE Figures 3 and 4 Attach Nozzle 1 Turn the unit so that the tank is face up 2 Align the nozzle so the red nozzle change button Figure 3 A is in line with the corresponding hole in the nozzle Figure 3 B 3 Depress the small red nozzle change button Figure 3 A and slide the nozzle over the unit shaft until the button locks into place 4 Pl...

Page 6: ...m around the cord at the A L C I A L C I may vary from illustration DANGER Improper installation of A L C I can result in electric shock Do not modify or by pass the A L C I Do not replace any electrical component in this product with anything other than an authorized ORECK replacement part The risk of electric shock can result if used in the vicinity of improperly grounded stationary appliances s...

Page 7: ...ng is not colorfast and should not be cleaned with the ORECK STEEMER wet extraction process This product is not recommended for use on carpets made from silk velvet wool and some cotton blends To Prepare Carpet Operating Instructions TO CLEAN CARPET Figures 11 and 12 WARNING Do not push forward Pull the cleaner towards you to clean This cleaner has been specifically designed to place the nozzle de...

Page 8: ...Figure 15 A Pull the nozzle Figure 15 B straight back and off the neck without twisting 15 B A 6 Open gray tank cap Fill with warm tap water close tank cap and replace tank onto cleaner 7 Locate the hand held nozzle and hose assembly Figure 16 Remove and discard the yellow tape 8 Attach the hand held nozzle and hose assembly to the cleaner neck by carefully aligning guide knob located on the top o...

Page 9: ...tlet 4 Turn cleaner on by placing the On Off power switch in the On position Figure 13 Operating Instructions 5 Lock the gray cleaner button by pressing and sliding the button forward on the main handle Figure 14 SMALL SPILL PICK UPS Small spills are typical household events When liquid is accidentally spilled within the home the liquid usually spreads out quickly into a wide area in a thin sheet ...

Page 10: ... you have been operating the cleaner at length it may be necessary to clean the nozzle from time to time particularly if the carpet is brand new or very dirty or if long haired pets frequently use the carpeted area Figure 22 6 Unplug cleaner and examine several areas on the power nozzle Figures 22 23 to see if debris has built up A Extractor slots Figure 22 A B Brush roll chamber Figure 22 B C Spr...

Page 11: ...cavity Using a long screwdriver loop belt around motor shaft Pull and stretch belt over crowned end of the brush roll 9 Replace brush roll into the power nozzle and rotate brush to properly align belt 10 Replace belt cover brush roll clamp and screws 11 Reconnect power cords and test 25 C Belt 5 Remove screw from belt cover Figure 25 A 6 Remove two 2 screws holding the brush roll clamp in place an...

Reviews: