3. Press
ST/LAP/+
repeatedly to select “WHEEL
SIZE”.
4. Press
SET
.
5. Input the bike wheel size by pressing
ST/LAP/+
to increase values or
-/SP
to decrease values.
6. Press
SET
to confirm.
BIKE WHEEL SIZE
Match the ETRTO or wheel size diameter printed
on the wheel with the wheel size setting at the right
hand column of the table below. Input the relevant
wheel size setting number after bike pod is paired.
ETRTO Wheel
size
diameter
(inches)
Wheel size
setting (mm)
25-559
26 x 1.0
1884
23-571
650 x 23C
1909
35-559
26 x 1.50
1947
37-622
700 x 35C
1958
47-559
26 x 1.95
2022
20-622
700 x 20C
2051
52-559
26 x 2.0
2054
23-622
700 x 23C
2070
25-622
700 x 25C
2080
28-622
700 x 28
2101
32-622
700 x 32C
2126
42-622
700 x 40C
2189
47-622
700 x 47C
2220
NOTE
Wheel sizes on this table are for reference
only as wheel size depends on the wheel type and
air pressure.
REMOVE PAIRED DEVICE
NOTE
The watch will not show “DEVICE REMOVE”
if no device is paired.
1. Press
MODE
repeatedly to select
.
2. Press
SET
.
3. Press
ST/LAP/+
repeatedly to select “DEVICE
REMOVE?”.
4. Press
SET
.
5. Press
ST/LAP/+
to select which device to
delete.
6. Press
SET
to confirm selection.
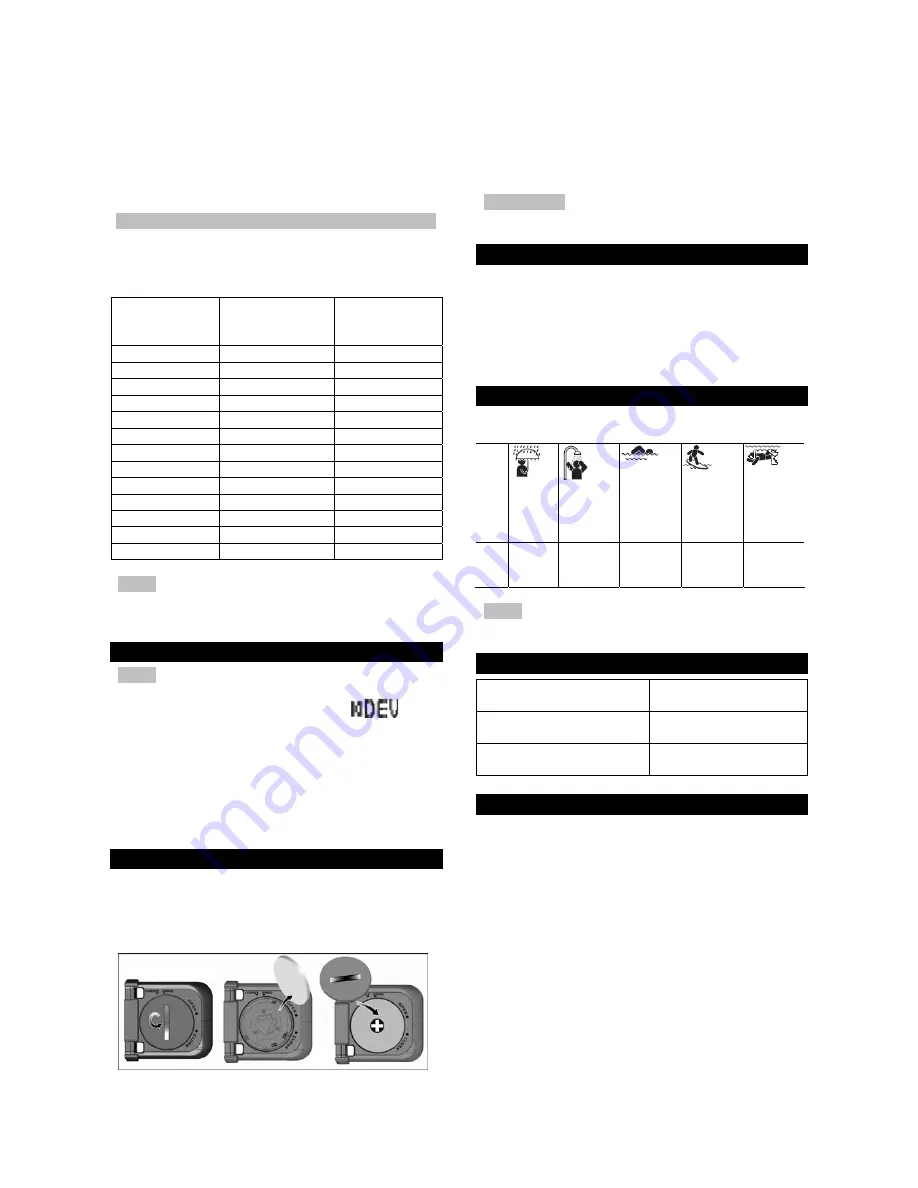
REPLACE BATTERY
If the watch indicates sensor battery is low, replace
batteries promptly as it may affect the accuracy of
the readings.
To replace the sensor battery:
1. Use a coin to open the battery compartment lid
by turning it anticlockwise.
2. Remove the old battery and insert a new
CR2032, 3V lithium battery.
3. Secure the lid by turning the coin clockwise.
IMPORTANT
Remember to pair device after every
battery replacement or reset.
CARE INSTRUCTIONS
•
Do not wrap the sensor in a wet towel nor with
other wet materials.
•
Do not place or wash the sensor under running
water, instead clean it with a wet cloth.
•
Do not store the sensor in a hot (about 50°C)
and humid (about 90%) environment.
WATER RESISTANCE
The AD202 is water-resistant up to 10 meters (32.8
feet). Not recommended to use for swimming.
RAIN
SPLASH-
ES ETC
SHOWER-
ING (WARM
/ COOL
WATER
ONLY)
LIGHT
SWIMMING
/ SHALLOW
WATER
SHALLOW
DIVING /
SURFING /
WATER
SPORTS
SNORKEL-
ING / DEEP
WATER
DIVING
10M /
32.8
FT
OK
NO NO NO NO
NOTE
Ensure the battery compartment is secured
and intact before exposing to excessive water.
SPECIFICATIONS
Power
1 x CR2032 3V lithium
battery
Operating temperature
5˚C to 40˚C (41˚F to
104˚F)
Storage temperature
-20˚C to 60˚C (-4˚F to
140˚F)
PRECAUTIONS
To ensure you use your product correctly and safely,
read these warnings and the entire user manual
before using the product:
•
Use a soft, slightly moistened cloth. Do not use
abrasive or corrosive cleaning agents, as these
may cause damage. Never use the products in
hot water or store them when wet.
•
Do not subject the product to excessive force,
shock, dust, temperature changes, or humidity.
Never expose the product to direct sunlight for
extended periods. Such treatment may result in
malfunction.
•
Do not tamper with the internal components.
Doing so will terminate the product warranty
and may cause damage. The main unit
contains no user-serviceable parts.


