5
TURNING ON THE CAMERA
Press the Power button once to turn on the camera. Press it again to turn the
camera off.
NOTE
•
The camera has an automatic time-out feature to conserve battery life. After 1
minute (or 2 minutes) the camera will time-out (turn off). When timed out, the
camera will not take a photo when you push the Shutter button. Press the Power
button once to turn on the camera again.
•
If power is low, the red LED blinks 5 times and then the camera turns off.
Recharge the battery immediately.
TURNING ON THE LCD
The LCD screen comes on automatically in preview mode when the power is turned
on. Press the LCD button once more to switch to preview mode with icons visible.
Press the LCD button again to turn off the LCD.
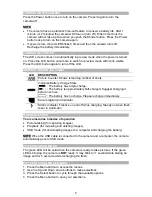
UNDERSTANDING LCD ICONS
LCD DESCRIPTION
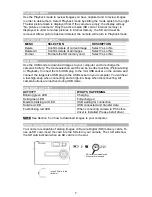
Picture Counter. Shows remaining number of shots.
Indicates Battery Charge State
: The battery has ample charge.
: The battery is approximately half-charged. Suggest charging it
before next use.
: The battery has no charge. Please recharge immediately.
Secure digital card indicator.
Strobe indicator. Flashes on and off while charging. Steady on when flash
is set to Automatic.
MODE SELECTION
Your camera has 3 modes of operation
:
•
Picture-taking (for capturing images)
•
Playback (for reviewing and deleting images)
•
USB mode (for downloading images to a computer and charging the battery)
NOTE
When the USB cable is connected to the camera and a computer, the camera
automatically goes to USB mode.
PICTURE-TAKING MODE
The green LED will be solid when the camera is ready to take pictures. If the green
LED is blinking, the camera is
NOT
ready. It may blink for 1 second while storing an
image and for 5 seconds while recharging the flash.
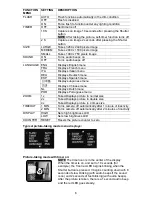
PICTURE-TAKING MODE MENUS
1. Press the Menu button to access the menus.
2. Use the Up and Down arrow buttons to make selections.
3. Press the Select button to cycle through the available options.
4. Press the Menu button to save your selections.


