background image

ESP

AÑOL

ESP

AÑOL

ENGLISH

FRANÇAIS

DEUTSCH

IT

ALIANO

POR

TUGUÊS

DS8228 Manual (086-002861-054)

POR

TUGUÊS

ENGLISH

FRANÇAIS

DEUTSCH

IT

ALIANO

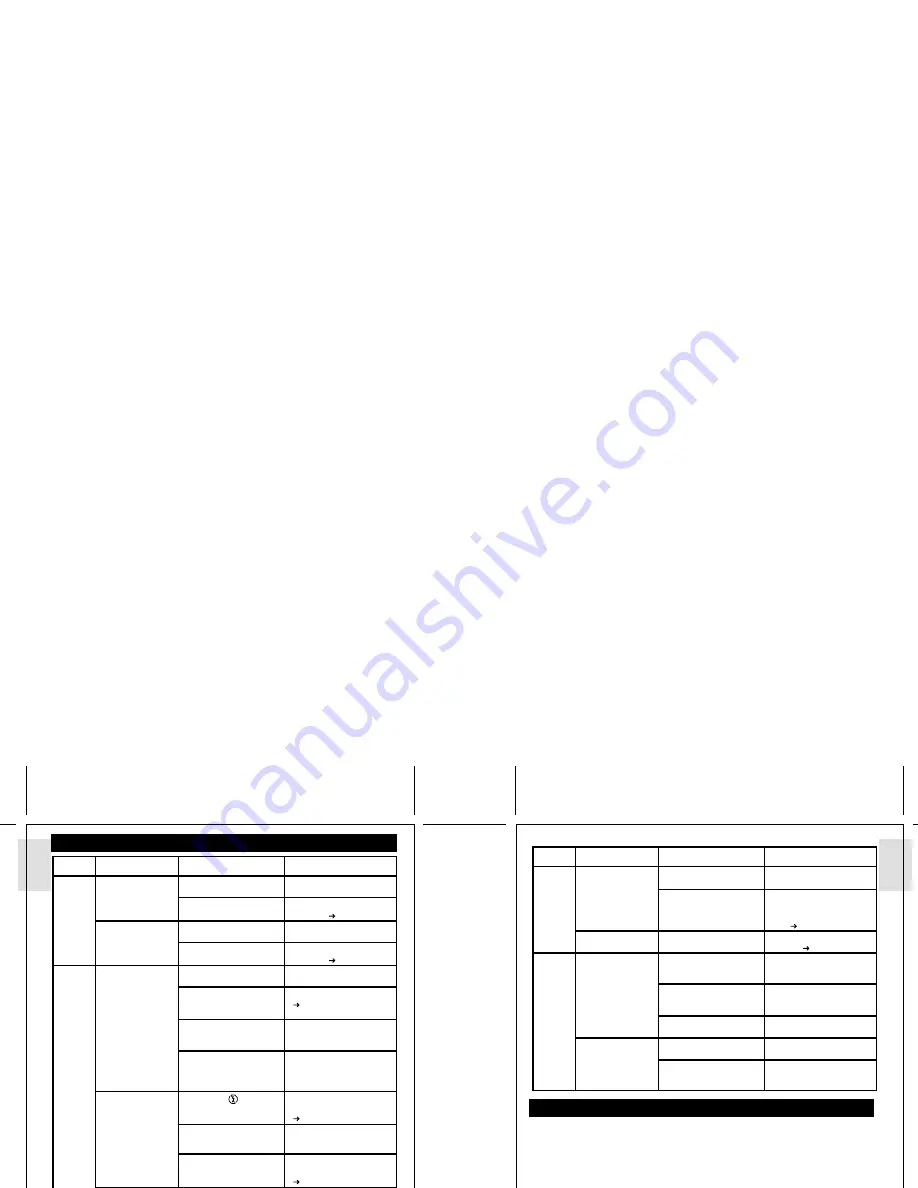
TROUBLESHOOTING

TRADEMARK INFORMATION

Microsoft™ and Windows™ are trademarks of the Microsoft Corporation of the United
States and other countries. Windows is an abbreviated term referring to the Microsoft
Windows Operating System.

Macintosh™ and Quicktime™ are registered trademark of Apple Computer, Inc.

CompactFlash™ and CF™ are trademarks of SanDisk.

Arcsoft Impression™ and Arcsoft Impression™ logo are registered trandemarks of Arcsoft Inc.

ADDITIONAL RESOURCES

Visit our website (www.oregonscientific.com) to learn more about your digital camera and
other Oregon Scientific products such as LCD TVs, hand-held organizers, alarm clocks, and
weather stations. The website also includes contact information for our customer service
department, in case you need to reach us.

© 2003 Oregon Scientific. All rights reserved.

30

31

Playback

Connect-
ing with
External
Devices

Cannot play back
images or movies.

Cannot delete
images or movies.

Picture not shown
on TV when
connected.

Camera does not
appear as
Removable Disk
when connected
to a PC.

Mode Dial is not set to
Playback Mode.

No images or movies are
recorded.

Images or movies are
protected.

Check cable connection.

Check channel on TV.

Camera or TV is not
turned on.

Check the USB cable
connection.

Camera is not turned on.

Set Mode Dial to Playback
Mode.

Images located in internal
memory instead.
Remove CompactFlash
card (  p.7).
Unprotect the images or
movies (  p.25).

Make sure yellow video
cable is plugged into the
TV’s AV terminal.
TV channel should be
switched to the appropriate
AV channel.
Turn on the camera and
TV.

Make sure both ends of the
USB cable are connected.

Turn the camera on.

Problem

Symptom

Check This

Remedy

Continued:

Replace with new
batteries.
Insert the batteries
correctly (  p.5)

Replace with new
batteries.
Disable the Auto Off
Function (  p.15)
Turn on the camera.

Delete unwanted files
(  p.24) or insert a new
CompactFlash card.

Change the Mode Dial to
Camera, Scene, or Movie
Mode.
Switch from your current
Focus Mode to either the
Macro or the the Scene
Mode.
Enable flash by changing
it to another setting
(  p.10).
Change the Mode Dial to
either Camera or Scene
Mode.
Wait until the Flashlight
Sensor has turned off
(  p.10).

Turn on the flash by
changing the Flash Mode
(  p.10).

Move closer to the subject
or choose another Focus
Mode (  p.9).

Clean the lens with a soft
cloth (  p.2).

No
Power

Taking
Pictures

Power will not
turn on.

Power turns off
after turning on.

Cannot take
pictures when the
Shutter Release
Button is pressed.

Flash does not go
off as expected.

Image taken
appears too dark
or blurred.

Batteries are exhausted.

Batteries are inserted
incorrectly.

Battery level is too low.

Auto Off Function is
enabled.
Camera not turned on.

No space on the
CompactFlash card /
Internal Memory

Mode Dial is set to
Playback mode.

Check your current
Focus Mode.

Flash is set  

  (no

flash)

Mode Dial is set to
Playback or Movie
Mode.
Flash has not finished
charging.

Check your Flash Mode.

The subject is too far
away.

The lens is dirty.

Problem

Symptom

Check This

Remedy

Summary of Contents for DS8228

Page 1: ...nstructions may cause harmful interference to radio communications However there is no guarantee that interference will not occur in a particular installation If this equipment does cause harmful interference to radio or television reception which can be determined by turning the equipment off and on the user is encouraged to try to correct the interference by one or more of the following measures...

Page 2: ...Front View 3 Back View 3 Mode Dial 4 4 Way Controller 4 Liquid Crystal Display 4 Battery Level Indicator 4 Getting Started 5 Package Contents 5 Installing the Batteries 5 Using an AC Adapter 5 Attaching the Strap and Lens Cap 6 CompactFlash CF Card 6 Basic Photography 7 Quick Start 7 Basic Functions and Settings 8 Toggling OSD Information 8 Selecting a Scene Setting 9 Selecting a Focus Mode 9 Sele...

Page 3: ... 1 Mega Pixels resolution you are assured of clear natural looking images every time you take a photo Multimedia Features You can shoot movie clips without sound with your digital camera for up to the available space of the camera s internal memory or the installed CompactFlash card Advanced Camera Functions In addition to the Auto Flash and 2x Zooming functions you can take advantage of advanced ...

Page 4: ...amage your eyesight Avoid leaving the camera exposed to direct sunlight as the action of the lens could cause fires Remove the batteries and memory card before storing the camera for long periods of time Then keep it in a well ventilated place in order to prevent moulding NOTES ON THE DIGITAL CAMERA Cleaning your Camera Lens Viewfinder Use a blower or a lens brush to remove dirt or dust Wipe caref...

Page 5: ...ries AA x 2 One Video Cable One User Manual A Lens Cover with Strap One USB Cable One Quick Start Guide INSTALLING THE BATTERIES Your camera is shipped with two AA sized batteries You may also use one CRV3 battery sold separately Incorrectly installing the batteries may damage your digital camera USING AN AC ADAPTER OPTIONAL If you intend to leave the camera on for a long period of time you may op...

Page 6: ...t is fully extended 4 Press the eject button 5 Pull out the card by grabbing the protruding 6 Flip the eject button back into the compartment Close the lid 4 5 6 2 1 1 Remove the lens cover from the lens 2 Turn the Mode Dial to Camera Mode 3 Check the battery indicator making sure there is enough power p 4 1 Loop the strap over your wrist 2 Hold the camera 3 Avoid blocking the lens and flash 4 Do ...

Page 7: ...rtrait Used for photographs where the subject is against a backdrop of night time scenery Night Used for photographs while employing slow shutter speeds to Landscape produce stunning night landscapes Backlight Used when light is coming from behind your subject The flash will fire automatically Sepia Used to give images a golden brown hue that resembles old photographs B W Used to give images a bla...

Page 8: ...Slow This mode uses a slow shutter speed in combination with flash The Synchronous fired flash freezes the subject in the foreground while capturing the Flash background scene In and modes there will be a brief initial flash before the main flash is emitted This is done to reduce the red eye effect in images Your digital camera comes with a 2X zooming function By default the zooming is not enabled...

Page 9: ...djusts all settings for you Scene Menu Setup Menu Asks you to choose the scene setting before entering the shooting mode Playback Menu Setup Menu Lets you play back all images movies recorded onto the camera s internal memory or CompactFlash card Movie Menu Setup Menu Allows you to shoot simple movies with the camera Example of a Menu Screen Under the Setup Menu which is available in all modes the...

Page 10: ... shut down push MENU or DISP on the camera Auto Off is not available in slideshow mode or when the camera is connected to a PC Logo Setting When the camera is turned on the opening logo will appear briefly by default You can choose to switch off this opening logo File Number Setting Your camera keeps an internal file counter for every image and movie taken that can be reset The setting options are...

Page 11: ...ing access the Scene Setting selection menu p 9 This setting is only available in Scene Mode Image Size Setting You can choose the resolution size of your images from Fine 1600 x 1200 Normal 1280 x 960 and Basic 640 x 480 The higher the resolution size of an image the larger the memory space it occupies Picture Quality Setting You can choose the picture quality of your Images The higher the resolu...

Page 12: ...at lower speeds ISO Options Speed Description Auto The camera sets the speed automatically 100 ISO rating 100 Use for low lit scenes 200 ISO rating 200 Use or normally lit scenes 400 ISO rating 400 Use for sports subjects in motion or brightly lit scenes Continuous Shooting Setting Con Shoot With this setting pictures can be taken continuously when you hold down the Shutter Release button A maximu...

Page 13: ...luorescent Lamp White F L Fluorescent Lamp Tungsten ISO p 19 Auto 100 200 400 EV p 19 2 0 1 7 1 3 1 0 0 7 0 3 0 0 0 3 0 7 1 0 1 3 1 7 2 0 PLAYBACK FUNCTIONS In Playback Mode you can review the images and movies stored within your current active storage memory The last image or movie taken is displayed on the OSD in Playback Mode Use the 4 Way Controller and press or to view through the images and ...

Page 14: ... while the Scrolling Mode is enabled PLAYBACK OF MOVIES Movie Playback Mode On Screen Display To playback movies 1 Press the Shutter Release Button to start playback 2 Press OK to hide the Progress Bar Press again to restore the Progress Bar 3 Press the Shutter Release Button again to stop the playback The movie will then start from the beginning All zooming functions are disabled during Movie Pla...

Page 15: ...plays up to nine thumbnail images similar to the Multi Frame Review setting p 23 Use the 4 Way Controller to navigate 2 You can set multiple images or movies for protection by highlighting an image then pushing the OK button The icon will then indicate that the image is set for protection To cancel the protection press the OK button again 3 Follow the rest of the on screen options to confirm delet...

Page 16: ...ppropriate AV channel display The OSD is automatically off when the camera is connected to a TV Use an AC Adapter if you intend to connect the camera to a TV for a long period of time CONNECTING TO A WINDOWS BASED PC Use the USB cable included to connect to your Windows PC This enables you to upload download edit and playback pictures and movies on your PC However the PC software must be installed...

Page 17: ... camera can then be uploaded and downloaded Before connecting to the Macintosh however software must be installed Power PC 16 bit colour display at 800x600 350 MB free hard disk space USB 1 1 interface Only the images and movies stored in the camera s current memory device CF card or internal memory will be visible on the Macintosh The OSD is automatically off when the camera is connected to the M...

Page 18: ...V terminal TV channel should be switched to the appropriate AV channel Turn on the camera and TV Make sure both ends of the USB cable are connected Turn the camera on Problem Symptom Check This Remedy Continued Replace with new batteries Insert the batteries correctly p 5 Replace with new batteries Disable the Auto Off Function p 15 Turn on the camera Delete unwanted files p 24 or insert a new Com...
Page 19: ...0 pixels VGA File Format DCF compliant Exif ver 2 1 JPEG compliant or TIFF YC uncompressed Lens F F2 8 F3 4 F4 8 F8 9 Digital zoom 2 x Shooting distance Normal F2 8 1 5 12m F3 4 1 3 45m F4 8 1 1 infinity F8 9 0 8 infinity Macro Approx 24cm Flashlight Distance Approx 0 8m 2m Operation Environment Temperature Approx 0 C 60 C Monitor 1 4 TFT LCD Internal Memory 8MB Digital Video Recording 320 x 240 p...

Reviews: