background image

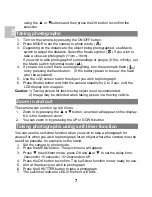
8.    The photograph will be taken after the timer reaches the delay time that you 

pre-set, and the camera will beep once.   


1.    Press the MODE button to select the video clip mode. 
2.    Press the SHUTTER button to start recording video, press the SHUTTER 

button again to stop recording. The video clip will now be saved as an AVI 
file in the camera memory. 

3.    Press MENU to set proper resolution, EV and WB, and press OK to confirm. 


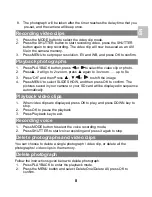
1.    Press PLAYBACK button, press 

or 

to select the video clip or photo. 

2.    Press

, it will go to 2x zoom, press 

▲ 

again to 3x zoom

…… up to 8x. 

3.   

Press “OK” and then Press 

,


,

or 

  to shift the image. 

4.    Press MENU to select SLIDE SHOW, and then press OK to confirm. The 

pictures saved in your camera or your SD card will be displayed in sequence 
automatically. 


1.    When video clips are displayed, press OK to play, and press DOWN key to 

stop.   

2.    Press OK to pause the playback 
3.    Press Playback key to exit. 


1.    Press MODE button to select the voice recording mode,   
2.    Press SHUTTER to start voice recording and press it again to stop. 


You can choose to delete a single photograph / video clip, or delete all the 
photographs / video clips in the memory. 


Follow the instructions given below to delete photograph. 

1.    Press PLAYBACK to enter the playback mode. 
2.    Press the MENU button and select Delete One/Delete All, press OK to 

confirm. 

Recording video clips


Playback photographs


Playback video clips


Recording voice


Delete photographs and video clips


Delete photograph


EN


Summary of Contents for DS9555

Page 1: ...photographs 8 Playback video clips 8 Recording voice 8 Delete photographs and video clips 8 Delete photograph 8 Shortcut to delete one picture 9 Installing the camera driver 9 Uninstalling old drivers and devices 9 Installing the driver for Windows XP Windows Vista 9 Connecting the camera 10 Connecting as a mass storage device 10 Connecting as a PC camera 10 Specifications 11 System requirement 12...

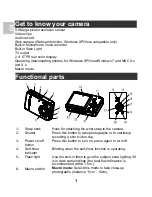
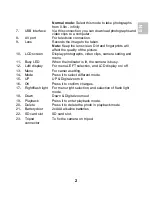
Page 2: ...strap to the camera 2 Shutter Press this button to take photographs or to start stop recording a short video clip 3 Power on off button Press this button to turn on press again to turn off 4 Self timer indicator Blinking when the self timer function is operating 5 Flash light Use the built in flash to give the subject extra lighting if it is in dark surroundings the best flash distance is recommen...

Page 3: ...and menu 11 Busy LED When the indicator is lit the camera is busy 12 Left display For menu LEFT selection and LCD display on off 13 Menu For camera setting 14 Mode Press it to select different mode 15 UP UP Digital zoom in 16 OK Press it to confirm changes 17 Right flash light For menu right selection and selection of flash light mode 18 Down Down Digital zoom out 19 Playback Press it to enter pla...

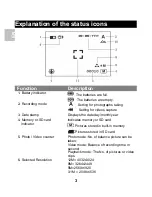
Page 4: ...SD card indicator Indicates memory or SD card Pictures stored in built in memory Pictures stored in SD card 5 Photo Video counter Photo mode No of balance picture can be taken Video mode Balance of recording time in second Playback mode The No of pictures or video clips 6 Selected Resolution 12M 4032x3024 8M 3264x2448 5M 2560x1920 3 1M 2048x1536 Explanation of the status icons Function Description...

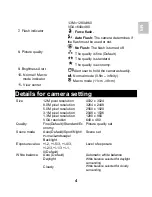
Page 5: ...w center Size 12M pixel resolution 4032 x 3024 8 0M pixel resolution 3264 x 2448 5 0M pixel resolution 2560 x 1920 3 1M pixel resolution 2048 x 1536 1 3M pixel resolution 1280 x 960 VGA resolution 640 x 480 Quality Fine Default Standard Ec onomy Picture quality set Scene mode Auto Default Sport Night Portrait Landscape Backlight Scene set Exposure value 2 5 3 4 3 2 3 1 3 1 0 Default Level of expos...

Page 6: ...s to take pictures automatically Date Input Off Default Set DD MM YYYY Time Stamp Off Default Date Only Date Time Show the date and or time on the pictures Continuous shoot Continuous shoot Can continuously shoot up to 3 pictures within 10 seconds Format Execute cancel Format the memory card Language English Default T Chines e S Chinese French Ger man Italian Spanish Portu guese Select display lan...

Page 7: ... card into the slot Do not force the card into the slot or else it may damage both the camera and the SD memory card Note The SD memory card must be formatted before taking photographs See the following sections for more information 1 Press Menu button 2 Select Setup setting by right key 3 Press OK to confirm and select by up or down key 4 Press OK to format the card or memory The camera can be se...

Page 8: ...1 Taking picture for fast moving object is not recommended 2 Image may be distorted when taking picture in a moving vehicle The camera can zoom in up to 8 times 1 Zoom in by pressing the or button a number will appear on the display 8 0 is the maximum zoom 2 You can zoom in by pressing the UP or DOWN button You can use the self timer function when you wish to take a photograph for yourself or when...

Page 9: ...IDE SHOW and then press OK to confirm The pictures saved in your camera or your SD card will be displayed in sequence automatically 1 When video clips are displayed press OK to play and press DOWN key to stop 2 Press OK to pause the playback 3 Press Playback key to exit 1 Press MODE button to select the voice recording mode 2 Press SHUTTER to start voice recording and press it again to stop You ca...

Page 10: ...ect Safe Mode from the menu which will be displayed 2 Click on Start Settings Control Panel and double click on Add Remove Programs icon 3 Find all the programs for similar old devices and remove these by clicking on the Add Remove button When in Safe Mode it is possible for some programs to appear twice In that case remove all the programs which appear twice 4 Restart the computer Note Make sure ...

Page 11: ... Setup setting 3 Press button to set USB connection 4 Press or button to choose the Disk Drive mode 5 Press OK to confirm 6 Connect the camera to the computer 7 Windows will automatically detect the camera You can use this camera as a removable disk When you connect the camera as a PC camera you can use the camera as a web cam for video conferencing on the Internet by using Windows NetMeeting or W...

Page 12: ...ital zoom 8x Flash strobe Built in Auto force off LCD display 2 4 real color LTPS TFT White balance Auto Daylight cloudy Tungsten Fluorescent Video mode 30fps QVGA 20fps VGA Built in memory 16 MB Flash memory External memory card SD card supports up to 8 GB File format Picture JPEG Video AVI Voice WAV Self timer 2 10 10 2 seconds PC interface USB 1 1 TV out NTSC PAL Power source 2xAAA alkaline bat...

Page 13: ...atted properly Format the memory in SETUP mode of the camera Please refer to section 5 3 Cannot find removable disk after connecting the camera to the computer 1 Connection failure 2 The mode of the camera is not set to removable disk properly 1 Make sure all cable connections are secured and restart the computer if necessary 2 Set the camera to removable disk mode refer to section 6 3 1 system se...

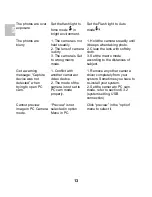
Page 14: ...cro mode according to the distances of subject Get a warning message Capture device was not detected when trying to open PC cam 1 Conflict with another camera or video device 2 The mode of the camera is not set to PC cam mode properly 1 Remove any other camera driver completely from your system Sometimes you have to re install your system 2 Set the camera to PC cam mode refer to section 6 3 2 syst...

Page 15: ...he user s authority to operate the equipment This equipment has been tested and found to comply with the limits for a Class B digital device pursuant to Part 15 of the FCC Rules These limits are designed to provide reasonable protection against harmful interference in a residential installation This equipment generates uses and can radiate radio frequency energy and if not installed and used in ac...

Page 16: ... product for all inquiries instead We Name Oregon Scientific Inc Address 19861 SW 95th Ave Tualatin Oregon 97062 USA Telephone No 1 800 853 8883 declare that the product Product No DS9555 Product Name 5 0 Mega Pixels Digital Camera Manufacturer iPM Concepts Limited Address Block C 9 F Kaiser Estate Phase 1 41 Man Yue St Hung Hom Kowloon Hong Kong is in conformity with Part 15 of the FCC Rules Oper...

Reviews: