


DE
5
Sommerzeit (DST)
Die Uhr wurde darauf programmiert, bei Inkrafttreten der
Sommerzeit automatisch umgestellt zu werden.
MANUELLE EINSTELLUNG DER UHR
HINWEIS
Auch wenn die Uhr manuell eingestellt wurde,
wird sie automatisch synchronisiert, wenn ein Funksignal
empfangen wird.
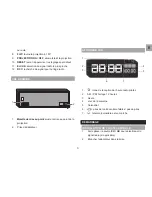
1. Drücken Sie auf
SET CLOCK
.
2. Drücken Sie auf
SET + /
-, um die Einstellungen zu
ändern. Halten Sie
SET + / -
gedrückt, um die Werte
rasch zu ändern.
3. Drücken Sie zur Bestätigung auf
SET CLOCK
.
Die Reihenfolge der Einstellungen lautet:
12-/24-Stundenformat, Zeitzone, Uhrzeit, Jahr,
Kalenderformat (M/T), Datum.
Der Zeitzonenausgleich stellt die Uhr auf +/- 23 Stunden von
der empfangenen Signalzeit ein.
Wenn Sie den Wert +1 in der Einstellung für den
Zeitausgleich eingeben, ergibt dies Ihre Ortszeit zuzüglich
1 Stunde. Wenn Sie sich in den USA befinden, stellen Sie
die Uhr wie folgt ein:
0
Pacific Time +1 Mountain Time
+2
Central Time +3 Eastern Time
So wählen Sie die Sprache aus, die wochentags
angezeigt wird:
Drücken Sie wiederholt auf
LANGUAGE
, um zwischen
ENG / FRE / GER / ITA / SPA zu wählen.
Um die Einstellung zu speichern, drücken Sie 5 Sekunden
lang keine Taste.
ALARM
So stellen Sie den Alarm ein:
1. Drücken Sie auf
SET +/-
, um die Alarmeinstellung
aufzurufen.
2. Drücken Sie wiederholt auf
SET +/-
, um die
Alarmzeit einzustellen. Um die Werte rasch zu ändern,
halten Sie die Taste gedrückt.
Um die Einstellung zu speichern, drücken Sie 5
Sekunden lang keine Taste.
gibt an, dass der Alarm aktiviert ist.
Zwischen akustischem Alarm und Radioalarm wählen:
• Verschieben Sie den Schalter
ALARM /
, um den
jeweiligen Alarm auszuwählen.
Lautstärke einstellen:
• Verschieben Sie
ALARM HI / LO
, um die Lautstärke
Summary of Contents for EasyPlus EC101
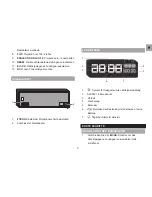
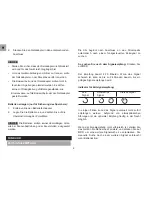
Page 1: ...EasyPlus Talk o Clock Model EC101 USER MANUAL...
Page 66: ...1 FM EC101 2 2 2 3 3 3 3 4 4 4 5 5 5 6 6 6 6 6 Oregon Scientific 7...
Page 67: ...2 1 2 3 4 5 6 7 8 1 2 3 4 5 6 7 8 180 9 10 11 1 2 3 4 5 6 7 8 1 2 3 4 5 6 7 8 9 10 11 12...
Page 68: ...3 12 RCC 1 2 1 2 12 3 4 5 6 7 1 2 1 2 1 2 1 2 3 4 5 6 7...
Page 69: ...4 RCC 2 10 24 RCC DST 1 2 3 12 24 23 1 0 1 2 3 5...
Page 70: ...5 1 2 5 8 24 1 2 180...
Page 71: ...6 x x 200 x 105 x 65 7 9 x 4 1 x 2 6 514 18 1 AC DC 6V 2 UM 4 AAA 1 5 V Oregon Scientific...
Page 80: ...1 FM EC101 2 2 2 3 3 3 3 4 4 4 5 5 5 6 6 6 6 6 Oregon Scientific 7...
Page 82: ...3 1 2 1 2 12 3 4 5 6 7 1 2 1 2 1 2 1 2 3 4 5 6 7...
Page 83: ...4 RCC 2 10 24 RCC DST 1 2 3 12 24 23 1 0 1 2 3 5...
Page 84: ...5 1 2 5 8 24 1 2 180...
Page 85: ...6 x x 200 x 105 x 65 7 9 x 4 1 x 2 6 514 18 1 AC DC 6V 2 UM 4 AAA 1 5 V Oregon Scientific...


