


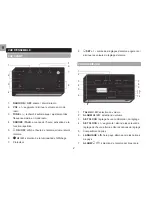


ES
5
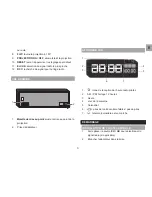
2. Pulse
SEt + /
- para realizar cambios en la
configuración. Mantenga pulsado
SEt + / -
para
cambiar los dígitos con rapidez.
3. Pulse
SEt CloCK
para aceptar los cambios.
Los pasos en la configuración siguen este orden: Formato
de 12 / 24 horas, zona horaria, hora, año, formato de fecha
(m / d), fecha.
La compensación de zona horaria reajusta la hora del reloj
+ / - 23 horas respecto a la señal de la hora recibida.
Si int1 en la configuración de la zona horaria, el
reloj mostrará la hora local más una hora adicional.
Si se encuentra en los EE.UU., ajuste la hora de la siguiente
manera:
0
Tiempo del Pacífico
+1
Tiempo de la Montaña
+2
Tiempo Estándar Central
+3
Tiempo del Este
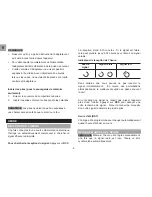
Seleccione el idioma para mostrar los días de la
semana:
Pulse
lANGUAGE
repetidamente parar elegir entre inglés
(ENG), francés (FRE), alemán (GER), italiano (ITA) o
español (SPA).
Para guardar la configuración, no pulse ningún botón
durante 5 segundos.
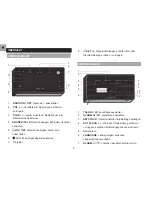
AlARMA
Ajuste de la alarma:
1. Pulse
SEt +/-
para acceder al modo de ajuste de
la alarma.
2. Pulse
SEt +/-
repetidamente para ajustar la alarma.
Mantenga el botón pulsado para cambiar los dígitos
con rapidez.
Para guardar la alarma, no pulse ningún botón durante 5
segundos.
Le indica que la alarma está activada.
Elija entre alarma con pitido o alarma con radio:
• Deslice el botón
AlARM /
para elegir el tipo de
sonido, pitido o emisora de radio.
Ajuste del volumen:
• Deslice el botón
AlARM HI / lo
para ajustar el nivel
del volumen.
Activación / desactivación de la alarma:
• Pulse
oN / oFF
.
Para silenciar la alarma:
• Pulse
SNooZE / tAlK
para silenciar la alarma durante
Summary of Contents for EasyPlus EC101
Page 1: ...EasyPlus Talk o Clock Model EC101 USER MANUAL...
Page 66: ...1 FM EC101 2 2 2 3 3 3 3 4 4 4 5 5 5 6 6 6 6 6 Oregon Scientific 7...
Page 67: ...2 1 2 3 4 5 6 7 8 1 2 3 4 5 6 7 8 180 9 10 11 1 2 3 4 5 6 7 8 1 2 3 4 5 6 7 8 9 10 11 12...
Page 68: ...3 12 RCC 1 2 1 2 12 3 4 5 6 7 1 2 1 2 1 2 1 2 3 4 5 6 7...
Page 69: ...4 RCC 2 10 24 RCC DST 1 2 3 12 24 23 1 0 1 2 3 5...
Page 70: ...5 1 2 5 8 24 1 2 180...
Page 71: ...6 x x 200 x 105 x 65 7 9 x 4 1 x 2 6 514 18 1 AC DC 6V 2 UM 4 AAA 1 5 V Oregon Scientific...
Page 80: ...1 FM EC101 2 2 2 3 3 3 3 4 4 4 5 5 5 6 6 6 6 6 Oregon Scientific 7...
Page 82: ...3 1 2 1 2 12 3 4 5 6 7 1 2 1 2 1 2 1 2 3 4 5 6 7...
Page 83: ...4 RCC 2 10 24 RCC DST 1 2 3 12 24 23 1 0 1 2 3 5...
Page 84: ...5 1 2 5 8 24 1 2 180...
Page 85: ...6 x x 200 x 105 x 65 7 9 x 4 1 x 2 6 514 18 1 AC DC 6V 2 UM 4 AAA 1 5 V Oregon Scientific...


