


3
SWE
11.
EU / UK
: välj närmsta radiosignal
12.
RCC
: sök radioklocksignal
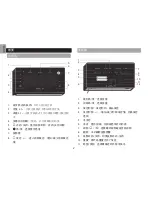
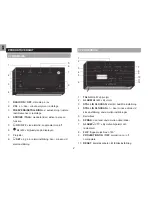
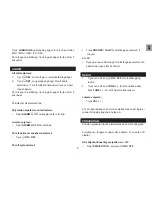
BAKIFRÅN
1. Vred: justera fokus för projektion
2. Nätadapterjack
LCd dISPLAy
1 : ikon för radiokontrollerad klocka
2. AM / PM: 12 timmars klocka
3. Klocka
4. Veckodag
5. Datum
6.
: låg batterinivå i huvudenheten /inget batteri
7. : dagligt alarm är på
ATT KoMMA IGÅNG
INSTALLATIoN Av HUvUdENHET
1. Ställ
EU / UK
för att välja önskad signal.
2. Sätt adaptern i uttaget.
NoTERA
• Kolla så att adapterpluggen går lätt att ansluta till
enheten.
• För att totalt bortkoppla spänningen, skall adaptern tas
bort från huvudenheten.
• Huvudenheten och adaptern får ej utsättas för fukt. Inga
föremål fyllda med vätska, såsom vaser, får placeras på
huvudenheten eller adaptern.
Installera batterier (endast för minnesbackup):
1. Öppna batteriluckan.
2. Se till att batterierna sätts in med rätt polaritet.
1
2
1
2
3
4
5
6
7
Summary of Contents for EasyPlus EC101
Page 1: ...EasyPlus Talk o Clock Model EC101 USER MANUAL...
Page 66: ...1 FM EC101 2 2 2 3 3 3 3 4 4 4 5 5 5 6 6 6 6 6 Oregon Scientific 7...
Page 67: ...2 1 2 3 4 5 6 7 8 1 2 3 4 5 6 7 8 180 9 10 11 1 2 3 4 5 6 7 8 1 2 3 4 5 6 7 8 9 10 11 12...
Page 68: ...3 12 RCC 1 2 1 2 12 3 4 5 6 7 1 2 1 2 1 2 1 2 3 4 5 6 7...
Page 69: ...4 RCC 2 10 24 RCC DST 1 2 3 12 24 23 1 0 1 2 3 5...
Page 70: ...5 1 2 5 8 24 1 2 180...
Page 71: ...6 x x 200 x 105 x 65 7 9 x 4 1 x 2 6 514 18 1 AC DC 6V 2 UM 4 AAA 1 5 V Oregon Scientific...
Page 80: ...1 FM EC101 2 2 2 3 3 3 3 4 4 4 5 5 5 6 6 6 6 6 Oregon Scientific 7...
Page 82: ...3 1 2 1 2 12 3 4 5 6 7 1 2 1 2 1 2 1 2 3 4 5 6 7...
Page 83: ...4 RCC 2 10 24 RCC DST 1 2 3 12 24 23 1 0 1 2 3 5...
Page 84: ...5 1 2 5 8 24 1 2 180...
Page 85: ...6 x x 200 x 105 x 65 7 9 x 4 1 x 2 6 514 18 1 AC DC 6V 2 UM 4 AAA 1 5 V Oregon Scientific...


