


5
SWE
Tryck
LANGUAGE
upprepade gånger för att välja mellan
ENG / FRE / GER / ITA / SPA.
För att spara inställning, tryck inga knappar förrän efter 5
sekunder.
ALARM
Att ställa alarmet:
1. Tryck
SET +/-
för att gå in i alarminställningsläget.
2. Tryck
SET +/-
upprepade gånger
för att ändra
alarmtiden. För att snabbt ändra tiden, tryck och håll
inne knappen.
För att spara inställning, tryck inga knappar förrän efter 5
sekunder.
indikerar att alarmet är på
välj mellan bipalarm och radioalarm:
• Skjut
ALARM /
omkopplaren för att välja.
Justera volymen:
• Skjut
ALARM HI / Lo
för att välja.
För att aktivera / avaktivera alarmet:
• Tryck
oN / oFF
.
För att tysta alarmet:
• Tryck
SNooZE / TALK
för att stänga av alarmet i 8
minuter
ELLER
• Tryck på annan valfri knapp för att stänga av alarmet och
aktivera det igen efter 24 timmar.
RAdIo
1. Tryck och håll inne
oN / oFF
för att sätta igång
radion.
2. Tryck och håll inne
TUNE + / -
för att autosöka eller
tryck
TUNE + / -
för att finjustera frekvensen.
Justera volymen:
• Tryck
voL +
/
-
För din bekvämlighet, kommer radiofrekvensen att lagras i
minnet till nästa gång radion slås på.
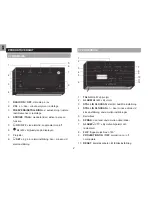
PRoJEKTIoN
Enheten projicerar tid och alarmstatus på en mörk bakgrund.
Projektionen fungerar endast när enheten är ansluten till
elnätet.
Att välja (kontinuerlig) projektion on / off:
•
Skjut
PRoJEKTIoN
– brytaren till
oN / oFF
.
Summary of Contents for EasyPlus EC101
Page 1: ...EasyPlus Talk o Clock Model EC101 USER MANUAL...
Page 66: ...1 FM EC101 2 2 2 3 3 3 3 4 4 4 5 5 5 6 6 6 6 6 Oregon Scientific 7...
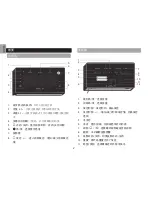
Page 67: ...2 1 2 3 4 5 6 7 8 1 2 3 4 5 6 7 8 180 9 10 11 1 2 3 4 5 6 7 8 1 2 3 4 5 6 7 8 9 10 11 12...
Page 68: ...3 12 RCC 1 2 1 2 12 3 4 5 6 7 1 2 1 2 1 2 1 2 3 4 5 6 7...
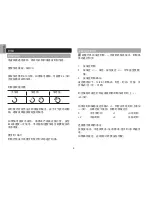
Page 69: ...4 RCC 2 10 24 RCC DST 1 2 3 12 24 23 1 0 1 2 3 5...
Page 70: ...5 1 2 5 8 24 1 2 180...
Page 71: ...6 x x 200 x 105 x 65 7 9 x 4 1 x 2 6 514 18 1 AC DC 6V 2 UM 4 AAA 1 5 V Oregon Scientific...
Page 80: ...1 FM EC101 2 2 2 3 3 3 3 4 4 4 5 5 5 6 6 6 6 6 Oregon Scientific 7...
Page 82: ...3 1 2 1 2 12 3 4 5 6 7 1 2 1 2 1 2 1 2 3 4 5 6 7...
Page 83: ...4 RCC 2 10 24 RCC DST 1 2 3 12 24 23 1 0 1 2 3 5...
Page 84: ...5 1 2 5 8 24 1 2 180...
Page 85: ...6 x x 200 x 105 x 65 7 9 x 4 1 x 2 6 514 18 1 AC DC 6V 2 UM 4 AAA 1 5 V Oregon Scientific...


