background image

中文(繁)

5

鬧鐘

欲設定鬧鐘︰

1.   按   設定 +/-進入鬧鐘設定。

2.   重複按   設定 +/-,調整鬧鐘時間。欲快速變

     更數值,按住按鍵。

欲儲存設定,在

5

秒內不要按任何按鍵。

   說明已開啟鬧鐘。

選擇嗶聲鬧鐘或收音機鬧鐘 

•      

滑動鬧鐘   / 

 切換鈕以選擇。

調整音量︰

•      

滑動鬧鐘高/低切換鈕以選擇。

欲啟動 / 停止啟動鬧鐘: 

•      

按開啟   /關閉。

欲關閉鬧鐘聲音﹕

•      

按貪睡功能/報時,可關閉鬧鐘聲音8分鐘。

•      

按任何按鍵終止鬧鐘,並在

 24 

小時後再次開啟鬧

    鐘。

收音機

1.  按住開啟 

 /關閉,以開啟收音機。

2.  按住調頻 +/-,進行自動搜尋,或按調頻 +/-,手

    動選擇頻率。

調整音量︰

•      

按音量+ /-。

為方便您的使用,機體將把收音機頻率儲存於記憶體
中,直至下次開啟收音機為止。

投射

本機體將時間和鬧鐘狀態投射至深色背景上。  

投射功能僅在機體連接至主電源時運作。

欲連續開啟/關閉投射︰

•      

將投射切換鈕切換至開啟/關閉。

180°

翻轉投射的影像︰

•      

按翻轉。

欲對焦影像︰

•      

轉動焦距轉盤。

Summary of Contents for EasyPlus EC101

Page 1: ...EasyPlus Talk o Clock Model EC101 USER MANUAL...

Page 2: ...k view 3 LCD display 3 Getting started 3 Main unit installation 3 Clock 4 Clock reception 4 Manually set clock 4 Alarm 5 Radio 5 Projection 6 Audible time function 6 Display brightness 6 Reset 6 Speci...

Page 3: ...time turn alarm on off 6 HI LO select display brightness 7 Projector 8 SET enter alarm setting increase decrease value of the alarm setting BOTTOM view 1 2 3 4 5 6 7 8 9 10 11 12 1 TALK HI LO select v...

Page 4: ...lock reception BACK view 1 2 1 FOCUS wheel adjust projection focus 2 Adaptor socket LCD DISPLAY 1 2 3 4 5 6 7 1 radio controlled clock reception icon 2 AM PM 12 hour clock 3 Clock 4 Day of the week 5...

Page 5: ...To search for signal reception Press RCC Reception takes 2 10 minutes If the signal is weak it can take up to 24 hours to get a valid signal Clock reception indicator No signal Weak signal Strong igna...

Page 6: ...y to select between ENG FRE GER ITA SPA To save setting do not press any key for 5 seconds ALARM To set the alarm 1 Press SET to enter alarm setting 2 Press SET repeatedly to adjust the alarm time To...

Page 7: ...e Turn FOCUS wheel NOTE If projection is illuminated do not look directly into the projector AUDIBLE TIME FUNCTION To hear the time Press SNOOZE TALK To hear the day press SNOOZE TALK again while voic...

Page 8: ...manufacturer Do not dispose old batteries as unsorted municipal waste Collection of such waste separately for special treatment is necessary Please note that some units are equipped with a battery saf...

Page 9: ...interference in a residential installation This equipment generates uses and can radiate radio frequency energy and if not installed and used in accordance with the instructions may cause harmful inte...

Page 10: ...lock Manufacturer IDT Technology Limited Address Block C 9 F Kaiser Estate Phase 1 41 Man Yue St Hung Hom Kowloon Hong Kong is in conformity with Part 15 of the FCC Rules Operation is subject to the f...

Page 11: ...cht 2 R ckansicht 3 LCD anzeige 3 Erste schritte 3 Installation der basiseinheit 3 Funkuhr 4 Zeitsignalempfang 4 Manuelle einstellung der uhr 5 Alarm 5 Radio 6 Projektion 6 H rbare uhrzeit 6 Anzeigehe...

Page 12: ...6 HI LO Anzeigehelligkeit verstellen 7 Projektor 8 SET Alarmeinstellungen aufrufen Wert der Alarmeinstellung erh hen verringern UNTERE ANSICHT 1 2 3 4 5 6 7 8 9 10 11 12 1 TALK HI LO Lautst rke ausw...

Page 13: ...CHT 1 2 1 FOCUS Einstellrad Projektionssch rfe einstellen 2 Anschluss f r Netzadapter LCD ANZEIGE 1 2 3 4 5 6 7 1 Symbol f r funkgesteuerten Zeitsignalempfang 2 AM PM 12 Stundenuhr 3 Uhrzeit 4 Wochent...

Page 14: ...llten keiner berm igen Hitze wie bei Sonnenbestrahlung oder Feuerstellen ausgesetzt werden FUNKUHR ZEITSIGNALEMPFANG Die Uhr beginnt nach Anschluss an eine Stromquelle automatisch nach einem funkgeste...

Page 15: ...eingeben ergibt dies Ihre Ortszeit zuz glich 1 Stunde Wenn Sie sich in den USA befinden stellen Sie die Uhr wie folgt ein 0 Pacific Time 1 Mountain Time 2 Central Time 3 Eastern Time So w hlen Sie di...

Page 16: ...f VOL Zu Ihrem Komfort wird die Radiofrequenz gespeichert um wieder aufgerufen zu werden wenn das Radio das n chste Mal eingeschaltet wird ProjeKtion Dieses Ger t kann die Uhrzeit und den Alarmstatus...

Page 17: ...Bel ftungs ffnungen nicht mit Gegenst nden abdecken wie z B Zeitungen Vorh nge usw Tauchen Sie das Ger t niemals in Wasser Falls Sie eine Fl ssigkeit ber das Ger t versch tten trocknen Sie es sofort...

Page 18: ...g k nnen ohne Benachrichtigung ge ndert werden HINWEIS Eigenschaften und Zubeh r nicht in allen L ndern verf gbar Weitere Informationen erhalten Sie von Ihrem Fachh ndler vor Ort ber Oregon Scientific...

Page 19: ...sera 3 Pantalla LCD 3 Gu a de inicio 3 Instalaci n de la unidad principal 3 Reloj 4 Recepci n de la hora 4 Ajuste manual del reloj 4 Alarma 5 Radio 6 Proyecci n de la hora 6 Funci n de notificaci n de...

Page 20: ...OFF mostrar la alarma activar o desactivar la alarma 6 HI LO ajustar el brillo de la pantalla 7 Proyector 8 SET entrar en el modo de ajuste de la alarma incrementar o disminuir los d gitos de la alar...

Page 21: ...e radiofrecuencia del reloj Vista Trasera 1 2 1 FOCUS ruedecilla para ajustar el enfoque del proyector 2 Conexi n del adaptador de alimentaci n Pantalla LCD 1 2 3 4 5 6 7 1 icono de recepci n de la se...

Page 22: ...ncluso si la hora ha sido ajustada manualmente 1 Pulse SET CLOCK NOTA Aseg rese de que el adaptador no quede obstruido y tenga f cil acceso a la unidad Desenchufe el adaptador de la toma de corriente...

Page 23: ...ne el idioma para mostrar los d as de la semana Pulse LANGUAGE repetidamente parar elegir entre ingl s ENG franc s FRE alem n GER italiano ITA o espa ol SPA Para guardar la configuraci n no pulse ning...

Page 24: ...curos La funci n de proyecci n s lo funciona cuando la unidad est conectada a la toma de corriente Activaci n continua desactivaci n del proyector Active o desactive el proyector deslizando el bot n P...

Page 25: ...ser distintas al producto en s Cuando elimine este producto aseg rese de que no vaya a parar a la basura general sino separadamente para recibir un tratamiento especial La colocaci n de este producto...

Page 26: ...contactar directamente con nuestro Departamento de Atenci n al Cliente por favor visite www oregonscientific es Para consultas internacionales por favor visite https us oregonscientific com about int...

Page 27: ...2 Vue arri re 3 Affichage LCD 3 D marrage 3 Installation de l unit centrale 3 Heure 4 R ception de l heure 4 R glage manuel de l heure 4 Alarme 5 Radio 6 Projection 6 Fonction heure audible 6 Luminos...

Page 28: ...6 HI LO s lection de la luminosit de l affichage 7 Projecteur 8 SET entr e des r glages d alarme augmente diminue les valeurs du r glage d alarme vue inf rieure 1 2 3 4 5 6 7 8 9 10 11 12 1 TALK HI L...

Page 29: ...de mise au point ajuste la mise au point de la projection 2 Prise d adaptateur AFFICHAGE LCD 1 2 3 4 5 6 7 1 icone de r ception de l heure radio pilot e 2 AM PM horloge 12 heures 3 Heure 4 Jour de la...

Page 30: ...va automatiquement commencer chercher un signal d heure radio pilot Pour chercher la r ception du signal Appuyer sur RCC La r ception prend 2 10 minutes Si le signal est faible cela peut prendre jusq...

Page 31: ...p t e pour s lectionner entre ENG FRE GER ITA SPA Pour sauvegarder les r glages n appuyer sur aucune touche pendant 5 secondes Alarme Pour r gler l alarme 1 Appuyer sur SET pour entrer dans le r glag...

Page 32: ...ranch dans une prise de courant Pour allumer teindre la projection en continu Faire coulisser la touche PROJECTION sur ON OFF Pour faire tourner l image projet e 180 Appuyer sur FLIP Pour faire la mis...

Page 33: ...de ce produit assurez vous qu il soit collect s par ment pour un traitement adapt Le poser sur certaines surfaces en bois peut endommager la finition du meuble et Oregon Scientific ne peut en tre tenu...

Page 34: ...ntific com service support asp Pour des renseignements internationaux rendez vous sur le site https us oregonscientific com about international asp Europe D claration de conformit Par la pr sente Oreg...

Page 35: ...2 Vue arri re 3 Affichage LCD 3 D marrage 3 Installation de l unit centrale 3 Heure 4 R ception de l heure 4 R glage manuel de l heure 4 Alarme 5 Radio 6 Projection 6 Fonction heure audible 6 Luminos...

Page 36: ...6 HI LO s lection de la luminosit de l affichage 7 Projecteur 8 SET entr e des r glages d alarme augmente diminue les valeurs du r glage d alarme vue inf rieure 1 2 3 4 5 6 7 8 9 10 11 12 1 TALK HI L...

Page 37: ...de mise au point ajuste la mise au point de la projection 2 Prise d adaptateur AFFICHAGE LCD 1 2 3 4 5 6 7 1 icone de r ception de l heure radio pilot e 2 AM PM horloge 12 heures 3 Heure 4 Jour de la...

Page 38: ...va automatiquement commencer chercher un signal d heure radio pilot Pour chercher la r ception du signal Appuyer sur RCC La r ception prend 2 10 minutes Si le signal est faible cela peut prendre jusq...

Page 39: ...p t e pour s lectionner entre ENG FRE GER ITA SPA Pour sauvegarder les r glages n appuyer sur aucune touche pendant 5 secondes Alarme Pour r gler l alarme 1 Appuyer sur SET pour entrer dans le r glag...

Page 40: ...ranch dans une prise de courant Pour allumer teindre la projection en continu Faire coulisser la touche PROJECTION sur ON OFF Pour faire tourner l image projet e 180 Appuyer sur FLIP Pour faire la mis...

Page 41: ...de ce produit assurez vous qu il soit collect s par ment pour un traitement adapt Le poser sur certaines surfaces en bois peut endommager la finition du meuble et Oregon Scientific ne peut en tre tenu...

Page 42: ...ntific com service support asp Pour des renseignements internationaux rendez vous sur le site https us oregonscientific com about international asp Europe D claration de conformit Par la pr sente Oreg...

Page 43: ...steriore 3 Display LCD 3 Per iniziare 3 Installazione unit principale 3 Orologio 4 Ricezione orologio 4 Impostazione manuale orologio 5 Allarme 5 Radio 6 Proiezione 6 Funzione ora sonora 6 Luminosit d...

Page 44: ...selezionare la luminosit del display 7 Proiettore 8 SET impostare l allarme aumentare diminuisce il valore di impostazione dell allarme VISTA INFERIORE 1 2 3 4 5 6 7 8 9 10 11 12 1 TALK HI LO selezion...

Page 45: ...el focus di proiezione 2 Presa jack di ingresso alimentazione elettrica DISPLAY LCD 1 2 3 4 5 6 7 1 icona ricezione segnale orario radiocontrollato 2 AM PM ora nel formato 12 ore 3 Orologio 4 Giorno d...

Page 46: ...in memoria l orario la data e l allarme nel caso di mancanza alimentazione di rete elettrica per un breve periodo Orologio RICEZIONE OROLOGIO Dopo il collegamento a alla rete elettrica pricipale l oro...

Page 47: ...tazione time offset verr fornita l ora locale maggiorata di un ora Se si risiede negli Stati Uniti impostare l orologio su 0 per l ora del Pacifico 1 per l ora della zona delle montagne Mountain 2 per...

Page 48: ...OTA L ultima frequenza radio selezionata sar memorizzata per la successiva accensione della radio PROIEZIONE Questa unit proietta l ora e lo stato dell allarme meglio visibile in condizione di scarsa...

Page 49: ...in acqua Se si versa del liquido sul prodotto asciugarlo immediatamente con un panno morbido e liscio Non pulire l unit con alcool solventi materiali abrasivi e o corrosivi Non aprire il prodotto ne...

Page 50: ...non disponibili in tutti i paesi Per ulteriori informazioni rivolgersi al proprio rivenditore Informazioni su Oregon Scientific Per avere maggiori informazioni sui nuovi prodotti Oregon Scientific vi...

Page 51: ...erkant 2 Achterkant 3 LCD scherm 3 Starten 3 Het apparaat instellen 3 Klok 4 Klok ontvangst 4 Klok handmatig instellen 4 Alarm 5 Radio 5 Projectie 5 Gesproken tijd functie 6 Helderheid scherm 6 Resett...

Page 52: ...llingen openen instellingswaarde alarm verhogen verlagen Onderkant 1 TALK HI LO volume selecteren 2 ALARM HI LO volume selecteren 3 SET CLOCK tijd instellen instelling bevestigen 4 SET CLOCK instellin...

Page 53: ...at instellen 1 Schuif de EU UK schakelaar op het dichtstbijzijnde radiosignaal indien van toepassing 2 Steek de adapter in het stopcontact NB Zorg dat de adapter in de buurt is van het apparaat en dat...

Page 54: ...het apparaat dan bij een raam en druk op RCC om nogmaals een signaal te zoeken Handmatig opnieuw een signaal zoeken verbruikt meer energie van de batterij Zomer Wintertijd DST De klok is zo geprogram...

Page 55: ...Volume aanpassen Schuif de ALARM HI LO schakelaar om te selecteren Het alarm aan uitzetten Druk op ON OFF Om het alarm te stoppen Druk op SNOOZE TALK om het alarm 8 minuten stil te zetten OF Druk een...

Page 56: ...ren helderheid scherm De helderheid instellen Druk op HI LO RESETTEN Druk op RESET om de standaardinstellingen te gebruiken Specificaties TYPE BESCHRIJVING L x B x H 200 x 105 x 65 mm 7 9 x 4 1 x 2 6...

Page 57: ...andere versies dan is de Engelstalige versie doorslaggevend NB De technische specificaties van dit product en de inhoud van de handleiding zijn zonder voorafgaande waarschuwing aan veranderingen onder...

Page 58: ...inferior 2 Vista traseira 3 Tela LCD 3 Para come ar 3 Instala o da unidade principal 3 Rel gio 4 Recep o do rel gio 4 Ajuste manual do rel gio 4 Alarme 5 R dio 5 Proje o 6 Fun o hora aud vel 6 Brilho...

Page 59: ...7 ALARM seleciona alarme bipe ou r dio 8 FLIP gira proje o em 180 9 PROJECTION ON OFF liga desliga proje o VIS O GERAL ViSTA FRONTAL 1 RADIO ON OFF liga desliga r dio 2 VOL aumenta diminui volume no...

Page 60: ...pilhas da unidade principal fracas esgotadas 7 alarme di rio ligado para come ar instala o da unidade principal 1 Deslize a tecla EU UK para selecionar o sinal de r dio mais pr ximo se aplic vel 2 Con...

Page 61: ...tmosf ricos a melhor recep o ocorre frequentemente durante a noite Caso a recep o do sinal seja mal sucedida coloque a unidade perto de uma janela e pressione RCC para tentar outra busca de sinal Ao f...

Page 62: ...ressione SET repetidamente para ajustar a hora do alarme Pressione e mantenha pressionado SET para alterar os valores rapidamente Para salvar o ajuste n o pressione nenhuma tecla durante 5 segundos O...

Page 63: ...m Gire o bot o FOCUS NOTA Quando a proje o estiver ligada n o olhe diretamente no projetor fun o hora aud vel Para escutar a hora Pressione SNOOZE TALK Para escutar a dia pressione SNOOZE TALK novamen...

Page 64: ...responsabilizar Consulte as instru es de cuidados do fabricante do m vel para obter informa es O conte do deste manual n o pode ser reproduzido sem a permiss o do fabricante N o descarte baterias usad...

Page 65: ...fic declara que este a Rel gio Falante EasyPlus modelo EC101 est conforme com os requisitos essenciais e outras provis es da Diretriz 1999 5 CE Uma c pia assinada e datada da Declara o de Conformidade...

Page 66: ...1 FM EC101 2 2 2 3 3 3 3 4 4 4 5 5 5 6 6 6 6 6 Oregon Scientific 7...

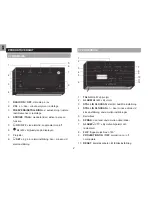
Page 67: ...2 1 2 3 4 5 6 7 8 1 2 3 4 5 6 7 8 180 9 10 11 1 2 3 4 5 6 7 8 1 2 3 4 5 6 7 8 9 10 11 12...

Page 68: ...3 12 RCC 1 2 1 2 12 3 4 5 6 7 1 2 1 2 1 2 1 2 3 4 5 6 7...

Page 69: ...4 RCC 2 10 24 RCC DST 1 2 3 12 24 23 1 0 1 2 3 5...

Page 70: ...5 1 2 5 8 24 1 2 180...

Page 71: ...6 x x 200 x 105 x 65 7 9 x 4 1 x 2 6 514 18 1 AC DC 6V 2 UM 4 AAA 1 5 V Oregon Scientific...

Page 72: ...7 OREGON SCIENTIFIC Oregon Scientific www oregonscientific com https us oregonscientific com service support asp http us oregonscientific com about international asp...

Page 73: ...Bakifr n 3 LCD display 3 Att komma ig ng 3 Installation av huvudenhet 3 Klocka 4 Klockmottagning 4 Manuell inst llning av klockan 4 Alarm 5 Radio 5 Projektion 5 Talande tidsfunktion 6 Ljusstyrka p dis...

Page 74: ...n i alarminst llning ka minska vid alarminst llning Vy Undersida 1 TALA HI LO v lj volym 2 ALARM HI LO v lj volym 3 ST LL IN KLOCKAN st ll tid bekr fta inst llning 4 ST LL IN KLOCKAN ka minska v rde v...

Page 75: ...NSTALLATION AV Huvudenhet 1 St ll EU UK f r att v lja nskad signal 2 S tt adaptern i uttaget NOTERA Kolla s att adapterpluggen g r l tt att ansluta till enheten F r att totalt bortkoppla sp nningen sk...

Page 76: ...n ny signals kning Manuell s kning av signalen f rbrukar mer batteri Sommartid DST Klockan r programmerad att automatiskt v xla till sommartid MANUELL INST LLNING AV KLOCKAN NOTERA ven om klockan r in...

Page 77: ...I LO f r att v lja F r att aktivera avaktivera alarmet Tryck ON OFF F r att tysta alarmet Tryck SNOOZE TALK f r att st nga av alarmet i 8 minuter ELLER Tryck p annan valfri knapp f r att st nga av ala...

Page 78: ...A 1 5V batterier F rsiktighets tg rder Uts tt inte apparaten f r kraftigt v ld st tar damm extrema temperaturer eller fukt T ck inte f r ventilationsh len F rs kra dig om att n rliggande f rem l s som...

Page 79: ...ning NOTERA Egenskaper och tillbeh r kan skilja mellan olika l nder F r mer information kontakta ditt lokala ink psst lle Om Oregon Scientific Bes k v r hemsida www oregonscientific se f r att se mer...

Page 80: ...1 FM EC101 2 2 2 3 3 3 3 4 4 4 5 5 5 6 6 6 6 6 Oregon Scientific 7...

Page 81: ...2 1 2 3 4 5 6 7 8 1 2 3 4 5 6 7 8 180 9 10 11 12 RCC 1 2 3 4 5 6 7 8 1 2 3 4 5 6 7 8 9 10 11 12...

Page 82: ...3 1 2 1 2 12 3 4 5 6 7 1 2 1 2 1 2 1 2 3 4 5 6 7...

Page 83: ...4 RCC 2 10 24 RCC DST 1 2 3 12 24 23 1 0 1 2 3 5...

Page 84: ...5 1 2 5 8 24 1 2 180...

Page 85: ...6 x x 200 x 105 x 65 7 9 x 4 1 x 2 6 514 18 1 AC DC 6V 2 UM 4 AAA 1 5 V Oregon Scientific...

Page 86: ...7 OREGON SCIENTIFIC Oregon Scientific www oregonscientific com https us oregonscientific com service support asp http us oregonscientific com about international asp...

Page 87: ...2011 Oregon Scientific All rights reserved...

Reviews: