background image

7

Hedge Trimmer Model HT275

Important Safety Instructions

Power Tool Use and Care

• 

Do not force the power tool. Use the 

correct power tool for your application.


The correct power tool will do the job 

better and safer at the rate for which it was 

designed 

• 

Do not use the power tool if the switch 

does not turn it on and off.

 Any power tool 

that cannot be controlled with the switch is 

dangerous and must be repaired 

• 

Disconnect the plug from the power 

source and/or the battery pack from 

the power tool before making any 

adjustments, changing accessories, or 

storing power tools.

 Such preventive safety 

measures reduce the risk of starting the 

power tool accidentally 

• 

Store idle power tools out of the reach 

of children and do not allow persons 

unfamiliar with the power tool or these 

instructions to operate the power tool.


Power tools are dangerous in the hands of 

untrained users 

• 

Maintain power tools. Check for 

misalignment or binding of moving 

parts, breakage of parts and any other 

condition that may affect the power tool’s 

operation. If damaged, have the power 

tool repaired before use.

 Many accidents 

are caused by poorly maintained power tools 

• 

Keep cutting tools sharp and clean.


Properly maintained cutting tools with sharp 

cutting edges are less likely to bind and are 

easier to control 

• 

Use the power tool, accessories and 

tool bits etc. in accordance with these 

instructions, taking into account the 

working conditions and the work to 

be performed.

 Use of the power tool for 

operations different from those intended could 

result in a hazardous situation 

Battery Tool Use and Care

• 

Recharge only with Oregon® Series C 

chargers specified by the manufacturer 

(Oregon® C650, C750).

 A charger that is 

suitable for one type of battery pack may 

create a risk of fire when used with another 

battery pack 

• 

Use power tools only with specifically 

designated Oregon® Series B battery 

packs (Oregon® B425E, B426, B600E, 

B650E, B662, B742).

 Use of any other 

battery packs may create a risk of injury and 

fire 

• 

When battery pack is not in use, keep it 

away from other metal objects, like paper 

clips, coins, keys, nails, screws or other 

small metal objects, that can make a 

connection from one terminal to another.


Shorting the battery terminals together may 

cause burns or a fire 

• 

Under abusive conditions, liquid may be 

ejected from the battery; avoid contact. 

If 

contact accidentally occurs, flush with water  

If liquid contacts eyes, additionally seek 

medical help  Liquid ejected from the battery 

may cause irritation or burns 

Service

Have your power tool serviced by a 

qualified repair person using only identical 

replacement parts.

 This will ensure that the 

safety of the power tool is maintained 

Summary of Contents for HT275

Page 1: ...ion Manual Hedge Trimmer Model HT275 Manuel d instructions original Taille haie mod le HT275 Manual de instrucciones original Cortasetos modelo HT275 Manual de instru es original Do podador de cerca v...

Page 2: ......

Page 3: ...on anglaise si vous percevez que le respect des consignes traduites pourrait occasionner des dommages mat riels ou des l sions corporelles Espa ol 48 ADVERTENCIA Lea y entienda todas las advertencias...

Page 4: ...Safety 9 Charger Safety 10 Symbols and Labels 11 Hedge Trimmer Names and Terms 12 Product Identification 13 Operating the Hedge Trimmer 14 Unpacking 14 Battery Pack and Charger 14 General Operation 1...

Page 5: ...nings refers to your mains operated corded power tool or battery operated cordless power tool Work area safety Keep work area clean and well lit Cluttered or dark areas invite accidents Do not operate...

Page 6: ...ons will reduce personal injuries Prevent unintentional starting Ensure the switch is in the off position before connecting to power source and or battery pack picking up or carrying the tool Carrying...

Page 7: ...ing edges are less likely to bind and are easier to control Use the power tool accessories and tool bits etc in accordance with these instructions taking into account the working conditions and the wo...

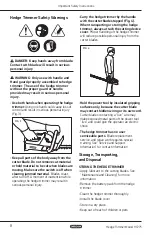
Page 8: ...y Carry the hedge trimmer by the handle with the cutter blade stopped Fig 4 When transporting or storing the hedge trimmer always attach the cutting device cover Proper handling of the hedge trimmer w...

Page 9: ...e management and recycling agencies have information on proper recycling or disposal instructions Battery packs can be collected in the United States or Canada through Rechargeable Battery Recycling C...

Page 10: ...T SAFETY INSTRUCTIONS CAUTION This appliance is not intended for use by persons including children with reduced physical sensory or mental capabilities or lack of knowledge unless they have been given...

Page 11: ...and when handling the cutting blades Sound Power Sound power level is 74 dB Two handed hold Hold hedge trimmer with both hands One handed hold Do not hold hedge trimmer with one hand Do Not Incinerat...

Page 12: ...utting speed Press the throttle trigger more firmly for faster cutting speed To get the most cutting time out of each charge use only the minimum cutting speed necessary to cut the material Front hand...

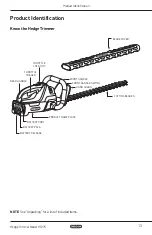
Page 13: ...entification Know the Hedge Trimmer NOTE See Unpacking for a list of included items REAR HANDLE THROTTLE TRIGGER THROTTLE LOCK OUT HAND GUARD BLADE COVER CUTTING BLADES FRONT HANDLE SWITCH FRONT HANDL...

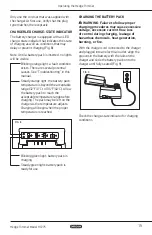
Page 14: ...on Cordless Tool System to obtain replacement parts at 888 313 8665 Battery Pack and Charger WARNING Do not charge the battery pack in the rain BATTERY PACK LED CHARGE LEVEL INDICATOR The lithium ion...

Page 15: ...ge 32 F 0 C to 104 F 40 C Allow the battery pack to reach the acceptable temperature range before charging The pack may be left on the charger as the temperature adjusts Charging will begin when the p...

Page 16: ...remove the pack Fig 11 General Operation WARNING Always wear proper gloves and eye protection OPERATING TEMPERATURE This hedge trimmer is designed to operate within a temperature range of 32 F to 104...

Page 17: ...firmly Pull back on trigger lock out 1 with thumb Fig 15 Squeeze the throttle trigger 2 until the cutting blades move at the desired speed The front handle switch 3 is a safety feature the hedge trim...

Page 18: ...the hedge trimmer with the cutting blades angled 5 10 toward the direction of the cut Fig 16 IMPORTANT The cutting blades occasionally bind and stop moving when material becomes lodged in the cutting...

Page 19: ...s remove the battery before clearing cutting blades to avoid accidental activation of the cutting blades CAUTION Cutting blades are sharp Always wear gloves when clearing material from the cutting bla...

Page 20: ...ades are sharp have no nicks or blunt edges and do not hang up or catch when running the hedge trimmer Periodically file away nicks and burrs on the blades to ensure they move freely Sharp and free mo...

Page 21: ...here are no user serviceable parts inside the battery pack Do not disassemble Lithium ion batteries have a predetermined operating life If the amount of cutting time per charge decreases noticeably th...

Page 22: ...t preventing cutting blade movement See Correcting Blade Bind Hedge trimmer does not cut properly Resin buildup preventing cutting blade movement See Blade Care Cutting blades are dull Have the cuttin...

Page 23: ...cessary Apply less pressure to the throttle trigger Resin buildup preventing cutting blade movement See Blade care Battery pack not fully charged See Charging the Battery Pack Blinking orange light on...

Page 24: ...on Operating temperatures 32 F to 104 F 0 C to 40 C Model Capacity nominal Voltage nominal B425E 2 6 Ah 94 Wh 36 VDC B426 2 6 Ah 94 9 Wh 36 5 VDC B600E 4 0 Ah 144 Wh 36 VDC B650E 6 0 Ah 216 Wh 36 VDC...

Page 25: ...urchaser only free of charge any product or part which is found upon examination by Blount to be defective in material and or workmanship The purchaser shall be responsible for all transportation char...

Page 26: ...ngement transport et mise au rebut 30 S curit de la batterie 31 S curit du chargeur 32 Symboles et tiquettes 33 Noms et termes utilis s pour le taille haie 34 Identification du produit 35 Fonctionneme...

Page 27: ...avail Garder le lieu de travail propre et suffisamment clair Les endroits encombr s ou sombres sont propices aux accidents Ne pas faire fonctionner d outils lectriques dans des atmosph res explosives...

Page 28: ...es accidentels S assurer que le commutateur est verrouill en position d arr t avant tout branchement la source d alimentation et ou au bloc de batterie ou avant de soulever ou de transporter l outil L...

Page 29: ...t entretenus et dont les tranchants sont bien aff t s risquent moins de se bloquer et sont plus faciles contr ler Utiliser l outil lectrique les accessoires et embouts etc conform ment aux pr sentes i...

Page 30: ...4 Pour le transport ou le rangement du taille haie toujours couvrir l outil de coupe Toujours couvrir la lame avec le couvre lame lors du transport ou du rangement du taille haie Une manipulation appr...

Page 31: ...lage appropri ou les instructions de mise au rebut Les blocs de batterie peuvent tre collect s aux tats Unis ou au Canada via l organisme Rechargeable Battery Recycling Corporation Oregon s est d j ac...

Page 32: ...IMPORTANTES ATTENTION Cet appareil n est pas destin tre utilis par des personnes y compris les enfants capacit s physiques sensorielles ou mentales r duites ou manquant de connaissances sauf si elles...

Page 33: ...des lames de coupe Puissance acoustique Le niveau de puissance acoustique est de 74 dB Prise deux mains Tenir le taille haie deux mains Prise une main Ne jamais tenir le taille haie une main Ne pas in...

Page 34: ...d une teinte plus claire moins ligneuse et plus flexible que le reste de la plante Pare main Barri re structurelle entre la poign e avant du taille haie et les lames de coupe Poign e arri re Poign e d...

Page 35: ...QUE Consulter D ballage pour obtenir la liste des articles inclus POIGN E ARRI RE ACC L RATEUR G CHETTE ACC L RATEUR BOUTON DE VERROUILLAGE PROT GE MAIN COUVRE LAME LAMES DE COUPE INTERRUPTEUR DE LA P...

Page 36: ...oc de batterie et chargeur AVERTISSEMENT Ne pas charger le bloc de batterie sous la pluie INDICATEUR DEL DU NIVEAU DE CHARGE DU BLOC DE BATTERIE Le bloc de batterie au lithium ion est quip d un indica...

Page 37: ...re en charge Le bloc peut rester sur le chargeur pendant que la temp rature se stabilise Le chargement ne commencera que lorsque la temp rature appropri e sera atteinte Voyant vert clignotant le bloc...

Page 38: ...le bloc Fig 11 Fonctionnement g n ral AVERTISSEMENT Toujours porter des gants appropri s et une protection oculaire TEMP RATURE DE FONCTIONNEMENT Ce taille haie a t con u pour fonctionner des temp ra...

Page 39: ...de la g chette 1 vers l arri re avec le pouce Fig 15 Appuyez sur la g chette d acc l rateur 2 jusqu ce que les lames de coupe bougent la vitesse d sir e L interrupteur de la poign e avant 3 est une f...

Page 40: ...que les lames de coupe soient inclin es entre 5 et 10 dans la direction de coupe Fig 16 IMPORTANT Les lames de coupe peuvent parfois se bloquer et arr ter de bouger si un mat riau reste coinc dans les...

Page 41: ...ie avant de d gager les lames de coupe afin d viter un d clenchement accidentel des lames de coupe ATTENTION Les lames de coupe sont aff t es Toujours mettre des gants avant de d gager le mat riau des...

Page 42: ...ords arrondis et ne pas suspendre ou attraper pendant le fonctionnement du taille haie Limer p riodiquement les entailles et les bavures des lames pour qu elles puissent bouger librement Des lames de...

Page 43: ...s pour tre r par es par l utilisateur Ne pas d monter Les batteries au lithium ion ont une autonomie pr d termin e Si le temps de coupe diminue sensiblement chaque charge cela signifie que le bloc de...

Page 44: ...ouvement des lames de coupe Consulter le chapitre D blocage de lame Le taille haie ne coupe pas correctement Accumulation de r sine emp chant le mouvement des lames de coupe Consulter le chapitre Entr...

Page 45: ...umulation de r sine emp chant le mouvement de la lame de coupe Consulter le chapitre Entretien des lames Bloc de batterie partiellement charg Consulter le chapitre Chargement du bloc de batterie Voyan...

Page 46: ...ture de fonctionnement De 0 40 C De 32 104 F Mod le Capacit nominale Tension nominale B425E 2 6 Ah 94 Wh 36 VDC B426 2 6 Ah 94 9 Wh 36 5 VDC B600E 4 0 Ah 144 Wh 36 VDC B650E 6 0 Ah 216 Wh 36 VDC B662...

Page 47: ...examen par Blount d fectueux en raison d un vice de mat riel et ou de fabrication L acheteur devra prendre sa charge tous les frais de transport et tout autre co t aff rent au retrait de toute pi ce...

Page 48: ...enamiento transporte y eliminaci n 52 Seguridad del cargador 54 S mbolos y etiquetas 55 Nombres Y t rminos del cortasetos 56 Identificaci n del producto 57 C mo operar el cortasetos 58 Desempaque 58 B...

Page 49: ...nta mec nica que funciona a bater a inal mbrica Seguridad en el rea de trabajo Mantenga el rea de trabajo limpia y bien iluminada Las reas desordenadas u oscuras aumentan las posibilidades de que se p...

Page 50: ...e utilice protecci n para los ojos La utilizaci n de equipo de protecci n como una m scara contra el polvo calzado de seguridad antideslizante un casco de seguridad o protecci n para los o dos para la...

Page 51: ...uchos accidentes son provocados por herramientas mec nicas con un mantenimiento deficiente Mantenga las herramientas de corte afiladas y limpias Las herramientas de corte mantenidas en forma adecuada...

Page 52: ...te el cortasetos por el asa con la hoja de corte detenida Fig 4 Al transportar o almacenar el cortasetos siempre acople la tapa del dispositivo de corte El manejo adecuado del cortasetos reducir las p...

Page 53: ...ormaci n sobre las instrucciones adecuadas de reciclado o eliminaci n Las bater as pueden recolectarse en los Estados Unidos o en Canad por medio de la Corporaci n de Reciclado de Bater as Recargables...

Page 54: ...st dise ado para uso por parte de personas incluidos los ni os con capacidades f sicas sensoriales o mentales reducidas o con falta de conocimiento a menos que hayan sido supervisadas o instruidas por...

Page 55: ...tos y al manipular las s de corte Potencia del sonido El nivel de potencia del sonido es de 74 dB Agarre con dos manos Sostenga el cortasetos con ambas manos Agarre con una mano No sostenga el cortase...

Page 56: ...argo del asa frontal que impide la activaci n accidental del acelerador hasta que se accione de forma manual Nuevo brote brote m s reciente en una planta Por lo general es m s claro tiene menos ramas...

Page 57: ...Desempaque para obtener una lista de los art culos incluidos ASA TRASERA GATILLO DEL ACELERADOR BLOQUEO DEL ACELERADOR PROTECCI N PARA LA MANO FUNDA DEL PEINE DE CORTE CUCHILLAS DE CORTE INTERRUPTOR D...

Page 58: ...rdless Tool System para obtener piezas de repuesto llamando al 1 888 313 8665 Bater a y cargador ADVERTENCIA No cargue la bater a bajo la lluvia INDICADOR LED DE NIVEL DE CARGA DE BATER A La bater a d...

Page 59: ...104 F 40 C Deje que la bater a alcance el rango de temperatura aceptable antes de cargarla Puede dejar la bater a en el cargador mientras se ajusta la temperatura La carga comenzar cuando se alcance...

Page 60: ...general ADVERTENCIA Utilice siempre guantes y protecci n para los ojos adecuados TEMPERATURA OPERATIVA Este cortasetos est dise ado para operar dentro de un rango de temperatura de 32 F a 104 F de 0 C...

Page 61: ...el bloqueo del acelerador 1 con el pulgar Figura 15 Apriete el gatillo del acelerador 2 hasta que las cuchillas se muevan a la velocidad deseada El interruptor del asa frontal 3 es un dispositivo de s...

Page 62: ...etos con las hojas de corte a un ngulo de 5 a 10 hacia la direcci n del corte Fig 16 IMPORTANTE En ocasiones las hojas de corte se atascan y dejan de moverse cuando el material se traba en las hojas d...

Page 63: ...mpre elimine la bater a antes de eliminar material de las hojas de corte para evitar la activaci n accidental de las hojas de corte PRECAUCI N las hojas de corte son afiladas Siempre utilice guantes c...

Page 64: ...en ni traben cuando est funcionando el cortasetos Lime en forma peri dica las mellas y las protuberancias que haya en las s para garantizar un movimiento libre Las s afiladas y con movimiento libre co...

Page 65: ...mantenimiento pueda realizar el usuario No la desmonte Las bater as de ion litio tienen una vida operativa predeterminada Si la cantidad de tiempo de corte por carga se reduce en forma considerable l...

Page 66: ...ovimiento de la hoja de corte Consulte C mo corregir el atascamiento de las hojas El cortasetos no corta en forma adecuada Acumulaci n de resina que impide el movimiento de la hojas de corte Consulte...

Page 67: ...que la necesaria Aplique menos presi n al acelerador Acumulaci n de resina que impide el movimiento de la de corte Consulte Cuidado de las barras La bater a no est completamente cargada Consulte C mo...

Page 68: ...emperaturas de funcionamiento De 0 C a 40 C 32 F A 104 F Modelo Capacidad nominal Voltaje nominal B425E 2 6 Ah 94 Wh 36 VDC B426 2 6 Ah 94 9 Wh 36 5 VDC B600E 4 0 Ah 144 Wh 36 VDC B650E 6 0 Ah 216 Wh...

Page 69: ...idere defectuosos en materiales y o en fabricaci n al examinarlos solo para el comprador original El comprador ser responsable de todos los cargos de transporte y de cualquier costo que implique retir...

Page 70: ...elimina o 74 Seguran a da bateria 75 Seguran a do carregador 76 S mbolos e etiquetas 77 Nomes e termos do podador de cerca viva 78 Identifica o do produto 79 Funcionamento do podador de cerca viva 80...

Page 71: ...nada reas escuras ou mal iluminadas convidam a acidentes N o trabalhe com ferramentas el tricas em atmosferas pass veis de explos o como na presen a de l quidos inflam veis gases ou poeiras As ferrame...

Page 72: ...es es Evite arrancar com a m quina inadvertidamente Veja se o interruptor est desligado OFF antes de ligar a m quina alimenta o el trica e ou bateria levant la ou transport la Levar ferramentas el tri...

Page 73: ...e convenientemente mantidas com l minas de corte afiadas t m menos probabilidade de dobrar e s o mais f ceis de se controlar Use a ferramenta el trica acess rios e outras pe as de acordo com estas ins...

Page 74: ...dador de cerca viva pelo punho com a l mina parada Fig 4 Quando transportar ou guardar o podador de cerca viva coloque sempre a capa do dispositivo de corte O manuseamento correto do podador de cerca...

Page 75: ...cais t m instru es sobre o descarte ou a reciclagem adequados As baterias podem ser coletadas nos Estados Unidos ou no Canad atrav s da Rechargeable Battery Recycling Corporation Empresa de reciclagem...

Page 76: ...falta de conhecimento do material a menos que estejam sob a vigil ncia de algu m ou instru dos por algu m respons vel pela sua seguran a Este aparelho n o um brinquedo e as crian as devem ser sempre...

Page 77: ...xer nas l minas N vel de som O n vel de som de 74 dB Suporte com as duas m os Segure no podador de cerca viva com as duas m os Suporte com uma m o N o pegue no podador de cerca viva com apenas uma m o...

Page 78: ...para cortar as cercas vivas Novo crescimento O crescimento mais recente da planta Geralmente tem uma cor mais clara o caule mais macio e mais flex vel do que o resto da planta Obstru o das l minas Qu...

Page 79: ...u podador de cerca viva NOTA Consulte Desembalar para ver os itens inclu dos Punho traseiro Gatilho de marcha GATILHO DE BLOQUEIO Protec odasm os Capa da l mina L minas de corte Interruptor do punho d...

Page 80: ...nificadas n o use o podador de cerca viva Contate a Oregon Cordless Tool System para obter pe as de substitui o Para consultar os n meros por pa ses consulte Assist ncia ao cliente por pa s Bateria e...

Page 81: ...m do n vel aceit vel 0 C 32 F a 40 C 104 F Deixe a bateria chegar temperatura aceit vel antes de por na carga Pode ser deixada no carregador at que a temperatura se ajuste A bateria come a a carregar...

Page 82: ...AVISO Use sempre luvas de prote o e prote o ocular TEMPERATURA DE FUNCIONAMENTO Este podador de cerca viva foi projetado para funcionar a temperaturas entre os 0 C e os 40 C 32 F e 104 F AL A Pegue se...

Page 83: ...rmeza em ambos os punhos Com o polegar puxe o gatilho de bloqueio 1 para tr s Fig 15 Prima o gatilho de marcha 2 at que as l minas de corte se movimentem velocidade desejada O interruptor no punho da...

Page 84: ...ra correta segure bem no podador e acione o Segure no podador de cerca viva com as l minas de corte num ngulo de 5 10 em dire o ao corte Fig 16 IMPORTANTE Por vezes as l minas ficam obstru das e deixa...

Page 85: ...S PRECAU O Retire sempre a bateria antes de limpar as l minas de corte para evitar o acionamento acidental das l minas PRECAU O As l minas de corte s o muito afiadas sempre utilize luvas durante a rem...

Page 86: ...t o afiadas n o t m reentr ncias nem extremidades quebradas e n o se pendure ou se apoie no podador de cerca viva De vez em quando afie e corrija as reentr ncias das l minas para que se movimentem liv...

Page 87: ...substitu veis pelo utilizador N o desmonte As baterias de on l tio t m uma vida til pr determinada Se o per odo decorrido por carga diminuir significativamente a bateria est no fim da vida e deve ser...

Page 88: ...nas O podador de cerca viva n o est cortando corretamente H um ac mulo de resina que impede o seu movimento Veja Cuidar das l minas As l minas de corte est o abotadas Contrate um profissional para afi...

Page 89: ...or especificada Aplique menos press o no gatilho de acelera o H uma acumula o de resina que impede o seu movimento Veja Cuidar das l minas A bateria n o est completamente carregada Consulte Carregar a...

Page 90: ...a o 0 C a 40 C 32 F a 104 F Modelo Capacidade nominal Tens o nominal B425E 2 6 Ah 94 Wh 36 VDC B426 2 6 Ah 94 9 Wh 36 5 VDC B600E 4 0 Ah 144 Wh 36 VDC B650E 6 0 Ah 216 Wh 36 VDC B662 6 0 Ah 216 Wh 36...

Page 91: ...reposi o ap s teste feito por um profissional qualificado pela Blount e confirmado o problema O comprador ficar respons vel por todos os custos de transporte e qualquer custo de remo o de qualquer par...

Page 92: ...OregonProducts com Blount International Inc 4909 SE International Way Portland OR 97222 4679 USA 613359 Rev AC 5 20...

Reviews: