background image

5

EN

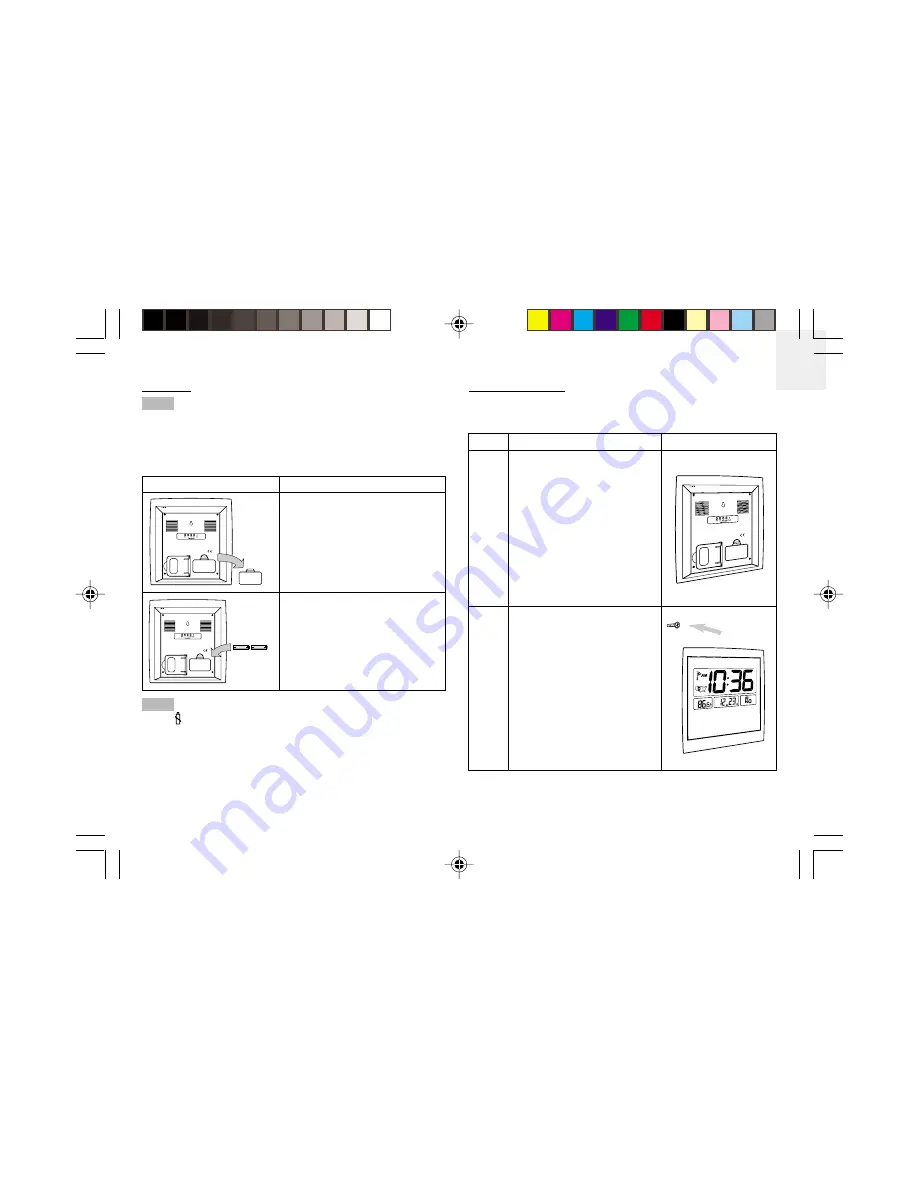
Batteries

When using the product for the first time, please note

that the batteries have already been installed in the unit. To
operate, locate the clear plastic battery tab inside the battery
compartment and remove it.

To load the batteries:

Diagram

Instructions

1. Locate the battery compartment.

2. Install the batteries by matching the correct

polarity. Always use the correct battery type
(2 UM-3 AA-sized 1.5V batteries).

Warning:

 Reversing the polarity may

damage the product.

Replace the batteries whenever the weak battery

mark (    ) is shown, the display is dim, or the display does not
illuminate when the power is on. Replace all the batteries at the
same time - it is dangerous to mix old and new batteries.

Contact your local waste disposal authority for instructions on
how to dispose of used batteries. Used batteries can be
harmful to the environment, and should not be thrown out with
household trash.

Placement of Unit

You can either mount the main unit on a wall or make it stand
on a flat surface.

Method

Instruction

Diagram

Table
Stand

The unit is already equipped with a Table
Stand. Simply pull out the Table Stand
and rest the main unit on a flat surface.

Wall
Mount

The main unit can be mounted onto a wall
using a No. 6 screw (3.0mm).

a) Position and nail the screw into the

place where you would like to hang
your main unit.

b) Leave ample space between the wall

and the screw head while testing to
make sure the nail is secure.

c) Fit the unit’s Wall-Mount Recess Hole

onto the screw head.

NOTE

NOTE

JM889NA ENG R3

12/16/04, 5:04 PM

5

Summary of Contents for JM889NA

Page 1: ...Jumbo RF Clock with Indoor Thermometer Model JM889NA User Manual JM889NA ENG Cover R3 12 16 04 5 04 PM 1...

Page 2: ...nt of unit 5 Indoor temperature display 6 Toggling between seconds day of week display 6 Radio reception 6 Radio reception description 6 Enabling disabling radio reception 7 To set the clock manually...

Page 3: ...more information please visit www boulder nist gov timefreq stations radioclocks htm Inadditiontoprovidingstep by stepinstructionsforthisproduct this manual contains important safety and care informat...

Page 4: ...k Button To manually adjust current time and date 7 button To increase setting values or to activate clock auto synchronization 8 Reset Hole Returns all settings to default values 9 Alarm Button To di...

Page 5: ...liquid cleaning agents benzene thinner or aerosols Ventilation The vents and other openings are designed for ventilation and should not be blocked or covered Blocking the vents can cause the product...

Page 6: ...gerous to mix old and new batteries Contact your local waste disposal authority for instructions on how to dispose of used batteries Used batteries can be harmful to the environment and should not be...

Page 7: ...gonthestrengthofthesignal Radio Reception Description Radio Reception Description Reception can be affected by a number of factors For best reception place the device away from metal objects and elect...

Page 8: ...omatic radio clock synchronization remember to disable the Radio Reception first Press once or press and hold the button to adjust the value of each setting NOTE Diagram Instructions 1 Press and hold...

Page 9: ...automatically stop ringing after 2 minutes But after 8 minutes the alarm will sound again unless ALARM is pressed Symbol Language English French Spanish Displaying Alarm Time By default the unit s LCD...

Page 10: ...ne 4 Adjusted Alarm Time now displayed Activating Deactivating the Alarm Diagram Instructions Diagram Instructions 1 LCD screen displays Alarm Time If is displayed the alarm is enabled Otherwise it is...

Page 11: ...e unit are low Check LCD display of the unit Install new batteries into the unit Problem Symptom Check This Remedy Problem Symptom Check This Remedy Clock time is not correctly set No radio signal rec...

Page 12: ...not attempt to repair the product yourself Contact the retailer or our customer service department if it requires servicing Take precautions when handling all battery types They can cause injuries bur...

Page 13: ...igital cameras MP3 players children s electronic learning products and games projection clocks health and fitness gear weather stations and digital and conference phones The website also includes cont...

Page 14: ...interference in a residential installation Thisequipmentgenerates usesandcanradiateradiofrequency energy and if not installed and used in accordance with the instructions may cause harmful interferenc...

Page 15: ...hone No 1 800 853 8883 Fax No 1 503 684 3332 declare that the product Product No JM889NA Product Name Jumbo RF Clock with Indoor Thermometer Manufacturer IDT Technology Limited Address Block C 9 F Kai...

Page 16: ...2005 Oregon Scientific All rights reserved 086 003278 025 JM889NA ENG Back R3 12 16 04 5 04 PM 1...

Reviews: