background image

NE

4

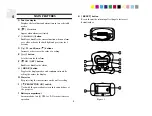
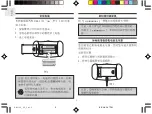
Once the power adapter is in place, you can select to turn on 

the projector for longer time, such as throughout the night, by 

sliding down the [   

 PROJECTION ON

 ] switch on the side of 

the unit. To turn off the projector, slide the switch back.
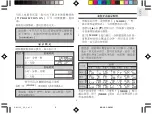
DISPLAY MODES

The unit supports two display modes in the sequence of:

Note that this switch can only be used with the power
adapter installed. For momentary projection, use the
[

 ].

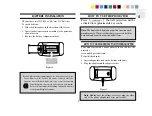
HOW TO SET THE CLOCK

1.  To set the clock, hold 

 for three seconds.         

     The display will return to MODE 1, with the hour digits   

     blinking.
2.  Use[   ] or [   ] to select the hour. Keep pressing the    


button to increase or decrease the value rapidly.

3.  Press 

to confirm. The minute digits will blink. 

      Repeat the same procedure to set the minutes,   

     then the day-of-month,month, display language and day-of-    

     week.

e

g

a

u

g

n

a

L

y

a

d

n

u

S

y

a

d

r

u

t

a

S

y

a

d

ir

F

y

a

d

s

r

u

h

T

.

d

e

W

y

a

d

s

e

u

T

y

a

d

n

o

M

h

si

l

g

n

E

n

a

m

r

e

G

h

c

n

e

r

F

n

a

il

a

tI

k

e

e

w

-

e

h

t-

f

o

-

y

a

D

If there is an item you do not wish to change, simply press 

 to bypass the item.

Press 

to exit. The display will return to the mode 

 last chosen.

Note  that  the  time  and  date  are  displayed  in  24-hour 

clock and 

DAY-MONTH

 format, respectively. For display 

language,you can choose among English, French, German 

and Italianóin that order. Day-of-week is the usual sequence 

of Monday through Sunday.

e

d

o

m


e

t

a

d

 /


e

m

it


h

c

a

e

 r

o

n

o

it

p

ir

c

s

e

d


y

a

l

p

si

D

[


e

h

n

o

 s

s

e

r

p


h

c

a

E


E

D

O

M


e

h

t


n

i


y

a

l

p

si

d


e

h

e

l

g

g

o

ll

i

w


]

.r

e

d

r

e

v

o

b

a

e

h

y

b


d

e

c

a

l

p

e

e

b

 l

li

w


y

a

l

p

si

d


e

h

f

o


e

n

il


d

n

o

c

e

e

h

t

a

h

e

t

o

N


e

h

fi


e

m

it


m

r

a

l

a


.

d

e

s

s

e

r

p


si


N

O

T

T

U

B


M

D

M

D

e

m

i

T

 l

a

c

o

L

e

m

i

T

 l

a

c

o

L

 ,

e

t

u

n

i

M

 ,

r

u

o

H

k

e

e

W

-

e

h

t-

f

o

-

y

a

D

h

t

n

o

M

 ,

y

a

D

h

t

n

o

M

 ,

y

a

D

s

d

n

o

c

e

S

 ,

e

t

u

n

i

M

 ,

r

u

o

H

--

--

--

--

--

--

--

--

--

--

--

--

--

--

--

--

--

--

--

-


E

D

O

M


E

D

O

M

--

--

--

--

--

--

--

--

--

--

--

--

--

--

--

--

--

--

--

-

313p en.indd   4

2006.9.19   4:32:45 PM

 ] 

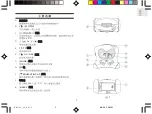
Summary of Contents for RA313P

Page 1: ...PROJECTION CLOCK Model RA313P User Manual...

Page 2: ...tions on your purchase of the Projection Clock RA313P To facilitate night time reading the unit comes with projector that can cast large clear clock time gures onto at surfaces in dark It also has a b...

Page 3: ...the time for the alarm F ON OFF button Enables or disables the alarm G MODE button Toggles the display modes and con rms entry while setting the values for display H Projector For projecting the curre...

Page 4: ...environment by taking exhausted batteries to authorized disposal stations HOW TO USE THE PROJECTOR Press the wall projection will be activated for approximately 8 seconds HOW TO USE THE PROJECTOR POWE...

Page 5: ...r u h T d e W y a d s e u T y a d n o M h s i l g n E n a m r e G h c n e r F n a i l a t I k e e w e h t f o y a D If there is an item you do not wish to change simply press to bypass the item Press...

Page 6: ...battery compartment It allows you to return all settings to its factory values To use the RESET 1 Locate the RESET beside the door tab 2 Use a blunt stylus to press the RESET once PRECAUTIONS This uni...

Page 7: ...ABOUT OREGON SCIENTIFIC Visit our website www oregonscienti c com to learn more about Oregon Scienti c products such as digital cameras MP3 players children s electronic learning products and games pr...

Page 8: ...1 5 6 p P _ C T _ P 3 1 3 M R M P 9 2 2 4 0 9 8 2 1 RA313P...

Page 9: ...2 A B C D E F ON OFF MODE G H PROJECTION ON I J UM 3 AA RESET K 1 5 6 p P _ C T _ P 3 1 3 M R M P 0 3 2 4 0 9 8 2 2 C H A B G E J I F D K...

Page 10: ...3 AA 1 2 3 8 1 2 UM 3 1 5V 2 3...

Page 11: ...4 PROJECTION ON MODE M D M D 1 2 5 6 p P _ C T _ P 3 1 3 M R M P 1 3 2 6 0 9 8 4 1 MODE 1 2 3 MODE 24 MODE MODE...

Page 12: ...5 1 0 00 2 3 4 5 6 ON OFF ON OFF ON OFF 8 2 8 RESET 00 00 00 1 1 RESET 1 RESET 2 RESET 1 2 3 4 5 6 ON OFF...

Page 13: ...6 5 C 50 C 24 2 8 0 5 2 1 5V UM 3 AA 107 X 115 X 64 X X 175 5 6 p P _ C T _ P 3 1 3 M R M P 5 3 2 4 0 9 8 2 7...

Page 14: ...T _ P 3 1 3 M R M P 6 3 2 4 0 9 8 2 8 Oregon Scientific MP3 www oregonscientific com Oregon Scientific Oregon Scientific www oregonscientific com service default asp 1 800 853 8883 www2 oregonscienti...

Page 15: ...1 RA313P 5 6 p P _ C S _ P 3 1 3 M R M P 5 4 2 6 0 9 8 1...

Page 16: ...2 A B C D E F ON OFF MODE G H PROJECTION ON I J UM 3 AA RESET K 1 5 6 p P _ C S _ P 3 1 3 M R M P 6 4 2 6 0 9 8 2...

Page 17: ...3 UM 3 AA 1 5V 1 2 3 1 1 2 2 3 5 6 p P _ C S _ P 3 1 3 M R M P 7 4 2 6 0 9 8 3...

Page 18: ...4 M D M D 1 2 5 6 p P _ C S _ P 3 1 3 M R M P 8 4 2 6 0 9 8 4 PROJECTION ON MODE 1 1 2 3 MODE MODE MODE MODE 24...

Page 19: ...5 1 0 00 00 00 00 2 3 4 5 6 ON OFF 20 2 ON OFF 8 ON OFF RESET RESET RESET RESET 1 1 1 2 1 2 3 4 5 6 5 6 p P _ C S _ P 3 1 3 M R M P 1 5 2 6 0 9 8 5...

Page 20: ...6 5 C 50 C 24 2 8 0 5 2 1 5V UM 3 AA 107 x115 x64 x x 175 5 6 p P _ C S _ P 3 1 3 M R M P 2 5 2 4 0 9 8 2 7...

Page 21: ...M P 3 5 2 4 9 8 8 Oregon Scientific Oregon Scientific MP3 www oregonscientific com Oregon Scientific Oregon Scientific www oregonscientific com service default asp 1 800 853 8883 www2 oregonscientifi...

Page 22: ...2006 Oregon Scientific All rights reserved 086L004677 024 C...

Reviews: