background image

2

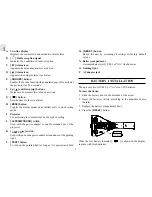
GB A Two-line display

Displays the current time and calendar or alarm time

B

[   

 ] Radio reception signal

Indicates the condition of radio reception

C

[   

 ] Alarm icon

Appears when weekday alarm is activated

D

[   

 ] Alarm icon

Appears when single alarm is activated

E

SNOOZE 

] button

Enables the snooze function when an alarm goes off or activates
the projector for five seconds

F

Up [ 

 ] and Down [ 

 ] buttons

Increases or decreases the value of a setting

G [ 

 ] button

Sets the time for the two alarms

H [ 

MODE 

] button

Toggles the display modes and confirms entry in clock setting
mode

I

Projector
For projecting the current time on the wall or ceiling

J


PROJECTION ON 

] switch

Used with the power adapter to enable extended use of the
projector

K [


LIGHT ON 


] switch

Used with power adapter to enable extended use of the guiding
light

L

TEST 

] button

To turn on the guiding light as long as it is pressed and held

M [ 

RESET 

] button

Resets the unit by returning all settings to factory default
values

N Battery compartment

Accommodates two (2) UM-3 or “AA” size batteries

O Guiding light

P

AC adapter jack

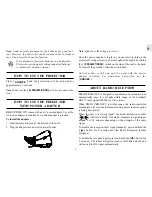
BATTERY INSTALLATION

The unit uses two (2) UM-3 or “AA” size 1.5V batteries.

To insert batteries:

1. Slide the battery door in the direction of the arrow.

2. Insert the batteries strictly according to the polarities shown

therein.

3. Replace the battery compartment door.

4. Press the [RESET] button.

When the low battery indicator [          ] is shown on the display,
replace with fresh batteries.

Summary of Contents for RM813P

Page 1: ...ontrolled clock It can automatically synchronize its current time and date when brought within an approximate 1500 km radius of the radio signal DCF77 generated from Frankfurt Germany the UK version f...

Page 2: ...ceiling J PROJECTION ON switch Used with the power adapter to enable extended use of the projector K LIGHT ON switch Used with power adapter to enable extended use of the guiding light L TEST button T...

Page 3: ...longer time such as throughout the night by sliding the PROJECTION ON switch on the side of the unit to the back To turn off the projector slide the switch back Note that this switch can only be used...

Page 4: ...seconds and the time zone offset hour digits will blink 2 Enter the value by buttons 3 Confirm the entry by pressing MODE and the 12 or 24 hour display format will blink 4 Repeat 2 and confirm the en...

Page 5: ...the setting The alarm will be activated automatically Follow the same procedures to set and activate the Single and or WeekdayAlarm HOW TO DEACTIVATE THE ALARM To deactivate the alarm 1 Select the al...

Page 6: ...e connected For instructions on how to install the adapter please see Section How to Use the Projector with Power Adapter Once the power adapter is in place slide the LIGHT ON switch at the side of th...

Page 7: ...aged batteries or distorted parts 4 Do not tamper with the unit s internal components Doing so will terminate the unit s warranty and may cause damage The unit contains no user serviceable parts 5 Onl...

Page 8: ...TE Directive Applied standards ETS 300 683 1997 Efficient use of the radio frequency spectrum Article 3 2 of the R TTEDirective Applied standards EN300 220 1 1997 INTENDED USE OF THE DEVICE CAUTION Th...

Reviews: