background image

3

GB

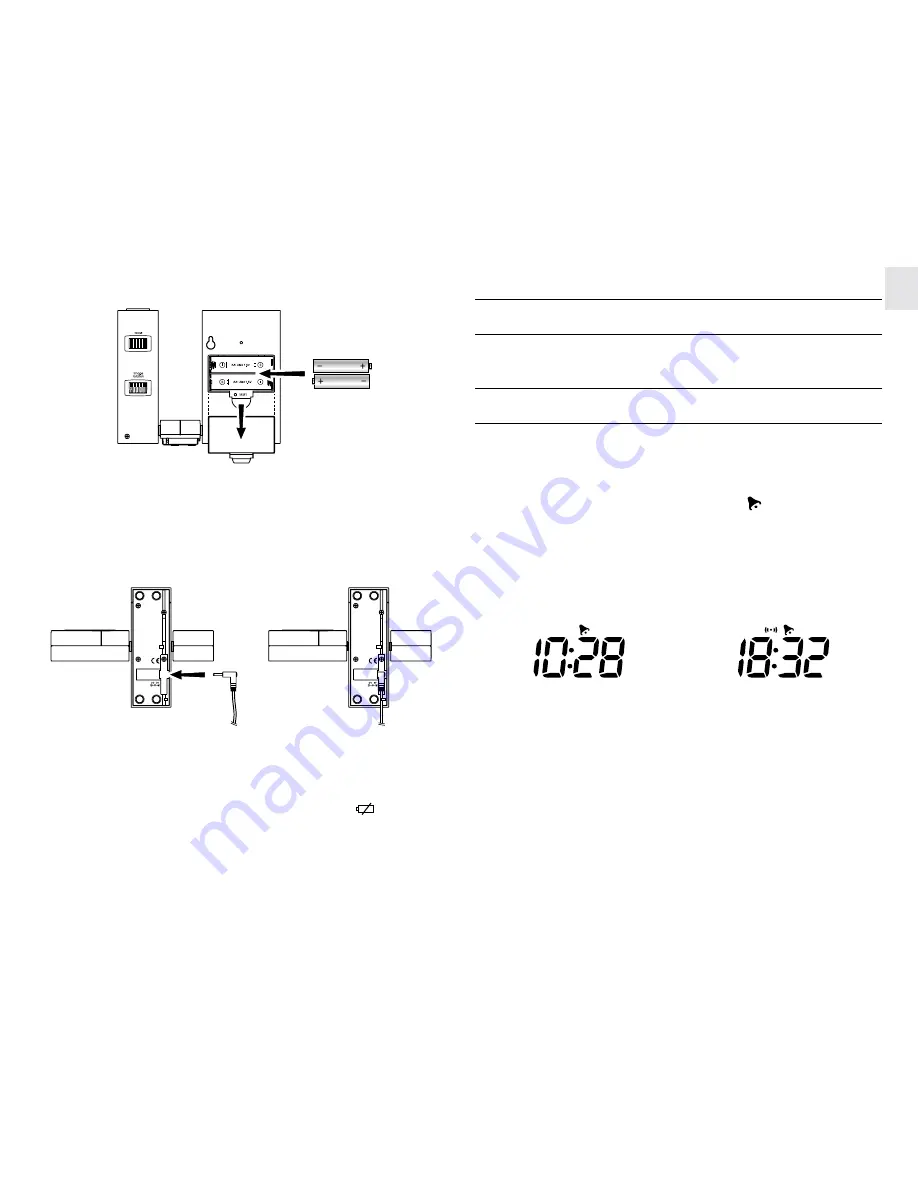
To install the adapter:

1. Insert adapter into jack at the bottom of the unit.

2. Plug the adapter into an electrical wall outlet.

Note: Make sure the voltage is correct.

When the power level of the installed batteries is low or when only
AC adapter is connected, the low battery indicator [          ] will light
up.  In these cases, replace or install with new batteries.

Current Time &

Alarm-on/off Status

Alarm Time &

Alarm-on/off Status

HOW TO ACTIVATE THE BACK-LIGHT

Press 

SNOOZE 

to turn on the back-light for 5 seconds.

HOW TO USE THE CLOCK PROJECTION

The clock projection makes it easier for you to read the Current time
or Alarm time with alarm-on/off status at night. To use the feature,

1. Press 

SNOOZE 

to turn on the projection for 5 seconds. The

current time with alarm-on/off status ( [ 

 ] on or off) will be

projected onto the surface the lens is facing.

2. To change to view the preset alarm time with its on/off status,

press 

SNOOZE 

when projection is already on.

3. Adjust the projected image as below.

Summary of Contents for RM868P

Page 1: ...ned to automatically synchronize its current time and date when brought within an approximate 1500km radius of the radio signal generated fromFrankfurt Germany DCF77 TheRM868PU theUKmodel will do the...

Page 2: ...s to default values H PROJECTIONON BUTTON Used with power adapter to enable continuous projection I IMAGEROTATION KNOB 90 left or right image rotation J 180 ROTATION BUTTON Flips the projected image h...

Page 3: ...arm Time Alarm on off Status HOW TO ACTIVATE THE BACK LIGHT Press SNOOZE to turn on the back light for 5 seconds HOW TO USE THE CLOCK PROJECTION The clock projection makes it easier for you to read th...

Page 4: ...image will return to Current time with Alarm on off status automatically after 10 seconds Note that this switch can only be used with the power adapter installed For momentary projection use the SNOOZ...

Page 5: ...he radio reception icon will start to blink A complete reception generally takes about 2 to 10 minutes depending on the strength of the radio signal After that the periodical scanning will only take a...

Page 6: ...hold MODE SET for 2 seconds 2 Enter the 2nd time zone offset hour using You can select between 23 and 23 hours Hold down either button to rapidly increase or decrease the value Press MODE SET 3 Enter...

Page 7: ...enter the hours The hand of hour on the analog display will be adjusted simultaneously 4 Press ALARM 5 Use to enter the minutes The hand of minutes on the analog display will be adjusted simultaneousl...

Page 8: ...BACKLIGHT The EL panel that provides illumination will lose power after extensive usage The unit may emit an audible sound whenever the display is illuminated by the EL backlight This is due to vibra...

Page 9: ...uld void the user s authority to operate the equipment R TTEComplianceNote This device complies with the essential requirements of Article 3 of the R TTE 1999 5 EC Directive if used for its intended u...

Reviews: