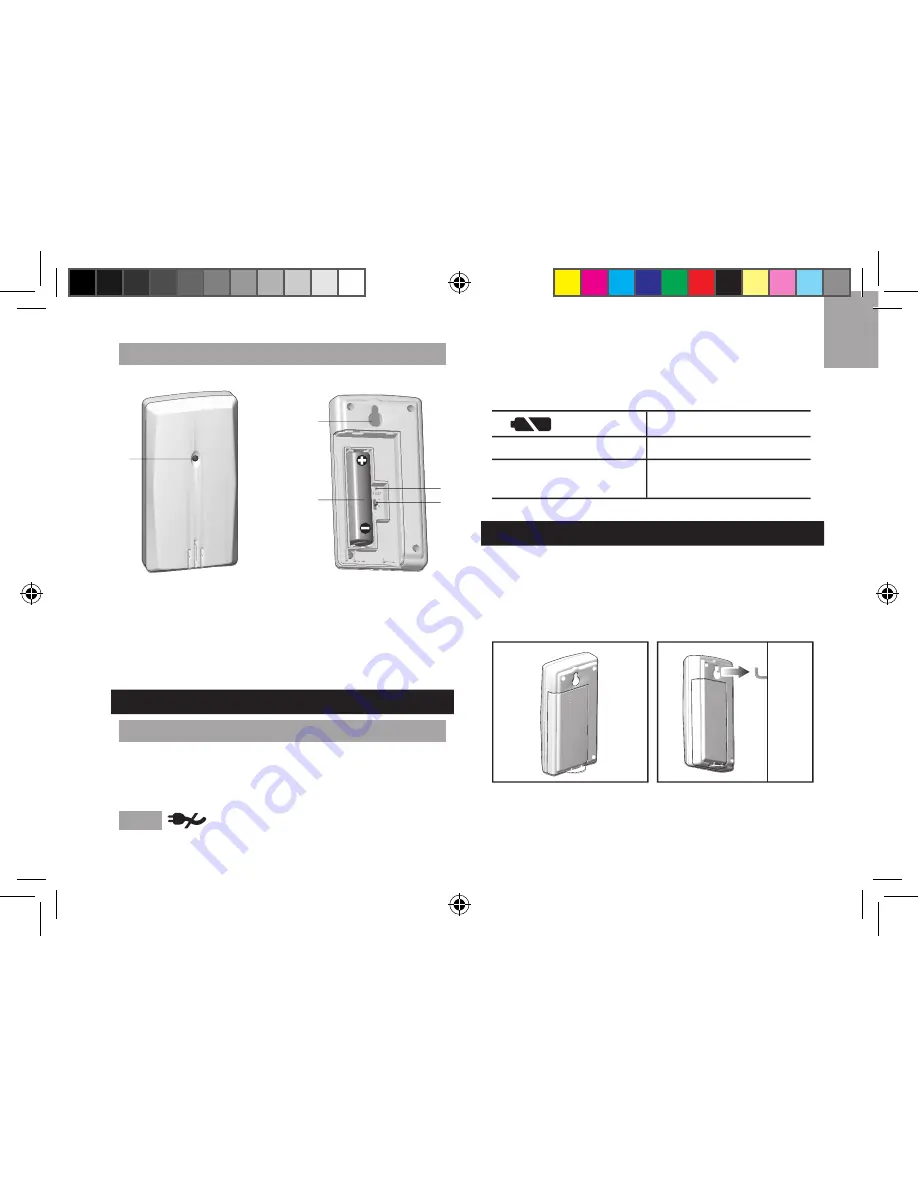
background image

3

EN

REMOTE SENSOR

1

2

3

4
5

1.  LED status indicator
2.  Wall mount hole
3.  Battery compartment
4. 

RESET

 hole: Reset unit to default settings

5. 

CHANNEL

 button: Select channel 1

GETTING STARTED

POWER SUPPLY

Batteries  serve  as  a  back-up  power  supply.  For 
continuous  use  of  projector  and  backlight,  install   
adapter. The socket-outlet shall be installed near the 
equipment and shall be easily accessible.

NOTE 


will  appear  when  power  supply  is  not 

connected.

To insert batteries:

1.  Remove the battery compartment and insert  
 

batteries, matching polarities.

2. Press 

RESET

 after each battery change.

  LOCATION

MEANING

Clock / alarm area

Main unit batteries low

Outdoor / indoor 
temperature area

Sensor batteries low

REMOTE SENSOR

To set up the sensor:

1.  Open the battery compartment, and insert batteries,
 

matching polarities.

2.  Place the sensor within 30 m (98 ft) of the main  
 

unit using the table stand or wall mount.

The transmission range may vary depending on many 
factors.  You  may  need  to  experiment  with  various 
locations to get the best results.

RMR329P_M_EN_R1.indd   3

6/21/07   12:45:23 PM

Summary of Contents for RMR329P

Page 1: ...view 2 Back view 2 Remote sensor 3 Getting started 3 Power supply 3 Remote sensor 3 Sensor data transmission 4 Clock 4 Clock reception 4 Manually set clock 4 Alarm 5 Temperature 5 Projector and backl...

Page 2: ...t 7 EU UK Radio signal switch 8 RESET Reset settings to default 9 Adapter socket INTRODUCTION Thank you for selecting this Oregon Scientific Radio Controlled Projection Clock with Indoor Outdoor Tempe...

Page 3: ...ot connected To insert batteries 1 Remove the battery compartment and insert batteries matching polarities 2 Press RESET after each battery change LOCATION MEANING Clock alarm area Main unit batteries...

Page 4: ...e the sensor in a location with a clear view to the sky away from metallic or electronic objects Position the sensor close to the main unit during cold winter months CLOCK CLOCK RECEPTION This product...

Page 5: ...o silence it for 8 minutes OR Press any other key to turn the alarm off and activate it again after 24 hours TEMPERATURE To toggle temperature unit Press C F To toggle between outdoor indoor sensor re...

Page 6: ...s necessary Please note that some units are equipped with a battery safety strip Remove the strip from the battery compartment before rst use NOTE The technical speci cations for this product and the...

Page 7: ...re about Oregon Scienti c products If you re in the US and would like to contact our Customer Care department directly please visit www2 oregonscienti c com service support OR Call 1 800 853 8883 For...

Page 8: ...Radio Controlled Projection Clock with Indoor Outdoor Temperature Model RMR329P USER MANUAL RMR329P_M_EN_R1 indd 8 6 21 07 12 45 29 PM...

Page 9: ...2007 Oregon Scienti c All rights reserved 086L004765 023 RMR329P_M_EN_R1 indd 9 6 21 07 12 45 29 PM...

Reviews: