background image

3

GB

The clock and radio have separate low-battery indicators. Change
the batteries accordingly when the respective indicator lights up.

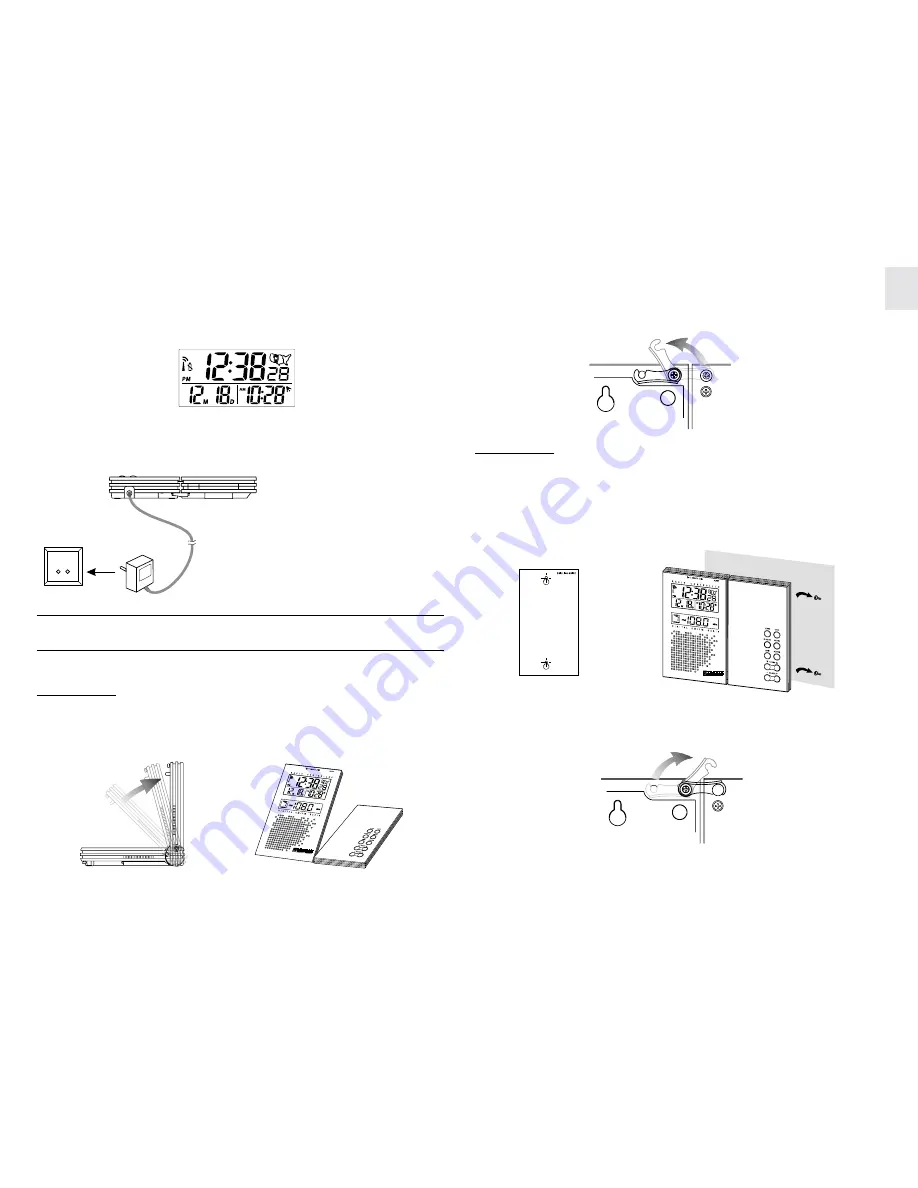
An AC Power Adapter is included. To connect it, plug it into the
power adapter connector and a wall socket.

BEFORE YOU BEGIN

The RRM-112A is designed for table stand or wall mount.

Table Stand

Place the RRM-112A on a flat, sturdy surface. You can adjust the
display angle of the LCD by lifting up the LCD panel.

Note: Unlock the latch on the back of the unit before lifting up
the LCD panel.

Wall Mount

A wall mounting guide is included.  Place the mounting guide on the
wall where the RRM-112A is to be hanged. After making appropriate
markings install two mounting screws onto the wall. Hang the
RRM-112A on the mounting screws.

Note: For wall mounting the unit should be kept flat by locking the
latch on the back of the unit.

Note: The power adaptor supplies
power only to the radio. The clock
operates on batteries.

Summary of Contents for RRM-112A

Page 1: ...and functions including an ExactSet TM clock that automatically sets the time and date from signals broadcast by the US Atomic Clock one of the world s most accurate timekeepers The RRM 112A also com...

Page 2: ...nds and Clock with Day of the Week display modes I SLEEP BUTTON Press to select the radio auto off feature for 15 30 46 60 90 or 120 minutes Activates the sleep function of the radio J SNOOZE LIGHT BU...

Page 3: ...ace You can adjust the display angle of the LCD by lifting up the LCD panel Note Unlock the latch on the back of the unit before lifting up the LCD panel Wall Mount A wall mounting guide is included P...

Page 4: ...s receiving radio signal the reception icon will start to blink The reception icon will show either strong weak or no signal depending on the strength of the radio signal A complete reception generall...

Page 5: ...value 3 Press CLOCK Minutes digits will flash 4 Enter the minutes using the VOLUME and VOLUME button 5 Press CLOCK 6 Follow the same procedure to set the year month day and the display language Englis...

Page 6: ...to locate the desired frequency Press once to advance 1 step press and hold to auto search the next channel To change the volume use VOLUME To select a programmed channel press STATION To turn off the...

Page 7: ...memory as long as there are batteries in the unit either for the clock or the radio SECTION 4 ADDITIONAL INFORMATION THE RESET BUTTON The RESET button is used to enhance synchronization of signals aft...

Page 8: ...Weight 286 8 gm 10 03 ounces Dimension 132 x 158 x 23 mm H x W x D 5 28 x 6 32 x 0 92 NOTE ON COMPLIANCE Warning Changes or modifications to this unit not expressly approved by the party responsible...

Page 9: ...made without a return material autrhorization Please retain your retail receipt as you may be asked to provide a copy of the receipt for proof of purchase date This warranty does not cover product su...

Reviews: