3
Combinations of motors and drivers
in the model names indicates
A
(single shaft) or
B
(double shaft).
z
2-phase motor
•
Standard type
Model
Motor model
Driver model
CVK213
K
PKP213D05
CVD205-K
CVK223
K
PKP223D15
2
CVD215-K
CVK225
K
PKP225D15
2
CVD215-K
CVK233
K
PKP233D23
CVD223-K
CVK235
K
PKP235D23
CVD223-K
CVK243
K
PKP243D23
CVD223-K
CVK244
K
PKP244D23
CVD223-K
CVK245
K
PKP245D23
CVD223-K
CVK246
K
PKP246D23
CVD223-K
CVK264
K
PKP264D28
CVD228-K
CVK266
K
PKP266D28
CVD228-K
CVK268
K
PKP268D28
CVD228-K
z
5-phase motor
•
Standard type
Model
Motor model
Driver model
CVK523
K
PKP523N12
CVD512-K
CVK525
K
PKP525N12
CVD512-K
CVK544
K
PKP544N18
CVD518-K
CVK546
K
PKP546N18
CVD518-K
CVK564F
K
PKP564FN24
W
CVD524-K
CVK566F
K
PKP566FN24
W
CVD524-K
CVK569F
K
PKP569FN24
W
CVD524-K
•
High-resolution type
Model
Motor model
Driver model
CVK544M
K
PKP544MN18
CVD518-K
CVK546M
K
PKP546MN18
CVD518-K
CVK564FM
K
PKP564FMN24
CVD524-K
CVK566FM
K
PKP566FMN24
CVD524-K
CVK569FM
K
PKP569FMN24
CVD524-K
Names of parts
STEP switch
(step angle)
No.1: 1P/2P switch (pulse input mode)
No.2: OFF/SD switch (smooth drive function)
No.3: R2/R1 switch (resolution)
No.4: STOP switch (standstill current rate)
No.5: OFF/FIL switch (command filter)
No.6: Not used.
RUN switch
(operating current rate)
PWR/ALM LED
CN1 connector
(power supply)
Mounting hole
(4 places)
CN2 connector
(motor)
CN3 connector
(I/O signal)
Installation
Location for installation
The driver has been designed and manufactured to be incorporated in
equipment. Install it in a well-ventilated location that provides easy access for
inspection.
The location must also satisfy the following conditions:
y
Inside an enclosure that is installed indoors (provide vent holes)
y
Operating ambient temperature 0 to +50 °C (+32 to +122 °F) (non-freezing)
y
Operating ambient humidity 85% or less (non-condensing)
y
Area that is free of explosive atmosphere or toxic gas (such as sulfuric gas)
or liquid
y
Area not exposed to direct sun
y
Area free of excessive amount of dust, iron particles or the like
y
Area not subject to splashing water (rain, water droplets), oil (oil droplets)
or other liquids
y
Area free of excessive salt
y
Area not subject to continuous vibration or excessive shocks
y
Area free of excessive electromagnetic noise (from welders, power
machinery, etc.)
y
Area free of radioactive materials, magnetic fields or vacuum
y
1000 m (3300 ft.) or lower above sea level
Installation direction
Install the driver on a metal plate having excellent vibration resistance in
vertically or horizontally. If the driver is installed under conditions other than
vertical or horizontal position, its heat radiation effect will deteriorate.
The items shown below are necessary in order to install the driver. The items
are not included and must be provided by the customer.
Torque the mounting screw to 0.5 N·m (71 oz-in).
y
M3 screw ........................................................... 4 pcs.
y
M3 spring washer .......................................... 4 pcs.
y
M3 nut ............................................................... 4 pcs. *
y
Spacer [5 mm (0.2 in.) or larger] ............... 4 pcs.
* Not necessary if screw holes are provided in the enclosure.
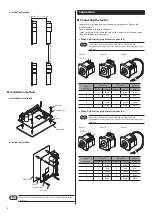
There must be clearances of at least 25 mm (0.98 in.) and 50 mm (1.97 in.)
in the horizontal and vertical directions respectively, between the driver
and enclosure or other equipment within the enclosure. When two or more
drivers are to be installed side by side, provide clearances in the horizontal
and vertical directions as shown in the figure.
y
Install the driver in an enclosure.
y
Do not install any equipment that generates a large amount of heat
or noise near the driver.
y
If the ambient temperature of the driver exceeds 50 °C (122 °F),
improve the ventilation condition.
•
Horizontal installation
20 mm (0.79 in.) or more
50 mm (1.97 in.) or more

