2
z
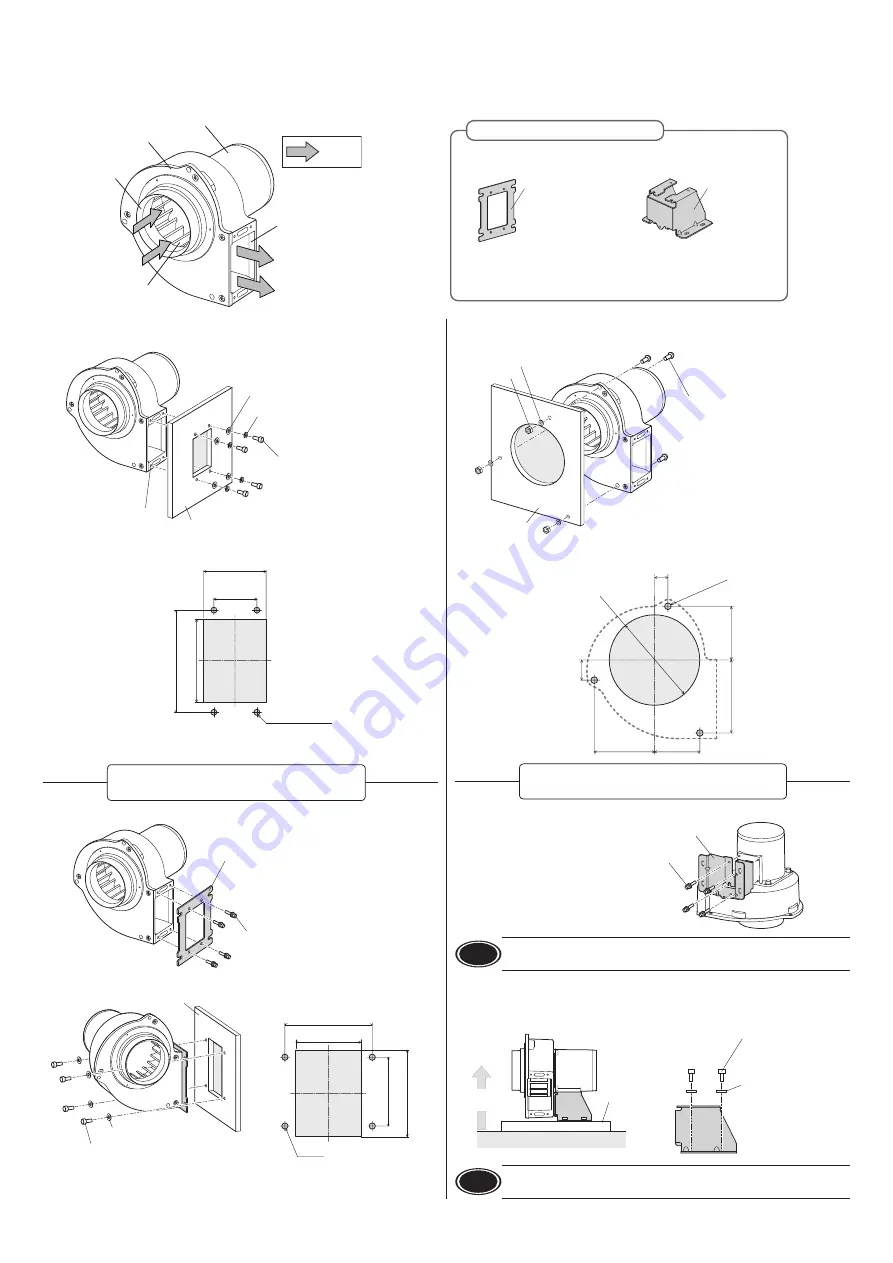
Installation using the exhaust outlet of fan
Install the fan to equipment as shown in the figure.
Mounting plate
Mounting screw
M5-4 pieces
Tightening torque: 2.5 N·m (22 lb-in)
4×M5
Depth: 8 mm (0.315 in.)
Spring washer
Washer
Reference panel cut-out
[Unit: mm (in.)]
61 (2.4)
40
±0.2
(1.575
±0.008
)
81 (3.19)
95
±0.2
(3.74
±0.008
)
4×Ø5.5 (0.217)
Assemble the mounting bracket for exhaust outlet to the fan and install it to equipment.
Assembly screw (included)
M5-4 pieces
Tightening torque: 2.5 N·m (22 lb-in)
Mounting bracket for
exhaust outlet :
PASF12
Mounting plate
Assembly screw
M6-4 pieces
Tightening torque: 3.0 N·m (26 lb-in)
Washer
Reference panel cut-out
[Unit: mm (in.)]
90
±0.2
(3.543
±0.008
)
110
(4.33)
95
±0.2
(3.74
±0.008
)
65
(2.56)
4×M6
z
Installation using the intake side of fan
Install the fan to equipment as shown in the figure.
Mounting screw
M6-3 pieces
Tightening torque: 3.0 N·m (26 lb-in)
Nut
Washer
Mounting plate
Reference panel cut-out
[Unit: mm (in.)]
Ø135
(5.31)
3×Ø6.5
±0.1
(0.256
±0.004
)
20 (0.79)
80 (3.15)
107 (4.21)
90 (3.54)
60 (2.36)
30 (1.18)
Assemble the installation pedestal to the fan and install it to equipment.
Assembly screw (included)
M4-4 pieces
Tightening torque: 1.3 N·m (11.5 lb-in)
Installation pedestal:
PAS12
Note
Be sure to assemble using the included screws. Using a longer screw than the
included screws may cause damage to product.
•
Installation direction
When installing the fan to equipment using the installation pedestal, install it in a direction
vertical to the ground as shown in the figure.
Mounting
plate
Ground
Vertical
direction
Mounting screw
M5-4 pieces
Tightening torque:
2.5 N·m (22 lb-in)
Washer
Note
Do not install in a direction other than a vertical direction. Doing so may
cause damage to the product due to vibration of the product or equipment.
Installation method
Install the fan onto an appropriate flat metal plate having excellent vibration resistance and heat conductivity. Install the fan so that there is no gap between the mounting plate or
peripheral equipment and the fan. Screws other than the supplied screws should be provided by a customer.
Intake
Exhaust outlet
Air flow
Motor part
Fan frame
Rotating part
(impeller)
Peripheral equipment (sold separately)
□
Mounting bracket for
exhaust outlet
Assembly screw: 4 pieces
Screw size: M5
□
Installation pedestal
Assembly screw: 4 pieces
Capacitor mounting screw: 1 piece
Screw size: M4
[ Included ]
[ Included ]
PASF12
PAS12
Installation using the mounting bracket
for exhaust outlet (sold separately)
Installation using the installation pedestal
(sold separately)


