background image

4

Listening Area

TV

CC

FL

FR

Place the center channel (CC) speak-

er directly above or below the video 

display, preferably equidistant from 

the walls on the left and right. The left 

(L) and right (R) speakers should be 

on the same wall on either side of the 

video display, with the center speaker 

exactly between them. It’s better if the 

left and right speakers are closer to the 

screen rather than further from it. It’s 

best if all three front speakers about 

3.5 feet (1 m) from the floor, however 

there’s a good chance that the center 

speaker will have to be lower or higher 

than the others. The speakers can be 

installed either vertically or horizon-

tally. For better sound quality, avoid 

installing the speakers near corners.

3.1 (3 Speaker Placement)

TV

L

R

Summary of Contents for Composer THTR60 Series

Page 1: ...Installation Manual THTR60 Series Composer Collection THTR69 THTR67 ...

Page 2: ...dation 3 Speaker Placement 4 About Speaker Wire 6 Installing the Wire 6 Wire Routing 7 Painting the Grille 8 Cutting the Hole 8 Connecting the Wire 9 Installing the Speaker 10 Testing Adjustments 11 Installing the Grille 11 Troubleshooting 12 Technical Assistance 13 Warranty 14 Return Process 15 ...

Page 3: ...ation process This instruction booklet covers the necessary information for a smooth installa tion including the tools you will need step by step instructions for installation troubleshooting tips for any errors that may occur and all warranty information If for any reason you experience problems or if you have installation questions please call us at 844 674 4461 Hours of operation are 8 00am to ...

Page 4: ...eter 1 25mm 1 25mm Frequency Response 40 Hz 20 kHz 40 Hz 20 kHz Impedance 8 ohm 8 ohm Power Handling 10 200 Watts 10 200 Watts Dimensions 8 67 x 29 85 220 x 758mm 8 67 x 29 85 220 x 758mm Grille Dimensions 9 11 x 30 29 231 x 769mm 9 11 x 30 29 231 x 769mm Cutout Dimensions 7 875 x 29 198 x 736mm 7 875 x 29 198 x 736mm Mounting Depth 3 78 96mm 3 78 96mm Specifications ...

Page 5: ...ed can have an impact on the performance of your speakers Use a multi stranded wiring designed for amplifier to speaker connections Which gauge to select depends on the length of wire to be used on any particular speak er The longer your run is the larger your wire size must be Wire Recommendation Wire Length Wire Gauge 0 100 0 30m 16 50 150 15 45m 14 Over 100 30m 12 Speaker Grille Template ...

Page 6: ...e center speaker exactly between them It s better if the left and right speakers are closer to the screen rather than further from it It s best if all three front speakers about 3 5 feet 1 m from the floor however there s a good chance that the center speaker will have to be lower or higher than the others The speakers can be installed either vertically or horizon tally For better sound quality av...

Page 7: ... and center speak ers should be in the same location as the previous two setups described The surround left and right speakers should be about 5 feet 1 5 m from the floor directly to either side of the listening area Finally the rear speak ers should be on the back wall about 5 feet 1 5 m from the floor and 3 to 6 feet 1 to 2 m apart If possible make sure that the distance between the rear speaker...

Page 8: ...e It s crucial that you keep track of which wire you use for positive and negative Typically if the wires are colored red and black the red wire is used for positive and the black wire is used for negative but sometimes other colors or patterns are used You can choose whichever color of wire you want to be positive and negative as long as you remain consistent throughout the install On both your a...

Page 9: ...g wires Behind the Baseboard When available you can route the wire through an attic or crawlspace Attic or Basement When running wires through a wall be sure to avoid all obstacles such as AC wiring pipes and ducts Through Walls If these speakers are being installed in a new home during construction the installation process will be a bit different although much simpler For these situations it s re...

Page 10: ...be painted with spray paint and most hardware stores will mix a can of paint to match whatever color you need Before painting carefully remove the thin cloth on the underside of the grille Lightly spray the front of the grille with the paint from a distance being careful not to plug any of the holes Diluting the paint with paint thinner will lessen the risk of filling any holes If a hole gets plug...

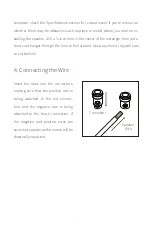
Page 11: ...ed speaker performance will be drastically impacted 4 Connecting the Wire Speaker Wire Connector template check the Specifications section for cutout sizes If you re unsure on whether there may be obstacles such as pipes or wires where you plan on in stalling the speaker drill a inch hole in the center of the rectangle then put a bent coat hanger through the hole to feel around Use a keyhole or dr...

Page 12: ...printed on the screws Not all SpringLock releases will be turned the same direction When you turn each SpringLock release you should hear each SpringLock clamp down on the wall Do not attempt to tighten the SpringLock releases because once the SpringLock has clamped down it s as secure as it can be If you need to remove the speaker turn the SpringLocks 90 in the opposite direction of the arrows 5 ...

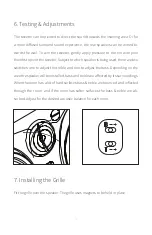
Page 13: ...e are two switches one to adjust the treble and one to adjust the bass Depending on the area the speaker will be installed bass and treble are affected by its surroundings When the room has a lot of hard surfaces bass treble are bounced and reflected through the room and if the room has softer surfaces the bass treble are ab sorbed Adjust for the desired acoustic balance for each room 6 Testing Ad...

Page 14: ...d Check the cord connecting the amplifier with the source The cord may be damaged or plugged into the wrong input or out put No Sound Check the wires connecting the amplifier with the speakers Make sure they re connected properly and not damaged in any way Poor Sound Quality If you hear something like static or the sound is cutting in and out check the audio cables If the problem increases when a ...

Page 15: ...rouble please include the model number and briefly explain what steps you took to resolve the problem in your email or be prepared to answer these questions over the phone If you are considering returning the product it s required that you contact Origin Acoustics prior to any return at tempts This way we can determine if the issue can be resolved without returning the product or if needed we can ...

Page 16: ... greater value that is the most similar to the original If this is the case installing the replacement model may require mounting modifications Origin Acoustics will not be responsible for any such related costs Limited Lifetime Warranty This warranty may not be valid if the product was purchased through an unautho rized dealer This warranty only applies to the individual that made the original pu...

Page 17: ...fore making any return attempts it is required that you first contact Origin Acoustics Return product to Origin Acoustics or your dealer either in person or by mail It s preferable if the product is returned in the original packaging If this isn t possible the customer is responsible for insuring the shipment for the full value of the product This warranty is in lieu of all other expressed or impl...

Page 18: ...www originacoustics com 844 674 4461 2017 Origin Acoustics ...

Reviews: