Page 4
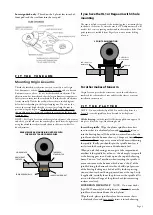
house (If the oil does not overflow when the spindle touches
the bottom then try 2 drops at a time
till you just achieve
overflow
- wipe away excess oil without withdrawing the sub-
platter. Next, if applicable, place the sub-platter on the spindle
such that the less recessed side is uppermost. Then place the
thin black disc on the top of the sub-platter (This is the same
diameter as the sub-platter). Lastly, place the platter on top of
the sub-platter and follow this with the thin black platter mat .
If you have the heavyweight platter
then raise the plinth more
than normal by winding out the adjustable feet, till the platter
no longer fouls on the motor pod. The belt must NOT run in
the groove of the platter.
NOTES:
The bearing fit is carefully toleranced to run fully loaded
with the specific oil we supply. It needs at least 10 minutes to
distribute the oil evenly over the running surfaces and approx
24 hours to properly “run in”. It needs this because of the exact
tolerances (0.0001”)which “float” the bearing off the side walls
to avoid metal to metal contact and also minimize viscous drag.
Eventually it should run virtually silent when truly vertical
and full of oil
- if it doesn’t do so, there has probably been
contamination with dust and you will need to clean it out with
a lint free paper towel or similar wrapped around a thin rod. If
you do this, be sure to also wipe the oil off the spindle as this
also may contain microscopic contamination that is not visible.
Do not use any other oil than Origin Live oil.
Do not tamper with the bolt in the bottom of the bearing
or oil leaks will occur and you will probably not succeed in
re-tightening it.
The thrust plate at the bottom of the bearing house may
appear to be discoloured or dirty - you should not attempt
to clean this up as it is part of the hardening process - the
centre of the plate is polished as this is the only part that
the spindle touches.
The Platter works best
without
any type of mat (including the
Ringmat and Sound deadened steel mat).
L E V E L T H E D E C K
The 3 feet under the plinth are all threaded so that by rotating
them you can adjust the level of the deck - Rotate all three feet
so that the top of the foot does
not
touch the plinth and only
sits on the thread alone - this is for best performance.
At this
stage check that the bearing house is at least 1mm clear
of touching the surface your deck is standing on (Aurora
only).
Note that when you level the deck, the only thing that matters
is that the platter (not the plinth) is level. Sometimes there
may be a slight discrepancy between the level of the plinth and
platter but this does not matter and is usually imperceptible
visually.
P O S I T I O N M O T O R P O D & F I T
B E L T
Position the motor pod roughly as shown in previous diagrams.
The pod should be oriented as shown, such that the switch is at
the front. Ideally the centre of the pulley should be somewhere
between
210mm (8.25inches) to 221mm (8.7 inches)
from
the centre of the platter.
We recommend and set up the
speed at factory at 212mm
. The pod must not touch the
plinth so rotate it if necessary.
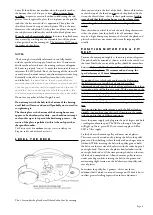
If you don’t have a ruler handy another method of setting
the belt tension is to install the belt using the method
photographed and then lift the belt off the pulley and let it lose
it’s tension whilst still holding it gently - With no tension in the
belt, the
centre
of the pulley should coincide with the inside of
the belt as you hold it. If this is not the case, move the pod to
achieve correct pulley position. This means that when you hook
the belt back over the pulley, you are stretching it about 2 to 3
mm.
Ideal tension for best performance is with the belt as slack as
possible - you can fine tune this just by listening to the sound
with the pod in slightly different positions.
Insert the power supply jack plug into the pod’s largest side hole
- see diagram of motor pod. The LED on the top of the pod
will light up. Note: green LED is advanced supply and Blue
LED is Ultra supply.
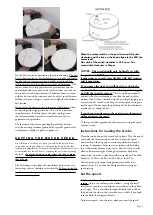
Fit the belt over the motor pulley and outer rim of platter.
This is most easily carried out by placing the belt in the pulley
groove and then holding it there loosely with one finger of your
left hand. Whilst retaining the belt in the pulley groove, hold
the belt onto the rear rim of the platter with the index finger of
your right hand. Now rotate the platter slowly clockwise with
your right hand index, all the time pressing the belt on the rim,
till the belt is completely on. Allow the motor pulley to rotate
under your finger whilst retaining the belt in the groove and
maintaining slight tension on the belt between the pulley and
rear of platter.
Sometimes the pulley has 2 grooves - this is not for an
additional belt ( which is not an advantage on OL decks) but is
to allow greater levelling capacity due to feet adjustment.


