background image

Page 10

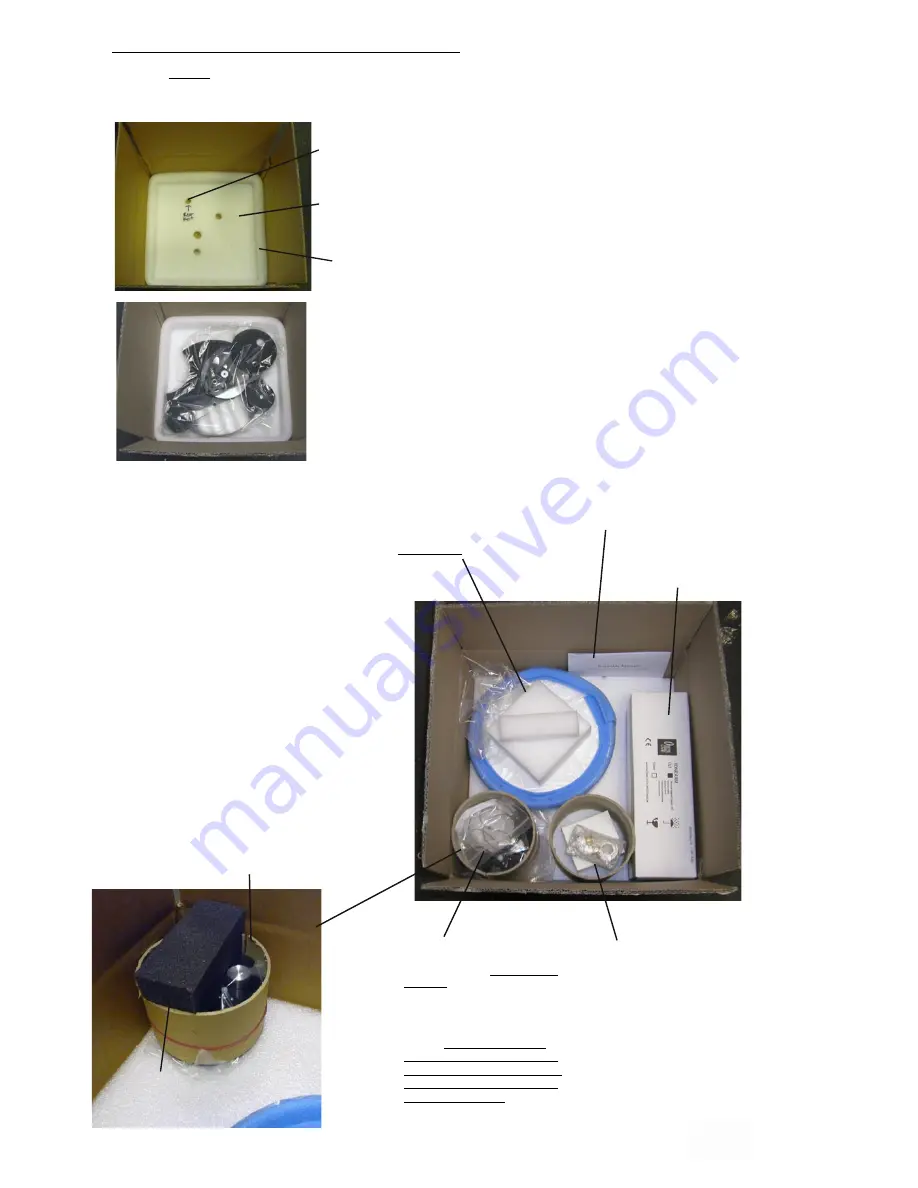
Wrap plith in polythene bag 
and place on bottom layer of 
foam - ensure that feet and 
bearing house all locate in holes 
in foam. The hole for the rear 
foot is marked with an R

Place top layer of foam on top 
of plinth - top foam has no 
holes in it.

Place components on top layer of foam as show below

R E P A C K I N G   M E T H O D

Please read carefully and do not deviate, do not cut up foam etc 
or damage will result - see seperate sheet for Sovereign packing 
instructions.

Wrap platter in polythene bag then 
tape blue edging foam to protect 
edges - lastly place thick foam square 
over platter - place in corner of box , 

upside down

 as shown.

Instruction manual

Arm if included or empty 
box - larger arms will not 
fit - i.e Encounter and 
above

Wrap motor pod in polythene and 
then tape ( or rubber band) round 
the cardboard tube which has a slit 
in it’s side - the tube sits on top of 
the base plate, not round it. This 
is to provide protection against 
anything that might knock the end 
of the motor shaft as this can cause 
damage. 

Note that the motor 

pod must be positioned in this 
corner of the box where there is 
the greatest depth i.e not over 
the plinth armboard

Place the strobe card and belt in the 
top of the motor pod card tube.

Place the wall wart transformer in 
the remaining cardboard tube as 
shown and then place the bubble bag 
containing the following items on top 
of the transformer

Bag contains - threaded vta adjuster, 
Oil bottle, screw driver, 2.5mm allen 
key

REAR FOOT
POSITION

Ensure base foam is 
in position in box as 
shown

EDGE SURROUND FOAM STRIP

MOTOR POD PACKED WITH ELASTIC BANDS 
ROUND SPLIT CARDBOARD TUBE - TUBE SITS 
ON TOP OF MOTOR POD BASE FLANGE.

FOAM CUSHION INSIDE
CARDBOARD TUBE

Summary of Contents for Aurora MKII

Page 1: ...ed must be reset accurately after 3 days of continuous running at 33rpm It cannot be overstated that it is VERY important to read these instructions to really get the best out of your deck and avoid m...

Page 2: ...d and later on the speed can nally be set with absolute accuracy As explained later this is because the electronics initially experience speed drift if they have not been run in and may need at least...

Page 3: ...hole mounting The arm is bolted or screwed to the deck using the 3 mounting holes in the base of the arm To raise the arm for VTA adjustment you will need to t 3 or more spacing washers under the arm...

Page 4: ...scous drag Eventually it should run virtually silent when truly vertical and full of oil if it doesn t do so there has probably been contamination with dust and you will need to clean it out with a li...

Page 5: ...best sound but you will need to adjust speed between different distance settings as speed varies slightly with different belt tension You can ne tune this just by listening to the sound with the pod i...

Page 6: ...click clockwise and set 45rpm speed or 78 rpm if you wish using the same procedure as for 33rpm The dc motors can be slightly noisy initially and are never completely silent in comparison to a c moto...

Page 7: ...h as Autoglym Fast glass but only if necessary wax furniture polish is to be avoided Do not spray directly on the turntable as it may clog up the cartridge etc but rather spray onto a soft polishing c...

Page 8: ...oned and then adjust the other s to give minimum noise If it continues to be very noisy please contact Origin Live However bear in mind that dc motors are rarely as silent as a c motors The other majo...

Page 9: ...Page 9...

Page 10: ...od in polythene and then tape or rubber band round the cardboard tube which has a slit in it s side the tube sits on top of the base plate not round it This is to provide protection against anything t...

Reviews: