background image

 
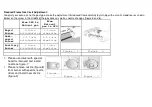
19. Please place the tray to the lowest shelf and add 200 ml water when you cook something in chicken roast section. 
20. Make sure that rear pulley section of the grill swelling is fixed on V-bed on the grill when you use the grill swelling. 
21. It is not suitable to operate both lower and upper burners simultaneously. The lower burner is designed for cooking and 

upper burner is designed for frying. 

22. WARNING:  The  appliance  and  its  accessible  parts  become  hot  during  use.  Care  should  be  taken  to  avoid  touching 

heating elements. Children less than 8 years of age shall be kept away unless continuously supervised 

23.  WARNING: Unattended cooking on a hob with fat or oil can be dangerous and may result in fire. NEVER try to extinguish 

a fire with water, but switch off the appliance and then cover flame e.g. with a lid or a fire blanket. 

24. WARNING: Danger of fire: do not store items on the cooking surfaces. 
25.  This  appliance  is  not  intended  for  use  by  persons  (including  children)  with  reduced  physical,  sensory  or  mental 

capabilities, or lack of experience and knowledge, unless they have been given supervision or instruction concerning use 
of the appliance by a person responsible for their safety 

26.  This  appliance  can  be  used  by  children  aged  from  8  years  and  above  and  persons  with  reduced  physical,  sensory  or 

mental  capabilities  or  lack  of  experience  and  knowledge  if  they  have  been  given  supervision  or  instruction  concerning 
use  of  the  appliance  in  a  safe  way  and  understand  the  hazards  involved.  Children  shall  not  play  with  the  appliance. 
Cleaning and user maintenance shall not be made by children without supervision. 


Electrical Connection and Security 

1.  Your oven is adjusted in compliance with 230 Volt 16 Ampere electric supplies. (For 3 phase 230V/400V 32 Ampere) If 

the mains are different from these values, contact your authorized service. 

2.  Electrical connection of the oven should only be made by the sockets with earth system installed in compliance with the 

regulations. If there is no proper socket with earth system in the place where the oven will be placed, immediately contact 
a qualified electrician. Manufacturer shall never be responsible from the damages that will arise because of the sockets 
connected to the appliance with no earth system. 

3.  Electrical cable should not touch the hot parts of the appliance. 
4.  Some models are supplied without a plug-an-lead set. In this case please use a flexible cable to suitable for connection to 

mono phase: H05 VV-F 3 G 4 mm2 or for 3 phase: H05 VV-F 5 G 1.5 mm2 


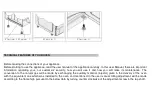
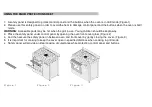
 INSTALLATION OF YOUR OVEN 

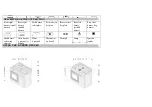
Summary of Contents for OR 952 PBX

Page 1: ......

Page 2: ...produzido em modernas instala es num ambiente de trabalho cuidadoso e tendo sempre presente o conceito de qualidade m xima Assim recomendamos que leia este manual de instru es atentamente antes de pr...

Page 3: ...o Parte 5 Informa es T cnicas Parte 6 Altera o dos bicos Parte 7 Descri o do painel de comando Parte 8 Descri o das sec es do forno Parte 9 Utiliza o do grupo de queimadores Parte 10 Modo de utiliza...

Page 4: ...omadas e com o sistema liga o terra instalado em conformidade com os regulamentos Se n o tiver uma tomada apropriado com o sistema de liga o terra no local onde o forno ser colocado contacte imediatam...

Page 5: ...ventila o limpas e sem obstru es 13 Quando o forno estiver a ser utilizado as partes mais acess veis poder o ficar quentes dever manter as crian as afastadas e das reas onde haja corrente el ctrica 14...

Page 6: ...e resultar em inc ndio NUNCA tenete apagar o fogo com gua desligue o aparelho e em seguida cobrir a chama com uma tampa ou um cobertor de fogo 24 AVISO Perigo de inc ndio N o armazenar itens nas supe...

Page 7: ...de g s e especifica es de press o indicado na placa de identifica o corresponde com o seu fornecimento de g s Se necess rio consulte um servi o autorizado para ajustar o tipo de g s que necessita 2 E...

Page 8: ...ado Fa a a liga o do forno para a v lvula de entrada de g s o comprimento da mangueira deve ser curto e ter a certeza de que n o h vazamento A mangueira utilizada n o deve ser superior a 125 cm para s...

Page 9: ...s Figura 2 Completar o processo de instala o dos p s por aparafusamento das porcas nos respectivos suportes Figura 3 2 Poder nivelar o seu fog o girando os p s aparafusados de acordo com o tipo de su...

Page 10: ...como fazer a manuten o do seu fog o Orima A convers o para o g s natural ser feita atrav s da troca do material auxiliar injectores entregue na recep o do fog o com um kit equivalente ao que foi inst...

Page 11: ...Produto 350 mm Queimador Semi rapido Injector mm 0 97 0 65 Pot ncia L mpada 15 W Pot ncia KW 1 78 1 78 Pot ncias Espeto 4 W Queimador Auxiliar Injector mm 0 72 0 50 Resist ncia Inferior 1000 W Pot nc...

Page 12: ...bem como altera es do bico Figura 5 e 6 De LPG para Gas Natural De Gas Natural para LPG Queimador Rapido 3 voltas no sentido inverso dos ponteiros do rel gio 3 voltas no sentido dos ponteiros do rel...

Page 13: ...ctrodo de igni o e do termopar Retire o queimador elevando o ligeiramente para a direita e aplique for a de trac o Figura 13 5 O injector do grelhador do forno facilmente alcan ado ap s a grelha do m...

Page 14: ...Figura 10 Figura 11 Figura 12 FIGURA 13 Figura 14 Figura 15...

Page 15: ...DESCRI O DO PAINEL DE COMANDO...

Page 16: ...te Rear electric hot plate Rear left burner middle burner Front left burner big burner Grill burner or heating element Oven burner optional or heating element Timer optional Thermostat optional Turnsp...

Page 17: ...NCIA QUEIMADOR FORNO OPCIONAL OU RESIST NCIA QUEIMADOR ESQUERDO DE TR S M DIO QUEIMADOR ESQUERDO FRONTAL PEQUENO DESCRI O DAS SEC ES DO FORNO QUEIMADOR DIREITO FRONTAL PEQUENO QUEIMADOR DIREITO DE TR...

Page 18: ...e a posi o da v lvula de g s e ao mesmo tempo pressione o bot o de igni o 5 Nos modelos com sistema de Seguran a quando a chama do fog o est apagada a v lvula de controlo corta o g s automaticamente P...

Page 19: ...este estiver vazio Quando quiser utilizar o seu forno Orima deve ligar o interruptor do forno e a igni o Caso contr rio o seu forno n o funcionar 2 Todos os tipos de refei es que ir cozinhar tempos e...

Page 20: ...laria fina 2 35 45 Pastelaria com sabores 2 20 30 Cordeiro 3 20 25 Vitela 3 30 40 Carne carneiro 3 30 40 Galinha aos bocados 3 30 40 Peixe 3 20 30 Nota Os valores na tabela s o os resultados obtidos n...

Page 21: ...utilizado Mantenha as crian as longe do alcance do mesmo 3 Coloque o painel de protec o sob o painel de controlo atrav s da abertura do forno de vidro tampa frontal Figura 2 4 Fixe o painel de Seguran...

Page 22: ...f cios de g s atrav s de um pincel 6 Nunca utilize produtos inflam veis como o cido gasolina ou derivados para limpar o forno 7 N o limpe o forno com limpeza a vapor 8 N o lave qualquer parte do seu f...

Page 23: ...is danos ao meio ambiente ou sa de humana causados pela elimina o incontrolada de res duos recicle o responsavelmente para promover a reutiliza o sustent vel dos recursos materiais Para retornar o apa...

Page 24: ...ough meticulous quality control checks and is manufactured in modern facilities To this effect we recommend that you read the entire guide carefully before operating the product and keep it as a refer...

Page 25: ...en feet Part 5 Technical features of your oven Part 6 Nozzle change operation Part 7 Descriptions of the control panel Part 8 Descriptions of the oven section Part 9 Using the burner groups Part 10 Us...

Page 26: ...r example the jets must be suitable for local gas type and gas pressure 8 Connect your oven to LPG cock in shortest way and without any leakage Minimum 40 cm Max 125 cm 9 When making gas leakage check...

Page 27: ...le for their safety 26 This appliance can be used by children aged from 8 years and above and persons with reduced physical sensory or mental capabilities or lack of experience and knowledge if they h...

Page 28: ...nozzle plug and the seals 5 Please use flexible hose for gas connection 6 If you make a connection with a flexible metal hose locate a seal between the main gas pipes 7 The inner diameter of the flexi...

Page 29: ...der to screw feet Figure 2 Complete the feet installation process by screwing the feet to the nuts Figure 3 2 You can balance your oven by turning the screwed feet according to the surface type you ar...

Page 30: ...w you will use it and how you will make its maintenance The conversion to the natural gas will be made by exchanging the auxiliary material injector given in the delivery of the oven with the equivale...

Page 31: ...height 350 mm Semi rapid Burner Injector mm 0 97 0 65 Lamp power 15 W Power KW 1 78 1 78 Turnspit power 4 W Auxiliary Burner Injector mm 0 72 0 50 Bottom heating element 1000 W Power KW 0 99 0 88 Top...

Page 32: ...nd 6 From LPG to Natural gas From Natural gas to LPG Rapid Burner 3 turns anticlockwise 3 turns clockwise Semi rapid Burner 2 5 turns anticlockwise 2 5 turns clockwise Auxiliary Burner 2 turns anticlo...

Page 33: ...oven broiler towards you slightly as shown in the figure 12 4 The oven broiler injector is reached easily after the oven broiler is removed figure 13 5 A 7 mm spanner shall be used in order to replace...

Page 34: ...DESCRIPTION OF THE CONTROL PANELS...

Page 35: ...t plate Rear electric hot plate Rear left burner middle burner Front left burner big burner Grill burner or heating element Oven burner optional or heating element Timer optional Thermostat optional T...

Page 36: ...h pressed until ignition is performed OPTIONAL 4 If your oven has ignition system from push button switch please press and turn gas valve open position and same time press ignition button 5 In models...

Page 37: ...ing first time operate your electric hotplate in position 6 for 5 minutes This will make the agent on your hotplate which is sensitive to heat get hardened by burning Use flat bottomed saucepans which...

Page 38: ...as a result of the tests performed in our laboratory You can find different flavors suitable for your taste depending on your cooking and using habits 3 Open the oven cover at level 1 and use the saf...

Page 39: ...ky 2 30 40 Filo pastry 2 35 45 Savory pastry 2 20 30 Lamb meat 3 20 25 Veal 3 30 40 Mutton 3 30 40 Chicken in pieces 3 30 40 Fish 3 20 30 Note The values in the Table are the results obtained in our l...

Page 40: ...Young children should be kept away 3 Place the safety panel under control panel by opening the oven front cover glass Figure 2 4 And then secure the safety panel in between oven and front cover by ge...

Page 41: ...d clean the gas ducts by means of a brush 6 Never use inflammable agents like acid thinner and gasoline when cleaning your oven 7 Do not clean your oven with steam cleaners 8 Don t wash any part of yo...

Page 42: ...is product is properly disposed of the user contributes to preventing potential environmental and health damage The symbol on the product or on the documentation that goes with it indicates that this...

Reviews: