background image


INSTRUCTION MANUAL 


MULTI-FUNCTION STAND MIXER 

ORS 688 BG 


Before operating this unit, please read these instructions completely 


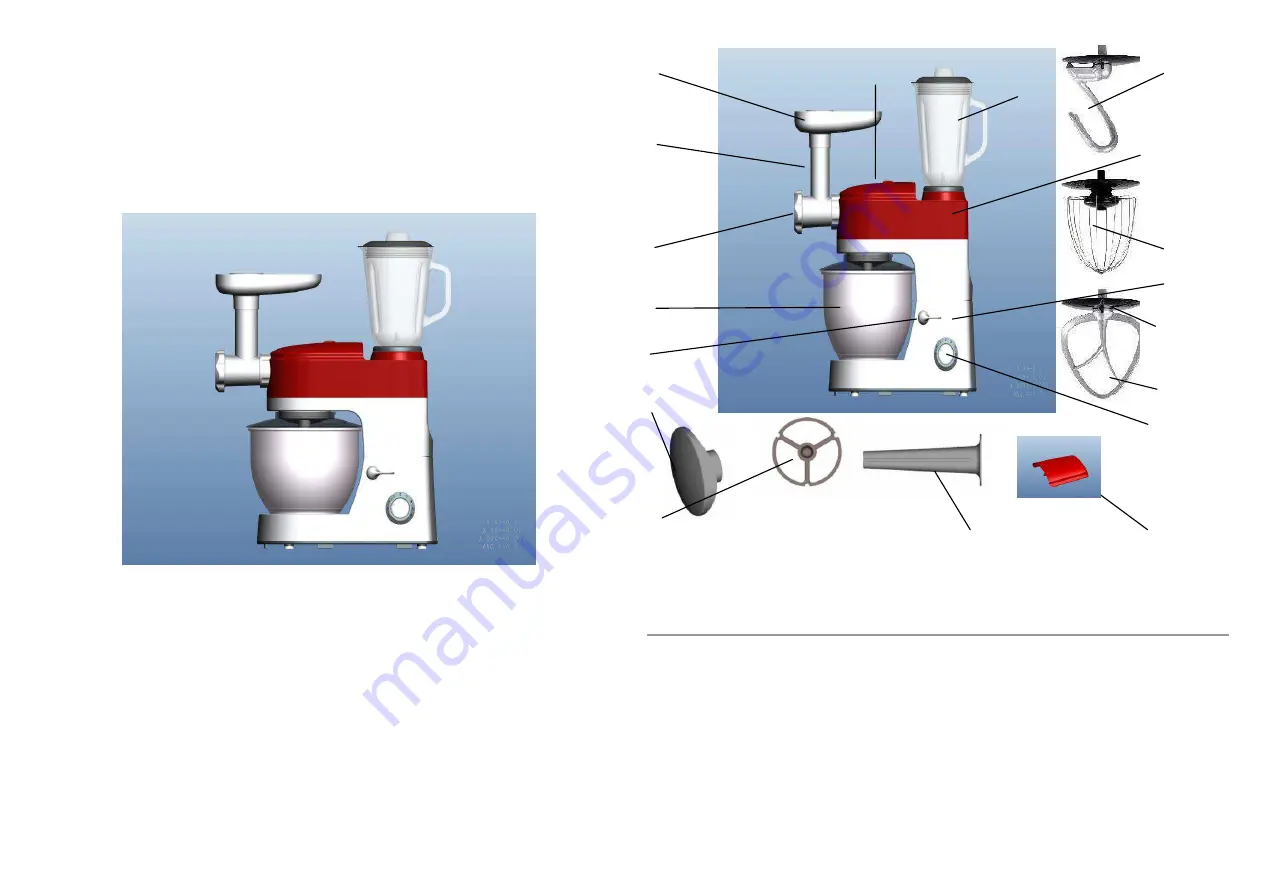
  Fig.

1


Configuration                                                                                   


  Meat Filling pan 


  Mincing tube 


  Locking button 


  Mixing bowl 


  Locking Switch 


  Mincer cover 


  I/R switch 


  Blender jar 


  Kneading blade 


  Top housing 


  Egg whisk 


  Motor shelter 


  Dusty cover 


  Mixing blade 


  Speed Switch 


  Sausage holder 


  Sausage presser 


  Blender cover 


Summary of Contents for ORS 688 BG

Page 1: ......

Page 2: ...ecipiente para carne a picar ĸ Tubo de picar Ĺ Botão de bloqueio ĺ Taça Ļ Interruptor de bloqueio ļ Tampa do picador Ľ I R interruptor ľ Copo liquidificador Ŀ Lâmina ŀ Estrutura superior ᬏ Batedor ᬐ Motor ᬑ Protector ᬒ Vara de mistura ᬓ Interruptor de velocidade ᬔ Suporte de salsicha ᬕ Calcador de salsicha ᬖ Capa do liquidificador ķ ĸ Ĺ ĺ ļ ľ Ŀ ŀ ŋ Ō Ŏ ŏ ő Ľ Ļ ō Œ ...

Page 3: ...Fig 3 Picadora 1 Recipiente de medição 2 Tampa 3 Copo de vidro 4 Anilha de vedação 5 Lâminas 6 Base do copo 1 Anel de fixação 2 Disco de mistura 3 Lâmina picadora 4 Espiral Rotativa 5 Recipiente funil 6 Tubo de picar 1 2 3 4 6 5 ...

Page 4: ...ha afastado das crianças O aparelho deve ser usado e guardado fora do alcance das crianças É necessária uma supervisão cuidadosa quando o aparelho é utilizado por ou na proximidades de crianças O aparelho só deve ser utilizado para a finalidade prevista Nunca o coloque a trabalhar vazio e sem supervisão Durante o uso não toque nas partes móveis com os dedos Se passar o aparelho para uma terceira p...

Page 5: ...seguida repita a etapa 4 5 e 6 10 Tire o copo e coloque a tampa de trás da máquina Guia de funcionamento Para misturar ou amassar massa 1 Sugestão de farinha e água na proporção de 5 3 2 Inicia com a velocidade 1 durante 10 segundos depois velocidade 2 por 10 segundos e em seguida velocidade 3 durante cerca de 3 minutos 3 Ao encher a taça certifique se de que não excede a quantidade máxima 4 A qua...

Page 6: ...mada 2 Após usar deixe o arrefecer antes de começar a limpar 3 Para limpar o exterior use um pano húmido e detergente neutro 4 Ao limpar o interior e exterior e tampa protectora de poeira 11 não utilize quaisquer detergentes abrasivos ou álcool 5 Nunca submergir em água 6 O batedor de massa batedor misturador recipiente de funil picador tubo de mistura e espiral rotativa não são laváveis na máquin...

Page 7: ... instructions completely Fig 1 Configuration Meat Filling pan Mincing tube Locking button Mixing bowl Locking Switch Mincer cover I R switch Blender jar Kneading blade Top housing ᬏ Egg whisk ᬐ Motor shelter ᬑ Dusty cover ᬒ Mixing blade ᬓ Speed Switch ᬔ Sausage holder ᬕ Sausage presser ᬖ Blender cover ...

Page 8: ...Fig 2 Blender Jar Fig 3 Food mincer 1 Measuring cup 2 Lid 3 Glass Jar 4 Sealing ring 5 Blade set 6 Cup base 1 Fixing ring 2 Mixing disk 3 Mincing blade 4 Snake 5 Hopper plate 6 Mincing tube 1 2 3 4 6 5 ...

Page 9: ...toy Keep away from children The device should be used and stored out of the reach of children Careful supervision is required when the device is used by or in the vicinity of children The device should only be used for its intended purpose Never operate empty and without supervision During use do not touch moving parts with your fingers Please note that when passing the device on to a third party ...

Page 10: ...k cover from the upper housing 9 Pure a cup of water into the blender jar set the blender jar onto the machine then repeat step 4 5 and 6 10 Take off the blender jar and set the back cover to the machine Operation Guide To mix or knead dough 1 Suggestion flour and water at a ratio of 5 3 2 From speed 1 for mix 10 second and speed 2 for mix 10 second afterwards speed 3 for about 3 minutes 3 When fi...

Page 11: ...inuously at a time Cleaning 1 Before cleaning please ensure that the Switch knob is at the 0 position and that the plug has been disconnected from the socket 2 After use allow the device to cool down before you start to clean it 3 To clean the exterior of the device use a moist cloth and a mild detergent 4 When cleaning the interior and exterior and protective dust cover do not use any abrasive de...

Reviews: