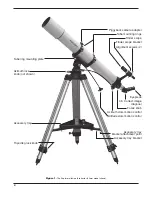
4
5. Next, tighten the screws at the top of the tripod legs, so
the legs are securely fastened to the altazimuth mount.
Use the larger wrench and your fingers to do this.
6. Attach the two tube mounting rings to the altazimuth
mount using the hex-head screws that come installed
in the bottom of the rings. First remove the screws,
then push the screws, with the washers still attached,
up through the holes in the tube ring mounting plate (on
the top of the mount) and rethread them into the bottom
of the tube rings. Tighten the screws securely with the
smaller wrench. Open the tube rings by first loosening
the knurled ring clamps.
7. Lay the telescope optical tube in the tube rings at about
the midpoint of the tube’s length. Rotate the tube in the
rings so the focusing knobs are on the underside of the
telescope. Close the rings over the tube and tighten the
knurled ring clamps finger-tight to secure the telescope
in position.
8. Now attach the two slow-motion cables to the altitude
and azimuth worm gear shafts of the mount. Position the
thumbscrew on the end of each cable over the indented
slot on the worm gear shaft, then tighten the thumb-
screw.
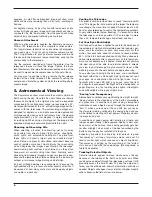
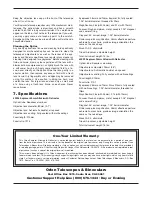
9. To place the finder scope in the finder scope bracket,
first unthread the two black nylon thumbscrews until
the screw ends are flush with the inside diameter of the
bracket. Place the O-ring that comes on the base of the
bracket over the body of the finder scope until it seats
into the slot on the middle of the finder scope. Slide the
eyepiece end (narrow end) of the finder scope into the
end of the bracket’s cylinder opposite the alignment
screws while pulling the chrome, spring-loaded tensioner
on the bracket with your fingers (Figure 2b.) Push the
finder scope through the bracket until the O-ring seats
just inside the front opening of the bracket cylinder. Now,
release the tensioner and tighten the two black nylon
screws a couple of turns each to secure the finder scope
in place.
10. Insert the “foot” of the finder scope bracket into the
dovetail holder on the top of the focuser. Lock the brack-
et into position by tightening the thumbscrew on the
holder.
11. Insert the chrome barrel of the 45° correct-image diago-
nal into the focuser drawtube and secure with the thumb-
screw on the drawtube.
12. Insert an eyepiece into the diagonal and secure it in
place with the thumbscrew on the diagonal. (Always
loosen the appropriate thumbscrew before rotating or
removing the diagonal or an eyepiece.)
3. aligning the Finder Scope
The Explorer refractors come with a 6x26 correct-image
finder scope. (The 6 means six-times magnification, and the
26 indicates a 26mm aperture.) The finder scope makes it
easier to locate the subject you want to observe in the tele-
scope, because the finder scope has a much wider field of
view. Unlike most finder scopes, images viewed in the cor-
rect-image finder scope will appear properly oriented (same
as the naked eye), which makes finding objects even easier.
Before you use the finder scope, it must be precisely aligned
with the telescope, so they both point to exactly the same
spot. Alignment is easiest to do in daylight, rather than at
night under the stars. First, insert the lowest-power (25mm)
eyepiece into the main telescope’s focuser. Then point the
telescope at a discrete object such as the top of a telephone
pole or a street sign that is at least a quarter-mile away.
Move the telescope so the target object appears in the very
center of the field of view when you look into the eyepiece.
Now look through the finder scope. Is the object centered
in the finder scope’s field of view, i.e., on the crosshairs?
If not, hopefully it will be visible somewhere in the field of
view, so only fine adjustment of the two black nylon align-
ment screws will be needed. Otherwise you’ll have to make
coarser adjustments to the alignment screws to redirect the
aim of the finder scope.
Use the two alignment screws to center the object on the
crosshairs of the finder scope. Then look again into the
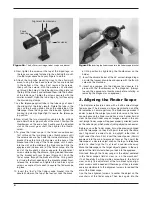
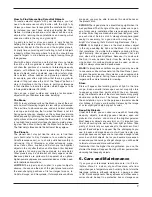
Figure 2a.
The 6x26 correct-image finder scope and bracket
Focus
lock-ring
Alignment thumbscrews
Tensioner
Figure 2b.
Inserting the finder scope into the finder scope bracket


