User’s Manual OR-7500FD Series
11
HDMI, VGA Output
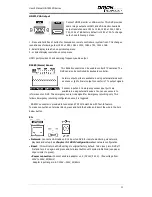
Connect HDMI monitor or VGA monitor. This DVR provides
same image output on HDMI and VGA monitor. Available
output resolutions are 1920 x 1080, 1280 x 1024, 1280 x
720, 1024 x 768. Factory default is 1280 x 720. To change
output, see following 3 steps.
1. Press and hold ‘Zoom’ button for 3seconds on remote controller or system front. This changes
resolutions as following order 1920 x 1080, 1280 x 1024, 1280 x 720, 1024 x 768.
2. Select display resolution on quick setup menu.
3. or Select display resolution on setup menu
HDMI port provides 32 kHz sampling frequency audio output.
RS485/Alarm/Sensor
This RS485 connector can be used to control PTZ cameras. The
DVR can also be controlled by keyboard controller.
2 alarm output ports are available in using external alarms such
as sirens or lights. Alarm output connector is TTL output signals.
2 sensor input and 1 emergency sensor input ports are
available in using external devices. You can use sensors to
inform event on DVR. The emergency sensor is designed for Emergency recording only. This
follows Emergency recording configuration once it is triggered.
RS-232C connector is provided to connect an ATM/ POS machine with Text-In feature.
To make connection on terminal block, press and hold the button and insert the wire in the hole
below button
Etc
•
Network
: Connect a LAN cable on RJ-45 port on DVR for remote monitoring via network,
playback and setup. See
Chapter 3-2. DVR Configuration
about network configuration
•
Reset
: : this will return all DVR settings to original factory default. To do reset, turn DVR off
first and turn it on again and press and hold reset button until system initialized. (use paper
clip or similar to press) .
•
Power connection:
Connect enclosed adapter on it. (DC12V, 3.33A) . (free voltage from
100V to 240V, 50/60Hz)
※
Adapter input range is: AC 100V ~240V, 50/60Hz


