3
table of contents
1. Unpacking and Assembly . . . . . . . . . . . . . . .3
Parts List . . . . . . . . . . . . . . . . . . . . . . . . . . . . . . . . . . . . 3
Attaching the Optical Tube to the Base . . . . . . . . . . . . . 3
Installing the Battery in the EZ Finder II . . . . . . . . . . . . . 3
Attaching the EZ Finder II . . . . . . . . . . . . . . . . . . . . . . . . 4
Inserting an Eyepiece . . . . . . . . . . . . . . . . . . . . . . . . . . . 4
2. Getting Started . . . . . . . . . . . . . . . . . . . . . . .4
Readying the FunScope Astro Dazzle for Observing . . . 4
Moving and Pointing the Telescope . . . . . . . . . . . . . . . . 4
Focusing the Telescope . . . . . . . . . . . . . . . . . . . . . . . . . 5
Using the EZ Finder II . . . . . . . . . . . . . . . . . . . . . . . . . . 6
Aligning the EZ Finder II with the Optical Tube . . . . . . . . 6
3. Using Your Telescope . . . . . . . . . . . . . . . . . .6
Choosing an Observing Location . . . . . . . . . . . . . . . . . . 6
How are the “Seeing” and Transparency? . . . . . . . . . . . 8
Tracking Celestial Objects . . . . . . . . . . . . . . . . . . . . . . . 8
Eyepiece Selection . . . . . . . . . . . . . . . . . . . . . . . . . . . . . 8
What to Expect . . . . . . . . . . . . . . . . . . . . . . . . . . . . . . . . 9
4. Care and Maintenance . . . . . . . . . . . . . . . . .9
5. Aligning the Mirrors (Collimation) . . . . . . . .9
Specifications . . . . . . . . . . . . . . . . . . . . . . . . .10
WARning:
Never look directly at the Sun with the
naked eye or with a telescope – unless you have
a proper solar filter installed over the front of the
telescope! Otherwise, permanent, irreversible eye
damage may result.
Congratulations on your purchase of an Orion FunScope™
Astro Dazzle 4.5 Altazimuth Reflector telescope. Besides hav-
ing the most dazzling appearance of any telescope on the mar-
ket, the FunScope Astro Dazzle 4.5 is a great tool for kids and
adults alike to explore the night sky’s celestial treasures. It’s a
real telescope, not a toy, that will provide the whole family with
breathtaking views of the Moon, planets, and even more-distant
objects like the Orion Nebula and Andromeda Galaxy. These
instructions will help you set up and operate your FunScope
Astro Dazzle telescope; please read them thoroughly.
1. unpacking and Assembly
The telescope will arrive almost completely assembled in
the box! You will just need to attach the tube to the base and
install a couple of accessories and you’ll be all set for astro
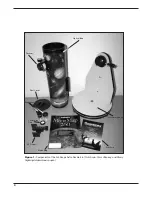
action. Make sure all the parts in the
Parts List and shown in
Figure 1 below are present. If anything appears to be miss-
ing or broken, immediately call Orion Customer Support (800-
676-1343) for assistance.
Parts list
Qty. Description
1
Optical tube assembly
1
Altazimuth base
1
EZ Finder II reflex sight (with button cell battery)
1
10mm Kellner eyepiece, 1.25" barrel diameter
1
25mm Kellner eyepiece, 1.25" barrel diameter
1
MoonMap 260
1
Quick collimation capr
1
2mm Allen wrench
1
Starry Night SE digital download coupon
Attaching the Optical tube to the Base
To attach the telescope optical tube to the base:
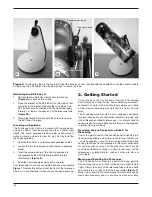
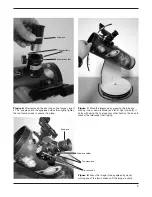
1. Orient the base as shown in
Figure 2A, then loosen the
tube clamp knob on the dovetail saddle
(2B).
2. Slide the dovetail mounting bar on the tube into the
dovetail saddle, then tighten the clamp knob to secure
the tube. The open end of the optical tube should be
facing forward, as in
Figure 2C.
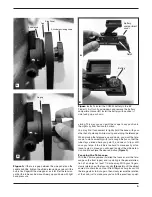
3. Tighten the altitude tensioning knob so there is no gap
between the side panel and the dovetail saddle hub, as
shown in
Figure 3, but the telescope should move easily
up and down with light hand pressure.
installing the Battery in the EZ Finder ii
Before installing the EZ Finder II on the telescope, you will
need to insert the included CR2032 3V lithium button cell bat-
tery in the EZ Finder II. If there is a small plastic tab sticking
out from the battery compartment cover, you must remove it
for the battery to make contact with the EZ Finder’s electronic
circuitry. The tab can then be discarded
1. Turn the EZ Finder II upside down as shown in
Figure
4A.
2. Insert a small, flat-blade screwdriver into the notch in the
battery compartment cover and gently pry it off.
3. Slide the battery under the retaining clip with the positive
(+) side facing up (touching the clip)
(4B).
4. Then press the battery compartment cover back on.
Should the battery die, replacement CR2032 batteries are
available at many stores where small batteries are sold or
online.


