10
Tracking Celestial Objects
When you observe a celestial object through the telescope, you’ll
see it drift slowly across the field of view. To keep it in the field,
assuming your equatorial mount is polar aligned, just turn the
R.A. slow-motion control cable clockwise. The Dec. slow-motion
control cable is not needed for tracking. Objects will appear to
move faster at higher magnifications, because the field of view
is narrower.
Optional Electronic Drives for Automatic
Tracking
An optional DC electronic drive can be mounted on the R.A. axis
of the equatorial mount to provide hands-free tracking. Objects
will then remain stationary in the field of view without any manual
adjustment of the R.A. slow-motion control cable.
Understanding the Setting Circles
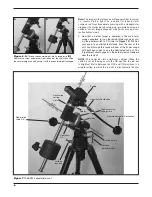
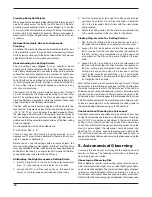
The two setting circles (
Figure 7) on an equatorial mount
enable you to locate celestial objects by their “celestial coordi-
nates”. Every object resides in a specific location on the “celestial
sphere”. That location is denoted by two numbers: its right ascen-
sion (R.A.) and declination (Dec.). In the same way, every loca-
tion on Earth can be described by its longitude and latitude. R.A.
is similar to longitude on Earth, and Dec. is similar to latitude. The
R.A. and Dec. values for celestial objects can be found in any
star atlas or star catalog.
The mount’s R.A. setting circle is scaled in hours, from 1 through
24, with small marks in between representing 10-minute incre-
ments. The numbers closest to the R.A. axis gear apply to view-
ing in the Southern Hemisphere, while the numbers above them
apply to viewing in the Northern Hemisphere.
The Dec. setting circle is scaled in degrees, with each mark rep-
resenting 2.5° increments. Values of Dec. coordinates range from
+90° to -90°. The 0° mark indicates the celestial equator. When
the telescope is pointed north of the celestial equator, values of
the Dec. setting circle are positive, while when the telescope is
pointed south of the celestial equator, values of the Dec. setting
circle are negative.
So, the coordinates for the Orion Nebula are:
R.A. 5h 35.4m Dec. -5° 27’
That’s 5 hours and 35.4 minutes in right ascension, and -5
degrees and 27 arc-minutes in declination (there are 60 arc-min-
utes in 1 degree of declination).
Before you can use the setting circles to locate objects, the
mount must be properly polar aligned, and the R.A. setting circle
must be calibrated. The Dec. setting circle has been permanently
calibrated at the factory, and should read 90° whenever the tele-
scope optical tube is parallel with the R.A. axis.
Calibrating the Right Ascension Setting Circle
1. Identify a bright star in the sky near the celestial equator
(Dec. = 0°) and look up its coordinates in a star atlas.
2. Loosen the R.A. and Dec. lock knobs on the equatorial
mount, so the telescope optical tube can move freely.
3. Point the telescope at the bright star whose coordinates
you know. Lock the R.A. and Dec. lock knobs. Center the
star in the telescope’s field of view with the slow-motion
control cables.
4. Rotate the setting circle until the metal arrow indicates the
R.A. coordinate listed in the star atlas for the object.
Finding Objects with the Setting Circles
1. Now that both setting circles are calibrated, look up in a
star atlas the coordinates of an object you wish to view.
2. Loosen the R.A. lock knob and rotate the telescope until
the R.A. value from the star atlas matches the reading on
the R.A. setting circle. Remember to use the upper set
of numbers on the R.A. setting circle. Retighten the lock
knob.
3. Loosen the Dec. lock knob and rotate the telescope until
the Dec. value from the star atlas matches the reading on
the Dec. setting circle. Remember that values of the Dec.
setting circle are positive when the telescope is pointing
north of the celestial equator (Dec. = 0°), and negative
when the telescope is pointing south of the celestial equa-
tor. Retighten the lock knob.
Most setting circles are not accurate enough to put an object
dead-center in the telescope’s eyepiece, but they should place
the object somewhere within the field of view of the red dot
finder scope, assuming the equatorial mount is accurately polar
aligned. Use the slow-motion controls to center the object in the
finder scope, and it should appear in the telescope’s field of view.
The R.A. setting circle must be re-calibrated every time you wish
to locate a new object. Do so by calibrating the setting circle for
the centered object before moving on to the next one.
Confused About Pointing the Telescope?
Beginners occasionally experience some confusion about how
to point the telescope overhead or in other directions. One thing
you DO NOT do is make any adjustment to the mount’s latitude
setting or to its azimuth position (don’t touch the azimuth lock
knob). That will throw off the mount’s polar alignment. Once the
mount is polar aligned, the telescope should be moved only
about the R.A. and Dec. axes by loosening one or both of the
R.A. and Dec. lock knobs and moving the telescope by hand, or
keeping the knobs tightened and moving the telescope using the
slow-motion cables.
5. Astronomical Observing
For many, this will be your first foray into the exciting world of
amateur astronomy. The following information and observing
tips will help get you started.
Choosing an Observing Site
When selecting a location for observing, get as far away as pos-
sible from direct artificial light such as street lights, porch lights,
and automobile headlights. The glare from these lights will great-
ly impair your dark-adapted night vision. Set up on a grass or
dirt surface, not asphalt, because asphalt radiates more heat.
Heat disturbs the surrounding air and degrades the images seen
Summary of Contents for 52588
Page 3: ...3 Figure 1 Parts of the BX90 EQ refractor A H I J F G C D B L K M E...
Page 14: ...14...
Page 15: ...15...


