6
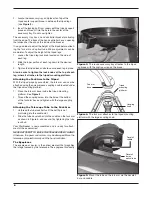
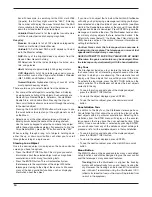
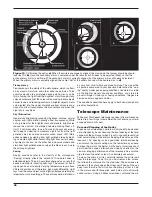
2. Locate the accessory tray, and place it on top of the
tripod center support brace in between the tripod legs
(see
Figure 3).
3. Insert the locking bolt from underneath the tripod support
brace and thread it into the hole in the center of the
accessory tray. Do not over tighten.
The accessory tray has a hand controller bracket protruding
from the edge. The back of the hand controller has an opening
that slides over the clip on the inside of the bracket.
It is a good idea to adjust the height of the tripod before attach-
ing the fork arm and optical tube. Minor adjustments can be
made later. To adjust the height of the tripod legs:
1. Loosen the tripod leg lock knob located on the side of
each leg.
2. Slide the inner portion of each leg down to the desired
length.
3. Tighten the tripod lock knobs to secure each leg in place.
Also, be sure to tighten the lock knobs at the top of each
leg, where it attaches to the tripod mounting platform.
attaching the Fork arm to the Tripod
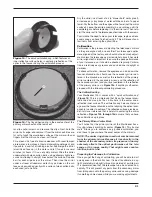
With the tripod properly assembled, the fork arm can now be
attached using the quick-release coupling knob located under
the tripod mounting platform:
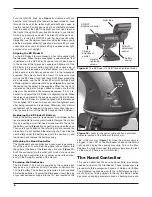
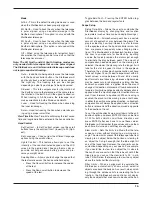
1. Place the fork arm base inside the tripod mounting
platform. See
Figure 4.
2. Thread the coupling screw into the hole at the bottom
of the fork arm base and tighten with the large coupling
knob.
attaching the Telescope Tube to the Fork arm
1. Unthread the tube lock bolt until the bolt tip is not
protruding into the saddle slot.
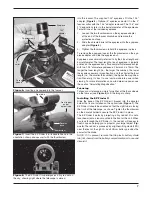
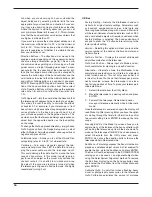
2. Slide the tube dovetail bar into the saddle on the fork arm
as shown in Figure 5, and secure it by tightening the tube
lock bolt.
Your StarSeeker is now assembled and is ready for attach-
ment of the accessories!
NEVER ATTEMPT TO MOVE THE TELESCOPE BY HAND!
Otherwise, the gears and motors may be damaged. Move the
telescope only electronically with the hand controller.
The Eyepieces
The eyepiece, or ocular, is the optical element that magnifies
the image focused by the telescope. The eyepiece fits directly
Figure 3.
The round accessory tray attaches to the tripod
leg brace with the captive screw on the brace.
Figure 5.
Mount the tube on the fork arm via the dovetail
bar and saddle.
Figure 4.
The fork arm attaches to the tripod mounting
platform with the large coupling knob.
Fork arm
base
Tripod
mounting
platform
Coupling
knob
Dovetail
bar on
optical tube
Dovetail
saddle
Summary of Contents for 8993
Page 27: ...27 Appendix C Time Zones ...


