background image

12

chimney and center it in the telescope’s eyepiece. Now, turn
the EZ Finder II on and look through it. The object will appear
in the field of view near the red dot.

Note: The image in the eyepiece of the Observer 60mm
will be reversed from left-to-right. This is normal for a
refractor telescope using a mirror star diagonal.

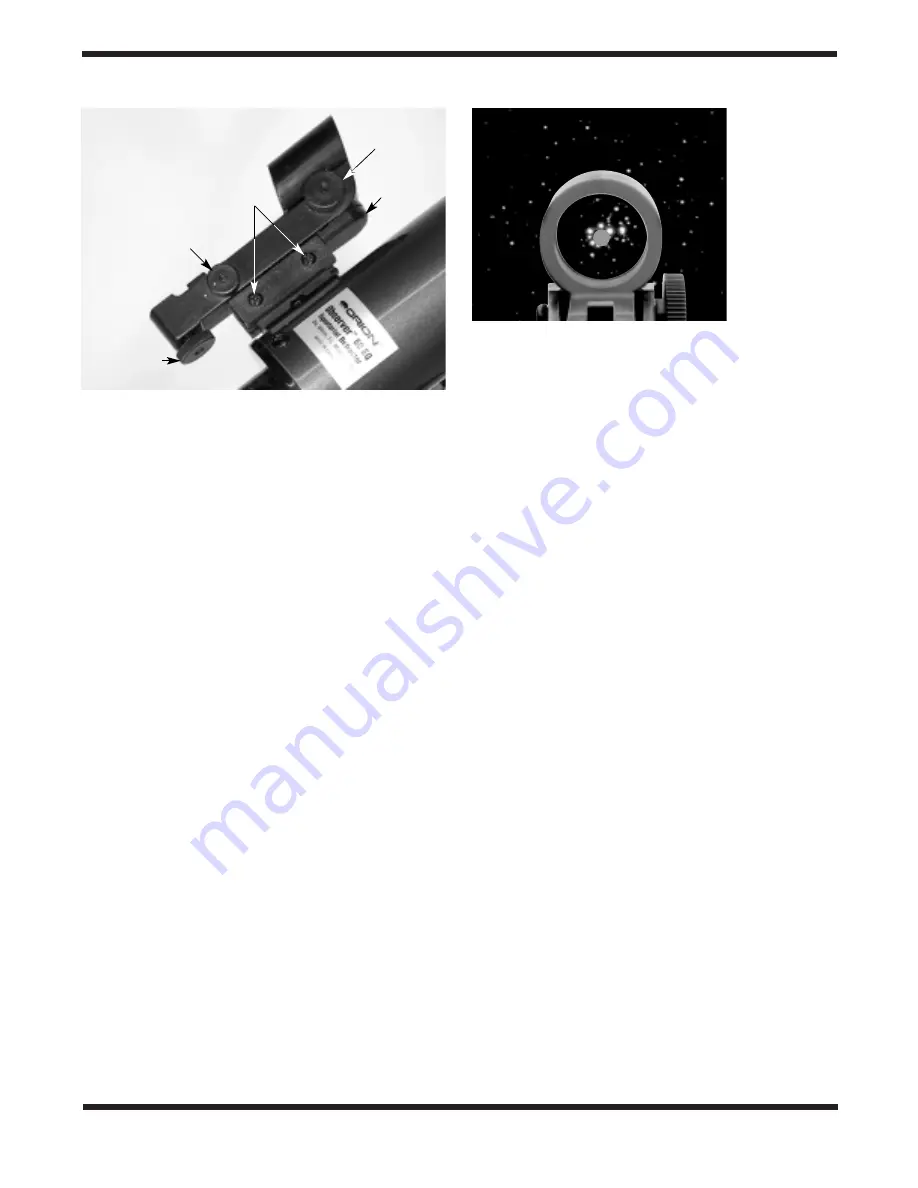
Without moving the telescope, use the EZ Finder II’s azimuth
(left/right) and altitude (up/down) adjustment wheels (Figure
5) to position the red dot on the object in the eyepiece.

When the red dot is centered on the distant object, check to
make sure that the object is still centered in the telescope’s
field of view. If not, recenter it and adjust the EZ Finder II’s
alignment again. When the object is centered in the eyepiece
and on the red dot, the EZ Finder II is properly aligned with
the telescope. Figure 6 shows how the view through the EZ
Finder may look while you are aligning it.

Once aligned, EZ Finder II will usually hold its alignment even
after being removed and remounted. Otherwise, only minimal
realignment will be needed.

Replacing the EZ Finder II Battery

Should the battery ever die, replacement 3-volt lithium batter-
ies are available from many retail outlets. Remove the old bat-
tery by inserting a small flat-head screwdriver into the slot on
the battery casing (Figure 5) and gently prying open the case.
Then carefully pull back on the retaining clip and remove the
old battery. Do not overbend the retaining clip. Then slide the
new battery under the battery lead with the positive (+) side
facing down and replace the battery casing.

5. Aligning the Equatorial
Mount

When you look at the night sky, you no doubt have noticed
that the stars appear to move slowly from east to west over
time. That apparent motion is caused by the Earth’s rotation

(from west to east). An equatorial mount (Figure 3a) is
designed to compensate for that motion, allowing you to easily
“track” the movement of astronomical objects, thereby keep-
ing them from drifting out of the telescope’s field of view while
you’re observing.

This is accomplished by slowly rotating the telescope on its
right ascension (R.A.) axis, using only the R.A. slow-motion
cable (7). But first the R.A. axis of the mount must be aligned
with the Earth’s rotational (polar) axis—a process called polar
alignment.

Understanding Polar Alignment 

To understand what you will be doing when polar aligning,
look at Figure 7 and 8. The exaggerated telescope mount in
Figure 7 shows how you will be aligning the right ascension
axis (shown in Figure 3a) so that it is parallel to the Earth’s
axis and pointing towards the North Star (Polaris). Figure 8
shows what the polar alignment will mean in terms of your
location and other reference points.

The reason for polar alignment is a little tricky to understand;
since the Earth is rotating, stars are moving across the sky in
an arc pattern for most of the world. If you were standing at
the North or South Pole, the stars would move in a circular
pattern overhead, never rising or setting. If you were standing
on the equator, the stars would move in straight line over-
head. If you faced east, a star that rose directly in front of you
would set directly behind you in the West.

However, most of us live at a place on the Earth where the
stars rise at one point in the East, move across part of the
sky, and set at a different part of the Western horizon, if they
set at all. This means that if you were to use an ordinary tri-
pod (which moves in up/down and left/right motions) to mount
your telescope, you would have a hard time “tracking” stellar
objects. This is where an equatorial mount has the advantage,
it may take a little longer to set up, but the effort is worth it.
Don’t be intimidated by the setting circles and knobs, its actu-
ally easier to do than you might think! Once you’ve practiced
with it a few times, you’ll be able to set up the equatorial
mount easily.

Figure 6.

EZ Finder II
superimposes a
tiny red dot on the
sky, showing right
where the
telescope is
pointed.

Figure 5. 

The EZ Finder II reflex sight

Power
knob

Azimuth
adjustment
wheel

Battery 
cover

Altitude
adjustment
wheel

Security
screws

Summary of Contents for Observer 60mm EQ

Page 1: ...roviding Exceptional Consumer Optical Products Since 1975 Customer Support 800 676 1343 E mail support telescope com Corporate Offices 831 763 7000 P O Box 1815 Santa Cruz CA 95061 Orion Observer 60mm EQ 9853 Equatorial Refractor Telescope ...

Page 2: ...2 ...

Page 3: ...s 7 8 3 Tripod legs 9 with attached accessory tray bracket 11 1 Accessory tray 10 with attachment wing screws 1 Counterweight shaft 25 1 Counterweight 6 1 Latitude adjustment T bolt 29 1 EZ Finder II reflex sight 4 3 Tripod leg attachment screws with wingnuts and washers 31 3 Leg lock knobs 12 1 25mm Kellner eyepiece 1 10mm Kellner eyepiece 1 90 Mirror star diagonal 2 1 Dust cover Welcome to the e...

Page 4: ...4 2 4 8 6 7 Observer 60mm Refractor 11 10 3 9 Figure 1 Observer 60mm EQ components 5 1 12 ...

Page 5: ...ning the Equatorial Mount section for more details Counterweight This counterweight will balance out the optical tube 1 when it is being aimed at celestial objects Right ascension slow motion control cable This cable is used to make small movements in right ascension when aiming the telescope Right ascension is explained in the Aligning the Equatorial Mount sec tion This cable is also used to trac...

Page 6: ...Figure 2a Optical tube components 6 14 Observer 60mm Telescope Tube Figure 2b Observer 60mm focuser detail 15 3 2 17 4 1 3 2 17 10 18 19 13 16 20 ...

Page 7: ...s a rack an pinion system to bring objects into focus Focus wheels These wheelswhen turned move the focuser drawtube 17 in or out Use it to bring things into focus when you are looking in the eyepiece 3 Diagonal holder thumbscrews These two thumbscrews secure the 90 mirror star diagonal 2 into the focuser drawtube 17 These should only be loosened to remove or rotate the star diagonal Eyepiece hold...

Page 8: ...Figure 3a Equatorial mount detail 8 Figure 3b Observer 60mm EQ tripod leg and mount attachment detail 22 Observer 60mm Tripod and Mount 23 25 21 26 27 8 29 31 31 30 7 24 28 6 ...

Page 9: ...atitude scale This scale gives a general indication of the latitude set ting of the equatorial mount 5 Latitude lock T bolt This T bolt must be loosened to make adjustments to the latitude of the telescope Latitude adjustment T bolt This T bolt is used to make adjustments to the latitude setting of the equatorial mount 5 Azimuth lock knob Loosening this knob will allow the equatorial to be adjuste...

Page 10: ... and the 40 line up Then retighten the latitude lock T bolt The declination Dec and right ascension R A axes may need re posi tioning rotation as well Be sure to loosen the R A and Dec lock knobs 22 24 before doing this Retighten the R A and Dec lock knobs once the equatorial mount is properly oriented 7 Thread the counterweight shaft 25 into the equatorial mount 5 at the base of the declination a...

Page 11: ... and should not drift from where you point it Focusing the Telescope With the 25mm Kellner eyepiece 3 inserted into the 90 mir ror star diagonal 2 and secured with the thumbscrews aim the optical tube 1 so the front open end is pointing in the general direction of an object at least 1 4 mile away Now with your fingers slowly rotate one of the focus wheels 18 until the object comes into sharp focus...

Page 12: ...them from drifting out of the telescope s field of view while you re observing This is accomplished by slowly rotating the telescope on its right ascension R A axis using only the R A slow motion cable 7 But first the R A axis of the mount must be aligned with the Earth s rotational polar axis a process called polar alignment Understanding Polar Alignment To understand what you will be doing when ...

Page 13: ...ts roughly at Polaris If you can not see Polaris directly from your observing site consult a compass and rotate the mount so the telescope points North Retighten the azimuth lock knob The equatorial mount is now polar aligned From this point on in your observing session you should not make any further adjustments in the azimuth or the latitude of the mount nor should you move the tripod Doing so w...

Page 14: ...itude on Earth and Dec is similar to latitude The R A and Dec values for celestial objects can be found in any star atlas or star catalog The mount s R A setting circle 23 is scaled in hours from 1 through 24 with small marks in between representing 10 minute increments The numbers closest to the R A axis gear apply to viewing in the Southern Hemisphere while the num bers above them apply to viewi...

Page 15: ... other directions Let s say you want to view an object that is directly overhead at the zenith How do you do it One thing you DO NOT do is make any adjustment to the lat itude adjustment T bolt 29 That will nullify the mount s polar alignment Remember once the mount is polar aligned the telescope should be moved only on the R A and Dec axes To point the scope overhead first loosen the R A lock kno...

Page 16: ...ez then you have fog haze clouds smog or other conditions that are hindering your viewing See Figure 11 Eyepiece Selection By using eyepieces of different focal lengths it is possible to attain many magnifications or powers with the Observer 60mm Your telescope comes with two Kellner eyepieces Figure 12 a 25mm which gives a magnification of 36x and a 10mm which gives a magnification of 90x Other e...

Page 17: ...the front opening of the Observer 60mm The primary attrac tion is sunspots which change shape appearance and loca tion daily Sunspots are directly related to magnetic activity in the Sun Many observers like to make drawings of sunspots to monitor how the Sun is changing from day to day Important Note Do not look at the Sun with any optical instrument without a professionally made solar filter or p...

Page 18: ...s in temperature and humidity Do not store the tele scope outdoors although storage in a garage or shed is OK Small components like eyepieces and other accessories should be kept in a protective box or storage case Keep the caps on the front of the telescope and on the focuser draw tube when not in use Your Observer 60mm telescope requires very little mechani cal maintenance The optical tube is al...

Page 19: ...19 ...

Page 20: ...ay Watsonville CA 95076 If the product is not registered proof of purchase such as a copy of the original invoice is required This warranty does not apply if in Orion s judgment the instrument has been abused mishan dled or modified nor does it apply to normal wear and tear This warranty gives you specific legal rights and you may also have other rights which vary from state to state For further w...

Reviews: