background image

1. Put one of the black nylon spacers on a black Phillips

head screw. The spacer should be oriented so the narrow
end seats against the head of the screw. Slip one of the
black 1/4" washers over the end of the screw. Now, thread
the screw into the hole in the base side panel just below
the cradle. The screw will thread into the preinstalled
insert in the hole. Use a Phillips screwdriver to tighten the
screw. Repeat this procedure on the opposite side panel.

2. Next, insert one of the screws with round plastic knob

attached through the end ring of one of the springs. Slip a
black nylon spacer onto the screw. Orient the spacer so
the narrow end is closest to the knob. Thread the entire
assembly into the hole in the center of the telescope’s alti-
tude side bearing until tight. The end ring of the spring
should seat onto the narrow end of the spacer. Repeat this
procedure for the other altitude side bearing.

3. Attach a pull loop to the free end of each spring. Slide the

loop through the opening in the ring on the end of the
spring.

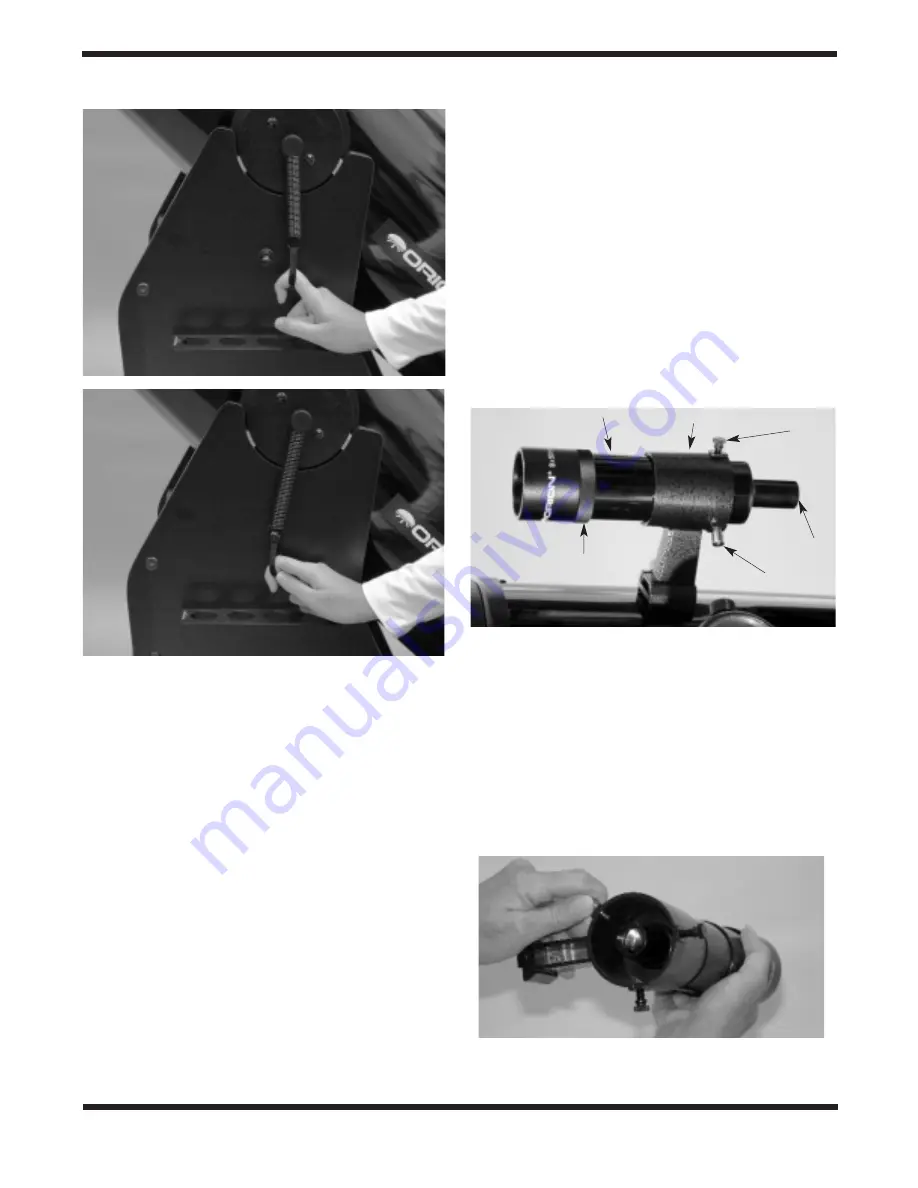
4. Now, pull each spring down using the pull loop, and posi-

tion the spring’s end ring over the head of the Phillips
screw (installed in step 1) and onto the narrow part of the
nylon spacer, as shown in Figure 7. You needn’t attach
both springs simultaneously; one at a time is fine.

The CorrecTension system is now installed and engaged. If
you wish to remove the telescope from the base, you will first
need to disconnect the springs from the “posts” on the
Dobsonian base. The springs will remain captive on the alti-
tude side bearings, so they will not get lost.

Installing the Finder Scope

SkyQuest XT10 Dobsonians come with a high quality, large
aperture 9x50 achromatic crosshair finder scope (Figure 8a)
as standard equipment. This greatly aids in finding objects to
view in the night sky, which will be discussed in detail later.

To place the finder scope in the finder scope bracket, first
unthread the two black nylon thumbscrews until the screw
ends are flush with the inside diameter of the bracket. Place
the O-ring that comes on the base of the bracket over the
body of the finder scope until it seats into the slot on the mid-
dle of the finder scope. Slide the eyepiece end (narrow end)
of the finder scope into the end of the bracket’s cylinder oppo-
site the alignment thumbscrews while pulling the chrome,
spring-loaded tensioner on the bracket with your fingers
(Figure 8b). Push the finder scope through the bracket until

6

Figure 7.

(a) 

To attach the spring to the base, grip the pull loop

with your index finger and pull down on the spring.

(b) 

While pulling

down, slip the end ring of the spring over the screw head and onto
the narrow part of the nylon spacer, then release the pull loop.

a.

b.

Figure 8a. 

The 9x50 finder scope and bracket.

Tensioner

Eyepiece

Nylon

alignment

thumbscrew (2)

Focus lock ring

Finder scope

Finder scope bracket

Figure 8b. 

Pull back on the tensioner and slide the finder scope

into its bracket until the O-ring is seated in the bracket ring.

Summary of Contents for SkyQuest XT10 9810

Page 1: ...nal Consumer Optical Products Since 1975 Customer Support 800 676 1343 E mail support telescope com Corporate Offices 831 763 7000 P O Box 1815 Santa Cruz CA 95061 INSTRUCTION MANUAL Orion SkyQuest XT10 9810 Dobsonian Reflecting Telescope ...

Page 2: ... side panel Front brace Handle Top baseplate Ground baseplate Finder scope Finder scope bracket Eyepiece Focus knob Optical tube Altitude side bearing CorrecTension XT Friction Optimization system Eyepiece rack Primary mirror cell Left side panel Figure 1 The SkyQuest XT10 Foot 3 ...

Page 3: ...s in the Parts List below are present Be sure to check boxes carefully as some parts are small If any thing appears to be missing or broken immediately call Orion Customer Support 800 676 1343 or email sales tele scope com for assistance Parts List Box 1 Optical Tube Assembly and Accessories Qty Description 1 Optical tube assembly 1 Dust cover 1 25mm Sirius Plössl eyepiece 1 10mm Sirius Plössl eye...

Page 4: ...ace of the top baseplate 6 Insert the T nut K into the center hole of the ground baseplate A so the nut s flanged top is on the same side of the baseplate as the Teflon pads Thread the large hex head screw G with a 3 8 washer F attached up through the ground baseplate and through the T nut until it is tight Now position the top baseplate D with side pan els attached over the ground baseplate and l...

Page 5: ...ng new feature of the SkyQuest XT10 Dobsonian is the CorrecTension Friction Optimization system Because of their relatively light weight 10 and smaller Dobsonians have always been plagued by insufficient friction on the altitude bearing surfaces As a result such telescopes move up and down much too freely This causes problems when the observer tries to accurately center and track an object for vie...

Page 6: ...cope from the base you will first need to disconnect the springs from the posts on the Dobsonian base The springs will remain captive on the alti tude side bearings so they will not get lost Installing the Finder Scope SkyQuest XT10 Dobsonians come with a high quality large aperture 9x50 achromatic crosshair finder scope Figure 8a as standard equipment This greatly aids in finding objects to view ...

Page 7: ...t using a proper solar filter over the front aperture Altitude and Azimuth The Dobsonian base of the SkyQuest XT10 permits motion of the telescope along two axes altitude up down and azimuth left right see Figure 10 This is very convenient since up down and left right are the most natural ways that people aim As a result pointing the telescope is exceptionally easy Simply take hold of the navigati...

Page 8: ... located behind the objective lens cell on the body of the finder scope see Figure 8a Back the lock ring off by a few turns for now Refocus the finder scope on a distant object by threading the objective lens cell in or out on the finder scope body Precise focusing will be achieved by focusing the finder scope on a bright star Once the image appears sharp retighten the lock ring behind the objecti...

Page 9: ...ystems can be expensive and unwieldy The CorrecTension Friction Optimization system of the SkyQuest XT10 Dobsonian however solves the finicky bal ance problem The spring coils pull the tube down onto the base thereby increasing the friction on the altitude bearing pads With CorrecTension the added weight of small front end loads will not adversely affect the balance of the telescope If you install...

Page 10: ...rk it yourself Note The center ring sticker need not ever be removed from the primary mirror Because it lies directly in the shadow of the secondary mirror its presence in no way adversely affects the optical performance of the tele scope or the image quality That might seem counterintuitive but its true Aligning the Secondary Mirror With the collimation cap in place look through the hole in the c...

Page 11: ...n tered under the focuser and the reflection of the primary mirror is centered in the secondary mirror but the small reflection of the secondary mirror with the dot of the colli mation cap is off center The tilt of the primary mirror is adjusted with three spring loaded collimation thumbscrews on the back end of the optical tube bottom of the primary mirror cell these are the larger thumbscrews Th...

Page 12: ...uld not observe through an open window from indoors Better yet choose a site out of town away from any light pollution You ll be stunned at how many more stars you ll see Most importantly make sure that any chosen site has a clear view of a large portion of the sky B Seeing and Transparency Atmospheric conditions play a huge part in quality of viewing In conditions of good seeing star twinkling is...

Page 13: ...ide bearings with both hands Also when looking overhead if the telescope cannot be moved any more in altitude rotate the telescope 180 in azimuth to continue motion Remember that objects appear to move across the field of view faster at higher magnifications This is because the field of view becomes narrower Eyepiece Selection By using eyepieces of varying focal lengths it is possible to attain ma...

Page 14: ...faint stars The brightest is the moon Titan VENUS At its brightest Venus is the most luminous object in the sky excluding the Sun and the Moon It is so bright that sometimes it is visible to the naked eye during full daylight Ironically Venus appears as a thin crescent not a full disk when at its peak brightness Because it is so close to the Sun it never wanders too far from the morning or evening...

Page 15: ...hy SkyQuests have also been optically opti mized for visual use since photographic optimization degrades visual performance With that in mind however it is possible to do some simple astrophotography with a SkyQuest With the use of afocal photography techniques where the camera is simply placed to the eyepiece to take a picture and digital cameras it is possible to take pictures of bright objects ...

Page 16: ...nthread the mirror clip anchor screws Next hold the mirror by its edge and remove it from the mir ror cell Be careful not to touch the aluminized surface of the mirror with your fingers Set the mirror on a clean soft towel Fill a clean sink free of abrasive cleanser with room temper ature water a few drops of liquid dishwashing detergent and if possible a cap full of rubbing alcohol Submerge the m...

Page 17: ...17 ...

Page 18: ...r 89 Hangar Way Watsonville CA 95076 If the product is not registered proof of purchase such as a copy of the original invoice is required This warranty does not apply if in Orion s judgment the instrument has been abused mishandled or modified nor does it apply to normal wear and tear This warranty gives you specific legal rights and you may also have other rights which vary from state to state F...

Reviews: